
Last Updated on July 18, 2023
Short Answer
Attaching a cracker to a whip requires careful handling and precision. Start by selecting a sturdy cracker compatible with your whip’s design. Next, ensure the hacker is securely tied to the end of the whip using a solid knot, such as a double overhand knot. Practicing proper technique and safety precautions when using a whip with a cracker attached is essential. Remember always to wear protective gear and maintain a safe distance from others. With practice and patience, you can effectively secure a hacker to a whip and enjoy its thrilling experience.
Attaching a cracker to a whip may seem daunting, but it can be easily accomplished with the proper knowledge and technique. Whether you are a beginner or an experienced whip handler, understanding the basics of this process is essential. This article will explore the different types of whips and crackers, provide a step-by-step guide for attaching a hacker to a bullwhip, and offer tips for doing so safely. We will also discuss common mistakes to avoid and how to choose the right cracker for your whip. Additionally, we will delve into maintaining and replacing crackers for optimal whip performance and explore advanced techniques and troubleshooting common issues. By the end of this article, you will have mastered the art of attaching a cracker to a whip.
Exploring Different Types of Whips and Crackers
- Understanding the different types of whips and crackers
- Exploring the characteristics and uses of each type
- Comparing the advantages and disadvantages of different types
- Choosing the proper whip and cracker combination for your needs
When attaching a cracker to a whip, it’s essential to understand the different types of lashes and crackers available. Each class has unique characteristics and uses, so choosing the right combination for your needs is necessary. Here are some key points to consider:
Understanding the different types of whips and crackers:
- Bullwhips are the most common type of whip, known for their long length and flexibility.
- Snake whips: These are similar to bullwhips but have a more flexible and lighter construction.
- Stock whips are shorter and stiffer than bullwhips, making them ideal for precision cracking.
Exploring the characteristics and uses of each type:
- Bullwhips are versatile and can be used for target cracking and performance routines.
- Snake whips are great for fast cracking and intricate routines.
- Stock whips are commonly used in Australian whip-cracking competitions.
Comparing the advantages and disadvantages of different types:
- Bullwhips offer a good balance between power and control but can be more challenging for beginners.
- Snake whips are lightweight and easy to handle, but they may not have as much power as bullwhips.
- Stock whips are precise and powerful but require more skill to crack effectively.
Choosing the proper whip and cracker combination for your needs:
- Consider your skill level, intended use, and personal preferences when selecting a whip and cracker combination.
- Experiment with different combinations to find the one that works best for you.
- Seek advice from experienced whip crackers or attend workshops to learn more about different combinations
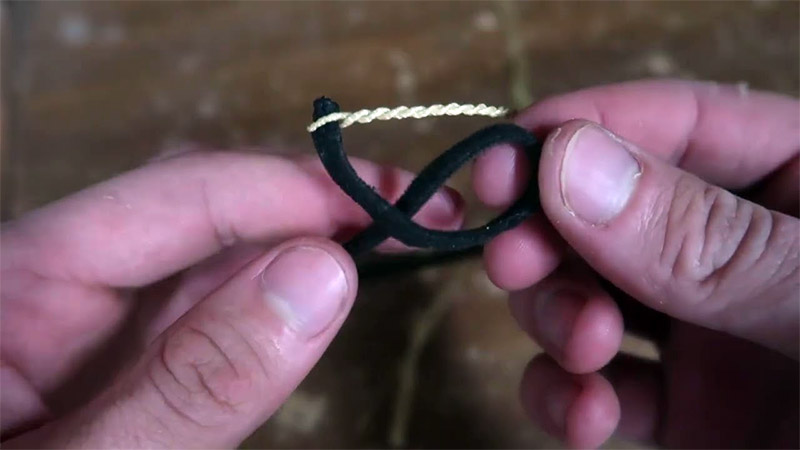
Step-By-Step Guide: Attaching a Cracker to a Bullwhip
Attaching a hacker to a bullwhip may seem daunting, but it can be done quickly with the proper technique. Follow these step-by-step instructions to ensure a secure and effective attachment:
Step 1: Prepare the Whip
Before attaching the cracker, ensure your bullwhip is clean and free from debris. This will provide a smooth and efficient attachment process.
Step 2: Thread the Cracker
Take the cracker and thread it through the loop at the end of the whip. Ensure the hacker is securely incorporated and there are no loose ends.
Step 3: Tie a Knot
Once the cracker is threaded, tie a tight knot at the end of the whip to secure the hacker in place. This will prevent it from coming loose during use.
Repeat these steps for each cracker you wish to attach to your bullwhip. Remember to always double-check the security of the attachment before using the whip.
Following this step-by-step guide, you can confidently attach a cracker to your bullwhip and enhance your whip performance.
Tips for Safely Attaching a Cracker to a Whip
Attaching a cracker to a whip may seem simple, but it is essential to do it safely to avoid accidents or injuries. Here are some tips to help you attach a cracker to a whip safely:
- Wear protective gear: Before you start attaching the cracker, make sure you are wearing appropriate protective equipment, such as gloves and eye protection. This will help protect you from any potential injuries.
- Inspect the whip: Before attaching the cracker, inspect the whip for any signs of damage or wear. If you notice any cracks or fraying, repairing or replacing the whip before attaching the hacker is essential.
- Use suitable materials: Use the correct materials to attach the cracker to the whip. This may include a cracker knot, waxed thread, or other appropriate materials. Using the wrong materials can compromise the integrity of the whip.
- Follow proper technique: When attaching the cracker, follow the procedure. This may involve tying a secure knot or using a specific method recommended for your type of whip.
- Practice caution: Take your time and be cautious when attaching the cracker to the whip. Rushing or being careless can lead to mistakes or accidents. Always prioritize safety.
By following these tips, you can safely attach a cracker to a whip and enjoy the art of whip cracking without any unnecessary risks. Remember, safety should always be your top priority.
Common Mistakes to Avoid When Attaching a Cracker to a Whip:
- Using the wrong type of cracker: Choosing a hacker compatible with your whip is essential. Using the wrong kind of cracker can affect the performance and safety of your whip.
- Not securing the cracker properly: When attaching a hacker to a whip, it is crucial to fasten it securely. Failing to do so can result in the hacker coming loose during use, which can be dangerous.
- Over-tightening the cracker: While it is essential to secure the hacker properly, over-tightening it can also cause issues. This can put unnecessary strain on the whip and lead to premature wear and tear.
- Neglecting to check for wear and tear: Before attaching a cracker to a whip, it is essential to inspect both the whip and the cracker for any signs of damage or wear. Using a worn-out hacker can compromise the performance and safety of the whip.
- Not following proper technique: Attaching a cracker to a whip requires a specific plan. Failing to follow the correct steps can result in an improperly attached hacker, affecting the whip’s performance.
- By avoiding these common mistakes, you can ensure that your cracker is securely attached to your whip, enhancing its performance and safety.
Enhancing Performance: Choosing the Right Cracker for Your Whip
Choosing the right cracker for your whip is essential for optimal performance. Here are some tips to help you make the right choice:
- Consider the material: Crackers can be made from various materials such as nylon, leather, or paracord. Each material has its characteristics and can affect the performance of your whip.
- Think about the length: The cracker’s size can impact your whip’s sound and speed. Longer hackers tend to produce louder cracks, while shorter ones can provide faster whip action.
- Experiment with different designs: There are various designs of crackers available, such as straight-cut, tapered, or knotted. Each design can create a distinct sound and affect how the whip cracks.
- Consider the whip type: Different types of whips may require specific crackers. For example, a bullwhip may need a heavier hacker than a snake whip.
- Consider your skill level: If you are a beginner, starting with a lighter and shorter cracker is recommended. As you gain more experience, you can experiment with different options.
Remember, choosing the right cracker is a personal preference and may require trial and error. Don’t be afraid to try different options until you find the one that suits your whip and style of cracking.
Maintaining and Replacing Crackers for Optimal Whip Performance
Once you have successfully attached a cracker to your whip, it is essential to maintain and replace it regularly to ensure optimal performance. Over time, the hacker can become worn out or damaged, affecting the whip’s ability to crack correctly.
To maintain your cracker, it is recommended to inspect it for any signs of wear and tear regularly. Look for frayed edges, loose threads, or any other damage that may compromise its functionality. If you notice any issues, it is best to replace the cracker immediately.
Replacing a cracker is a relatively simple process. Removing the old hacker from the whip and untie any knots or attachments. Then, attach the new cracker using the same method outlined in the step-by-step guide. Make sure to secure it tightly to ensure a proper crack.
Remember, a well-maintained and adequately replaced cracker is essential for optimal whip performance. By inspecting and replacing your cracker regularly, you can ensure that your whip continues to crack with precision and power.
Exploring Advanced Techniques for Attaching a Cracker to a Whip
Once you have mastered the basic steps of attaching a cracker to a whip, you may explore advanced techniques to enhance your whip performance. These techniques can help you achieve greater control and precision in your whip cracking.
1. Double Loop Method
The double loop method involves creating two loops with the cracker and attaching them to the fall of the whip. This technique can provide a stronger attachment and prevent the hacker from coming loose during vigorous cracking.
2. Reverse Hitch Method
The reverse hitch method involves attaching the cracker to the fall of the whip in a reverse manner. This technique can create a different sound and improve the overall performance of the whip.
3. Adding Weight
By adding Weight to the cracker, such as tiny metal beads or washers, you can alter the dynamics of the whip and achieve different cracking effects. However, it is essential to ensure that the added Weight does not compromise the safety or integrity of the whip.
Remember, these advanced techniques require practice and experimentation. It is essential always to prioritize safety and use caution when attempting new strategies. With time and dedication, you can master the art of attaching a cracker to a whip and take your whip-cracking skills to the next level.
Troubleshooting: Common Issues When Attaching a Cracker to a Whip
Attaching a cracker to a whip may seem simple, but it can sometimes be challenging, especially for beginners. This section will discuss some common issues you may encounter when attaching a cracker to a whip and provide solutions to help you troubleshoot these problems.
1. Cracker Slipping Off
One of the most common issues is the cracker slipping off the whip during use. This can be frustrating and can affect the performance of your whip. To prevent this, ensure the hacker is securely tied to the fall of the whip. Double-check the knot and ensure that it is tight and secure.
2. Whip Not Cracking Properly
If your whip is not cracking correctly, it could be due to a few reasons. First, check the length of the cracker. If it is too short, it may not create enough momentum to produce a loud crack. Additionally, make sure that the hacker is made of suitable material. Leather or nylon crackers are commonly used and provide a good shot. If the hacker is worn out or damaged, replace it with a new one.
By addressing these common issues and following the tips in this article, you can troubleshoot any problems you may encounter when attaching a cracker to a whip. With practice and patience, you will master the art of tying a hacker to a whip and enhance your whip-cracking skills.
Mastering the Art of Attaching a Cracker to a Whip
Throughout this article, we have delved into the intricacies of attaching a cracker to a whip. We have explored the different types of lashes and crackers, provided a step-by-step guide for connecting a hacker to a bullwhip, and offered tips for doing so safely. We have also discussed common mistakes to avoid and highlighted the importance of choosing the right hacker for optimal whip performance.
Additionally, we have touched on the maintenance and replacement of crackers to ensure the whip’s longevity and functionality. We have even delved into advanced techniques for attaching a hacker to a whip, allowing for enhanced performance.
By following the information provided in this article, you can become a master in the art of attaching a cracker to a whip. Whether you are a beginner or an experienced whip handler, these insights will undoubtedly prove valuable in your journey. So practice, and enjoy the thrill of cracking your whip with precision and finesse.
Frequently Asked Questions
Q: What is the purpose of attaching a cracker to a whip?
A: Attaching a cracker to a whip allows for a loud cracking sound, adding to its overall performance and effectiveness.
Q: Are there different types of whips and crackers?
A: Yes, there are various types of whips, such as bullwhips, snake whips, and signal whips, each requiring a specific kind of cracker for optimal performance.
Q: How do I attach a cracker to a bullwhip?
A: To attach a cracker to a bullwhip, you must unravel the end of the whip, insert the hacker, and then secure it tightly using a knot or a whip cracker knot.
Q: What are some tips for safely attaching a cracker to a whip?
A: Some tips for safely attaching a cracker to a whip include wearing protective gloves, ensuring the whip is secured correctly, and practicing in a spacious area away from people or objects.
Q: What are common mistakes to avoid when attaching a cracker to a whip?
A: Common mistakes to avoid when attaching a cracker to a whip include using the wrong type of cracker, not securing the hacker tightly enough, and not properly maintaining the whip.
Q: How do I choose the right cracker for my whip?
A: To choose the right cracker for your whip, consider factors such as the type of whip you have, the desired sound, and the material of the hacker. Experimentation may be necessary to find the perfect fit.
Q: How often should I maintain and replace the crackers on my whip?
A: It is recommended to regularly inspect and maintain the crackers on your whip, replacing them when they show signs of wear and tear or if their performance is compromised.
Q: Are there advanced techniques for attaching a cracker to a whip?
A: There are advanced techniques for attaching a cracker to a whip, such as using different knot variations or incorporating additional materials for enhanced performance.
Q: What are some common issues when attaching a cracker to a whip?
A: Some common issues when attaching a cracker to a whip include the cracker coming loose during use, the whip not producing a loud cracking sound, or the hacker breaking prematurely.
Q: How can I master attaching a cracker to a whip?
A: Mastering the art of attaching a cracker to a whip requires practice, patience, and a thorough understanding of the techniques and principles involved. Regularly honing your skills and seeking guidance from experienced whip users can also be beneficial.
About The Author

Wendy Lee is a pop culture ninja who knows all the latest trends and gossip. She's also an animal lover, and will be friends with any creature that crosses her path. Wendy is an expert writer and can tackle any subject with ease. But most of all, she loves to travel - and she's not afraid to evangelize about it to anyone who'll listen! Wendy enjoys all kinds of Asian food and cultures, and she considers herself a bit of a ninja when it comes to eating spicy foods.