
Last Updated on July 27, 2023
Welcome to our article on how to build trusses for a 12×20 shed. Trusses play a crucial role in shed construction, providing the necessary support and stability for the roof. In this guide, we will walk you through the step-by-step process of building trusses for your shed, from gathering the necessary tools and materials to installing and securing the trusses in place. We will also discuss reinforcing the truss joints for added strength and adding the roofing material to complete the shed. By the end of this article, you will have the knowledge and skills to confidently build trusses for your own shed. Let’s get started!
Understanding the Importance of Trusses in Shed Construction
When it comes to building a shed, trusses play a crucial role in providing structural support and stability. Understanding the importance of trusses is essential for a successful shed construction project. Here are some key points to consider:
- Trusses are triangular-shaped frameworks that distribute the weight of the roof evenly, preventing sagging and ensuring the shed’s durability.
- They provide a strong and stable base for the roof, allowing it to withstand heavy loads, such as snow or wind.
- Trusses also help to create an open and spacious interior, as they eliminate the need for interior support walls.
- By using trusses, you can maximize the usable space in your shed and have more flexibility in designing the layout.
- Properly constructed trusses can significantly increase the lifespan of your shed, as they provide superior strength and stability.
Overall, understanding the importance of trusses in shed construction is crucial for ensuring a sturdy and long-lasting structure. By following the proper techniques and using high-quality materials, you can build trusses that will provide the necessary support for your 12×20 shed.
Gathering the Necessary Tools and Materials
Before you begin building trusses for your 12×20 shed, it is important to gather all the necessary tools and materials. This will ensure that you have everything you need to complete the project efficiently and effectively.
Some of the tools you will need include a tape measure, a circular saw, a power drill, a framing square, a hammer, and a level. These tools will help you accurately measure and cut the truss components, as well as assemble and secure the trusses in place.
In addition to the tools, you will also need a variety of materials. This includes lumber for the truss components, such as 2x4s or 2x6s, as well as plywood for the gussets. You will also need nails or screws to secure the truss joints, as well as roofing material to complete the shed.
By gathering all the necessary tools and materials beforehand, you can ensure a smooth and efficient construction process. This will help you save time and avoid any unnecessary delays or setbacks.
Measuring and Cutting the Truss Components
Once you have gathered all the necessary tools and materials, it is time to move on to the next step in building trusses for your 12×20 shed: measuring and cutting the truss components. This step is crucial as it ensures that your trusses will fit together properly and provide the necessary support for your shed.
Start by measuring the length and width of your shed. These measurements will determine the size of your truss components. Use a tape measure to accurately measure the dimensions, and write down the measurements for reference.
Next, using a saw or a circular saw, cut the truss components according to the measurements you have taken. It is important to make precise cuts to ensure that the trusses fit together tightly and securely.
Remember to wear safety goggles and gloves while cutting the truss components to protect yourself from any potential injuries. Take your time and double-check your measurements before making any cuts to avoid any mistakes.
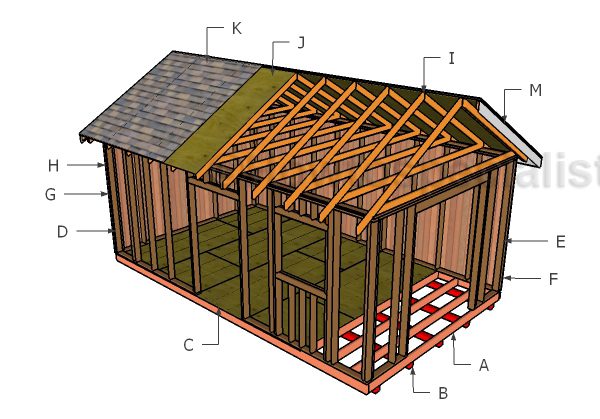
5. Assembling the Truss Framework
Once you have measured and cut all the truss components, it’s time to assemble the truss framework. This step is crucial in ensuring the stability and strength of your shed. Here’s how you can assemble the truss framework:
- Start by laying out the bottom chord and top chord on a flat surface, making sure they are parallel to each other.
- Next, position the truss webs between the bottom and top chords, evenly spacing them apart.
- Secure the truss webs to the chords using nails or screws, ensuring they are flush with the edges.
- Repeat this process for each truss, making sure they are all identical in design and dimensions.
- Once all the trusses are assembled, double-check their alignment and make any necessary adjustments.
Remember to follow the truss design and layout plan carefully to ensure the trusses are assembled correctly. It’s also important to use the appropriate fasteners and techniques to ensure the truss framework is sturdy and secure.
6. Reinforcing the Truss Joints for Added Strength
Once the truss framework is assembled, it is important to reinforce the joints to ensure added strength and stability. Here are some steps to follow:
- Inspect the joints: Before reinforcing the truss joints, carefully inspect them to ensure they are properly aligned and secure.
- Use metal plates or brackets: Metal plates or brackets can be used to reinforce the joints. These can be purchased at a hardware store and come in various sizes and shapes.
- Position the plates or brackets: Place the metal plates or brackets on the joints, making sure they are centered and aligned with the truss members.
- Secure the plates or brackets: Use screws or nails to secure the plates or brackets to the truss members. Make sure they are tightly fastened to provide maximum reinforcement.
- Repeat for all joints: Repeat the process for all the truss joints, ensuring that each one is reinforced properly.
- Check for stability: Once all the joints are reinforced, check the stability of the truss framework. Shake it gently to see if there is any movement or weakness. If necessary, add additional reinforcement.
By reinforcing the truss joints, you can ensure that your shed will be strong and durable, able to withstand various weather conditions and provide long-lasting protection for your belongings.
Installing the Trusses onto the Shed Structure
Once you have assembled the truss framework, the next step is to install the trusses onto the shed structure. This is a crucial step in the construction process as it provides the foundation for the entire shed.
Before installing the trusses, it is important to ensure that the shed structure is properly prepared. This includes making sure that the walls are sturdy and level, and that the foundation is strong enough to support the weight of the trusses.
To install the trusses, start by positioning them at the desired locations on the shed structure. Use a level to ensure that they are straight and aligned properly. Once in position, secure the trusses to the shed structure using nails or screws.
It is important to follow the manufacturer’s instructions for installing the trusses, as different types of trusses may require different installation methods. Additionally, it is recommended to have at least two people working together to install the trusses, as they can be heavy and difficult to maneuver on your own.
By properly installing the trusses onto the shed structure, you are ensuring the stability and durability of your shed. This step is essential for creating a strong and reliable structure that will withstand the test of time.
Securing the Trusses in Place
Once the trusses have been assembled and reinforced, the next step is to secure them in place on the shed structure. This is a crucial step in ensuring the stability and durability of the shed.
First, you will need to determine the spacing for the trusses. This will depend on the size and design of your shed, as well as the load-bearing capacity of the trusses. It is important to consult the building plans or a structural engineer to ensure proper spacing.
Next, you will need to position the trusses on the shed structure. Start by placing the first truss at one end of the shed and secure it with screws or nails. Then, move on to the next truss and repeat the process until all the trusses are in place.
Once the trusses are secured, it is important to check for any gaps or misalignments. Use a level to ensure that the trusses are straight and level. If necessary, make any adjustments before moving on to the next step.
Finally, reinforce the trusses by adding additional screws or nails at the joints. This will provide extra stability and prevent any movement or shifting of the trusses.
By following these steps, you can ensure that your trusses are securely in place, providing a strong and stable framework for your shed.
Adding the Roofing Material to Complete the Shed
Once the trusses have been securely installed onto the shed structure, the next step in the construction process is to add the roofing material. The roofing material not only provides protection from the elements but also adds to the overall aesthetic appeal of the shed.
Before starting this step, it is important to gather all the necessary tools and materials. These may include roofing shingles, roofing nails, a hammer, a ladder, and safety equipment such as gloves and goggles.
Begin by laying the first row of roofing shingles along the bottom edge of the roof, making sure to align them properly. Use roofing nails to secure the shingles in place, placing them at regular intervals along the edges and in the center of each shingle.
Continue adding rows of shingles, overlapping each row slightly to ensure proper water drainage. Trim any excess shingle material as needed to create a clean and professional-looking finish.
Once all the shingles have been installed, inspect the roof for any loose or missing shingles. Replace or secure them as necessary.
With the roofing material in place, the shed is now complete and ready for use. Take a moment to admire your handiwork and enjoy the satisfaction of a job well done.
Conclusion: Building trusses for a 12×20 shed is a crucial step in the construction process. Trusses provide the necessary support and stability to ensure the shed can withstand various weather conditions and remain structurally sound. By understanding the importance of trusses and following the proper steps, you can successfully build a strong and durable shed.
Throughout this article, we have discussed the necessary tools and materials needed for truss construction, as well as the process of measuring and cutting the truss components. We have also covered the assembly of the truss framework and the reinforcement of truss joints for added strength.
Furthermore, we have explored the installation of the trusses onto the shed structure and the methods for securing them in place. Lastly, we have highlighted the final step of adding the roofing material to complete the shed.
By following these steps and utilizing the proper techniques, you can confidently build trusses for your 12×20 shed and create a sturdy and reliable structure that will stand the test of time.
Learn how to build trusses for a 12×20 shed with this comprehensive guide. Create a sturdy structure for your shed.
About The Author

Zeph Grant is a music fanatic. He loves all types of genres and can often be found discussing the latest album releases with friends. Zeph is also a hardcore content creator, always working on new projects in his spare time. He's an amateur food nerd, and loves knowing all sorts of random facts about food. When it comes to coffee, he's something of an expert - he knows all the best places to get a good cup of joe in town.