
Last Updated on July 27, 2023
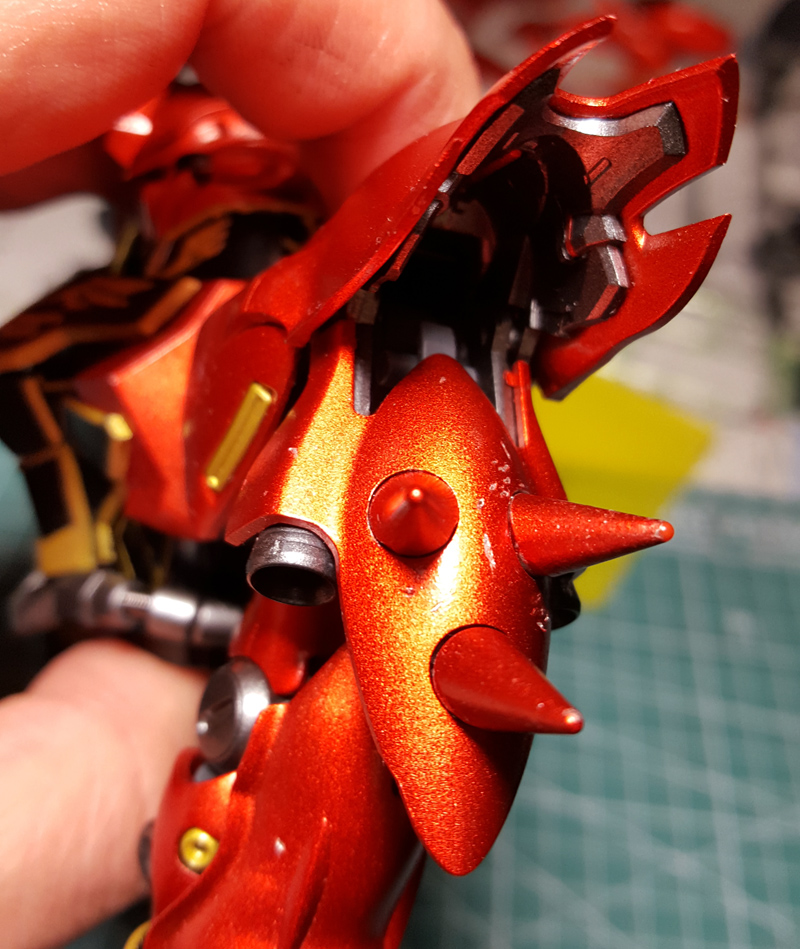
Gunpla, short for Gundam plastic models, are popular among hobbyists and enthusiasts alike. These model kits allow individuals to build and customize their own miniature robots, creating a unique and personalized piece of art. One technique that has gained popularity in the Gunpla community is candy coating. Candy coating involves applying layers of translucent paint to achieve a glossy and vibrant finish, giving the model a candy-like appearance. In this article, we will explore the step-by-step process of candy coating Gunpla models, from gathering the necessary materials to applying the final clear coat. By following these techniques, you can transform your Gunpla into a stunning masterpiece. So let’s dive in and learn how to candy coat Gunpla!
Gathering the necessary materials and tools for candy coating
Before you can begin candy coating your Gunpla model, it is important to gather all the necessary materials and tools. Here are the items you will need:
- Gunpla model: Choose the model you want to candy coat. Make sure it is clean and free from any dust or debris.
- Sanding tools: You will need sandpaper or sanding sticks to smooth out any rough edges or imperfections on the model.
- Primer: Apply a primer to the model to create a smooth surface for the candy coat paint to adhere to.
- Candy coat paint: Choose a candy coat paint in the color of your choice. This type of paint gives a glossy, candy-like finish to your Gunpla model.
- Paint brushes: Use high-quality paint brushes to apply the candy coat paint evenly and smoothly.
- Decals and panel lining markers: These can be used to add additional details and enhance the candy coating.
- Clear coat: Apply a clear coat to protect the candy coat paint and give it a polished look.
By gathering all the necessary materials and tools, you will be well-prepared to begin the candy coating process and achieve a professional finish on your Gunpla model.
Preparing the Gunpla model for candy coating
Before applying the candy coat paint, it is important to properly prepare the Gunpla model. This involves cleaning the model to remove any dust or debris that may interfere with the paint application. Use a soft brush or compressed air to gently remove any loose particles from the surface of the model.
Next, inspect the model for any imperfections or blemishes. Fill in any gaps or seams with putty or filler, and sand down any rough areas to create a smooth surface. This step is crucial for achieving a flawless candy coating finish.
Once the model is clean and smooth, it is recommended to prime the surface with a primer. This will help the candy coat paint adhere better to the model and provide a more even finish. Apply the primer in thin, even coats, allowing each coat to dry before applying the next.
After the primer has dried, lightly sand the surface of the model with a fine-grit sandpaper to further smooth out any imperfections. This will ensure a professional-looking candy coating finish.
By properly preparing the Gunpla model before applying the candy coat paint, you can achieve a stunning glossy effect that will make your model stand out.
Applying the base coat for a smooth candy coating finish
Before applying the candy coat paint, it is important to first apply a base coat to ensure a smooth and even finish. The base coat acts as a foundation for the candy coat paint and helps to enhance its color and shine.
To apply the base coat, start by preparing the Gunpla model by cleaning it thoroughly and removing any dust or debris. This can be done using a soft cloth or brush. Once the model is clean, apply a thin layer of primer to the entire surface. The primer helps to create a smooth surface for the base coat to adhere to.
After the primer has dried, it is time to apply the base coat. Choose a color that complements the candy coat paint you will be using. Using a spray can or airbrush, apply thin and even coats of the base coat to the model. Allow each coat to dry before applying the next one.
Once the base coat is applied, inspect the model for any imperfections or unevenness. If necessary, sand the surface lightly to smooth out any rough areas. This will ensure a flawless candy coating finish.
To achieve a glossy candy coating finish on your Gunpla model, it is important to properly mix and apply the candy coat paint. Here are some steps to help you achieve the desired effect:
– Start by gathering the necessary materials and tools for candy coating, including candy coat paint, mixing cups, paint brushes, and a spray booth or well-ventilated area.
– Before applying the candy coat paint, make sure to properly prepare your Gunpla model by cleaning it and removing any dust or debris. You can use a soft brush or compressed air to clean the model.
– To mix the candy coat paint, follow the instructions on the paint bottle. It is important to mix the paint thoroughly to ensure a smooth and even application.
– Once the paint is mixed, you can begin applying it to your Gunpla model. Start with a thin layer and gradually build up the thickness as needed. Make sure to apply the paint evenly and avoid any drips or streaks.
– After applying the candy coat paint, you can add additional layers for depth and shine. This can be done by applying a clear coat or using a gloss enhancer.
– To enhance the candy coating, you can also use decals and panel lining. These can add detail and make your Gunpla model look more realistic.
– Finally, to protect the candy coating and give it a polished look, apply a clear coat. This will help seal the paint and prevent it from chipping or fading over time.
By following these steps and using the right techniques, you can achieve a professional candy coating finish on your Gunpla model. Enjoy the process and admire your beautifully candy coated creation!
6. Adding additional layers for depth and shine
Once you have applied the candy coat paint and achieved the desired glossy effect, you can further enhance the appearance of your Gunpla model by adding additional layers for depth and shine. Here are some tips on how to do this:
- Start by allowing the candy coat paint to dry completely before adding any additional layers.
- For added depth, you can apply a darker shade of the candy coat paint to certain areas of the model. This can be done by mixing a small amount of a darker color with the candy coat paint and carefully applying it with a brush or airbrush.
- To create a shiny metallic effect, you can use metallic paints or metallic markers to highlight certain parts of the model. This can be done by carefully applying the metallic paint or marker to areas such as the edges of armor pieces or the details on weapons.
- Another technique to add shine is to use a clear gloss paint or top coat. This can be applied over the candy coat paint to give it a high-gloss finish. Make sure to apply the clear coat evenly and allow it to dry completely before handling the model.
By adding these additional layers, you can create a more dynamic and eye-catching candy coating finish for your Gunpla model.
Using decals and panel lining to enhance the candy coating
Once you have achieved a smooth and glossy candy coating on your Gunpla model, it’s time to take it to the next level by using decals and panel lining. Decals are small stickers that can be applied to the surface of the model to add details and markings. They come in various designs and can be customized to suit your preferences.
Before applying the decals, make sure that the candy coat paint has fully dried. Gently peel off the desired decal from its backing paper and carefully place it on the desired area of the model. Use a soft brush or cotton swab to press down the decal and remove any air bubbles.
Panel lining is another technique that can enhance the candy coating by adding depth and definition to the model’s details. It involves using a fine-tipped marker or specialized panel lining pen to trace the panel lines and crevices on the model. This creates a shadow effect and makes the details stand out.
Remember to let the panel lining ink dry completely before handling the model to avoid smudging. You can also use a cotton swab dipped in rubbing alcohol to clean up any mistakes or excess ink.
By using decals and panel lining, you can truly bring your candy coated Gunpla model to life and make it look even more realistic and eye-catching.
Applying a Clear Coat for Protection and a Polished Look
Once you have achieved the desired candy coating finish on your Gunpla model, it is important to apply a clear coat for protection and to give it a polished look. The clear coat acts as a barrier, protecting the paint from scratches and fading over time. It also adds a glossy shine to the model, enhancing its overall appearance.
Before applying the clear coat, make sure that the candy coat paint has fully dried. This usually takes around 24 hours, but it is best to check the manufacturer’s instructions for specific drying times. Once the paint is dry, you can proceed with applying the clear coat.
Choose a high-quality clear coat that is specifically designed for models. This will ensure a smooth and even application. Shake the can well before use to mix the clear coat thoroughly. Hold the can about 6-8 inches away from the model and spray in even, sweeping motions. Apply a thin and even layer, making sure to cover the entire surface of the model.
Allow the clear coat to dry completely before handling the model. This usually takes around 24 hours, but again, refer to the manufacturer’s instructions for specific drying times. Once dry, your Gunpla model will have a protective and polished finish, ready to be displayed with pride.
Tips and tricks for achieving a professional candy coating finish
When it comes to achieving a professional candy coating finish on your Gunpla model, there are a few tips and tricks that can make all the difference. First and foremost, it is important to properly prepare your model before applying any paint. This includes cleaning the surface, sanding any imperfections, and priming the model to ensure a smooth and even base.
Once your model is prepped, it is time to apply the candy coat paint. One important tip is to thin the paint before applying it. This will help to achieve a more even and glossy finish. Additionally, it is important to apply thin layers of paint, allowing each layer to dry completely before applying the next. This will help to prevent any drips or unevenness in the finish.
Another trick to achieving a professional candy coating finish is to add additional layers for depth and shine. This can be done by applying a clear coat over the candy coat paint. The clear coat will not only protect the paint, but it will also add a polished and glossy look to the model.
Lastly, don’t forget to use decals and panel lining to enhance the candy coating. Decals can add extra detail and realism to your model, while panel lining can help to define the different parts and add depth to the candy coating.
By following these tips and tricks, you can achieve a professional candy coating finish on your Gunpla model that will impress even the most seasoned modelers.
Enjoy the Fruits of Your Labor with a Stunning Candy Coated Gunpla Model
After following the step-by-step guide on how to candy coat your Gunpla model, you can now sit back and admire your masterpiece. The process may have been intricate and time-consuming, but the end result is well worth it. Your Gunpla model now boasts a smooth and glossy finish that is sure to catch the eye of anyone who sees it.
By gathering the necessary materials and tools, preparing the model, applying the base coat, mixing and applying the candy coat paint, adding additional layers, using decals and panel lining, and applying a clear coat, you have achieved a professional candy coating finish that rivals those of experienced modelers.
Now, proudly display your candy coated Gunpla model and let it serve as a testament to your dedication and skill. Whether you choose to showcase it in a display case or use it as a centerpiece for your collection, your beautifully candy coated Gunpla model is sure to be a source of pride and admiration.
So, go ahead and enjoy the fruits of your labor. Your candy coated Gunpla model is a true work of art that showcases your creativity and craftsmanship. Congratulations on a job well done!
Learn how to candy coat your Gunpla model with this step-by-step guide. Achieve a glossy and professional finish.
About The Author

Zeph Grant is a music fanatic. He loves all types of genres and can often be found discussing the latest album releases with friends. Zeph is also a hardcore content creator, always working on new projects in his spare time. He's an amateur food nerd, and loves knowing all sorts of random facts about food. When it comes to coffee, he's something of an expert - he knows all the best places to get a good cup of joe in town.