
Last Updated on September 16, 2022
There are a few simple steps to installing a throttle cable on a go karter. First, choose the correct throttle cable for your go kart. Next, weld up the pedal stops. Welding the pedal stops can be tricky, so make sure you follow the directions carefully and avoid doing anything that could harm your pedals. Lastly, you must make sure the throttle cable tab faces the eyelet on the pedal.
Adding a throttle cable to a go kart
If you want to add a throttle cable to your go-kart, you must first install the gas pedal. The gas pedal comes with a return spring and hardware to attach it to the frame of the go-kart. The gas pedal has four small holes on its lower part, the lowest of which is used for the pivot bolt. The third hole is for the throttle cable’s return spring and the top hole is for the throttle cable’s eyelet.
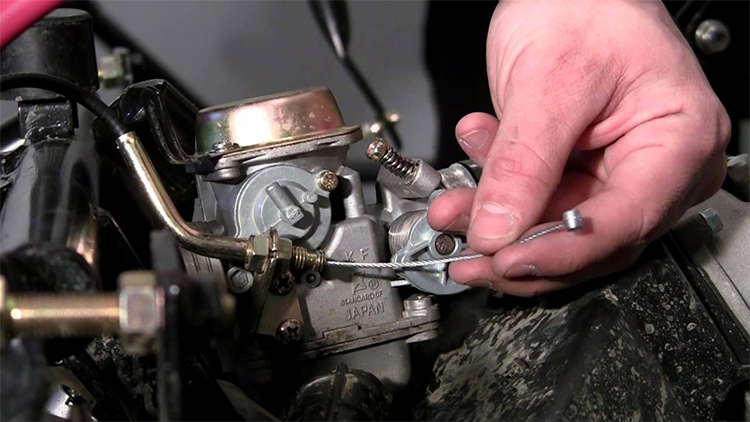
Once you have fitted the throttle cable retainer, feed the cable through the hole. Carefully bend it upward and downward. A spring will be located between the throttle cable and the swivel clevis. The spring will prevent the cable from pulling through the clevis entirely. The spring may need to be shortened. Next, feed the throttle return spring over the inner part of the cable and push it tightly against the rotating clevis.

Choosing a throttle cable for a go kart
When you buy a new go kart, you have many options when it comes to throttle cables and cable hardware. Throttle cables and cable hardware are also known as mini bike throttle cables, UTV cables, or go kart brake cables. You can choose from a variety of different manufacturers and styles, including Manco, American Sportworks, and Predator. You can even purchase Universal Cables for the Predator engine. You can easily determine which type of throttle cable you need by pulling the housing of the throttle cable until you feel resistance.
When choosing a go kart throttle cable, be sure to check the size. The length of the outer sheath should match the distance between the seats. The inner sheath should be 150-200mm longer than the required length, so it can wrap around the pedal ring and stay on the carburettor. You can find out the proper inner sheath length by studying advertisements and pictures of a go kart cylinder. The optimal length is the same as the distance between the throttle cable lever and the pedal plus 200mm.
Adjusting a throttle cable on a go kart
There are two main ways to adjust a throttle cable on a go karter. You can use the twist-style throttle or the hand-operated one, but the process is the same. In either case, the rider applies the throttle by pushing the accelerator pedal through a cable, which transmits the motion to the engine. To ensure smooth operation, keep the cable free of dirt and debris. The cable tension can also be adjusted by loosening the lock-nut at the handlebars.
To adjust a single throttle cable, simply remove the dust covers and loosen the locknut. Next, adjust the throttle cable until it’s at the correct amount of free play – usually about two to three millimeters – when closed. When finished, tighten the locknut and replace the dust cover. Now, you’re ready to adjust the other cables, as well.
To adjust the fuel and air mixture, look for a brass-colored screw next to the choke. Turn the screw clockwise or counter-clockwise until the mixture is right. The resulting mixture should be rich enough to start and run. Make sure to never turn the screw more than 1/8 turn at a time, as too much turns will result in a lean motor at full speed.
Another common issue involving go karts is faulty throttle cables. They can cause acceleration problems and delayed responses to a gas pedal. A faulty throttle cable can also cause the go kart to have jerky acceleration, which is unpleasant to experience. The throttle cable must be in good condition in order for you to enjoy the ride. You should lubricate it regularly to avoid this problem.
When you’re making adjustments to the carburetor, you should first inspect the carburetor and drive belt for any misalignments or wear. A loose belt can cause jerky acceleration, so you should replace any worn or damaged parts with new ones to avoid these problems. Alternatively, you can also check for engine issues, such as noises coming from the engine, or inconsistent output.
Welding up the pedal stops
When you’re installing a throttle cable on a go-kart, the first thing you’ll want to do is set the pedal stops to the desired positions. First, hold the throttle pedal against the rear pedal stop. Now, pull the cable housing towards the rear of the kart, without letting the pedal go all the way through. Doing so will ensure that the cable won’t come undone when the kart accelerates.
The pedals are made from 13mm steel pipe that has been heated with an Oxy acetylene gas plant. The pedals are adjustable and come with two holes to accommodate the throttle cable and brake cable. A simple plate or flange on the pedal’s back will keep it from slipping back into position when you push the pedal. Pedal stops also prevent the pedal from hitting the tie rods.
After you’ve welded up the pedal stops, it’s time to install the cable. You can make them adjustable by cutting the metal stock to the desired position and then using a chopsaw or a hacksaw to cut it to the proper length. Then, you can file or grind the edges smooth. Once you’ve finished tack welding the two parts together, you can do a final weld to finish the frame. Next, you’ll need to install the bottom plate, install the on-off switch, and paint your go kart.
After you’ve attached the throttle cable, you can then install the brake cable. If you haven’t already installed a brake cable on your kart, you can use an adjustable brake rod to install one. But make sure that you set the throttle cable lever centered in the pedal’s center hole, as this will help keep it from slipping. Make sure that the brake rod’s guide tab is placed about 4″ from the center of the throttle pedal bolt hole, so it can easily fit over the brake pedal. After that, you can weld the brake rod to the frame.
When it comes to welding up the pedal stops, you have to take care not to damage the pedals. This part is extremely important, because the pedals are very close to the pedals, and the paint may come off and damage the steering system. So make sure that the pedals and brake rod are securely mounted. A good way to do this is to use flat 3/16″ steel. Alternatively, you can use a piece of plywood to install the pedals.
About The Author

Zeph Grant is a music fanatic. He loves all types of genres and can often be found discussing the latest album releases with friends. Zeph is also a hardcore content creator, always working on new projects in his spare time. He's an amateur food nerd, and loves knowing all sorts of random facts about food. When it comes to coffee, he's something of an expert - he knows all the best places to get a good cup of joe in town.