
Last Updated on September 17, 2022
If you’re looking for instructions on how to install a toggle switch on spst or m.Button toggle switches, or if you want to install LED lights on your motorcycle, this article is for you. Here are some other tips:
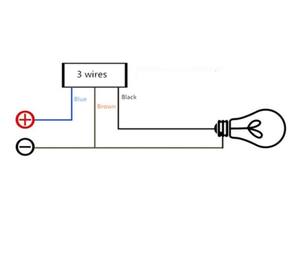
m.Button
You’ve probably wondered how to install a toggle switch on a bike. There are several steps involved, but once you know them, you’ll be a pro in no time. First, strip the ends of the wires, leaving one end with a 1/4″ strip. Then, solder the remaining half to a running wire. Run the running wire through the motorcycle’s bars to the toggle switch’s on/off position. This wire will attach to the middle terminal of the switch.
Next, find the negative and positive wires from the motorcycle battery. You may have to sand the painted surface to make sure they don’t touch each other. Make sure to use a BLUE wire for power, and a BLACK wire for ground. You should also consult a wiring diagram before you begin, and measure the length of the wires. Be sure to allow for extra wire length in case you need to cut them later. It’s better to have more than enough at the beginning than to use a lot later.
spst toggle switch
To install a SPST toggle switch, you must first drill a hole in the control panel. Choose the appropriate bit that is larger than the switch bushing. It can be difficult to drill through an otherwise flat panel, so you may need to use a jigsaw or sandpaper to finish the hole. Alternatively, you can use high-speed steel (HSS) twist drill bits or spade bits.
The supply wire is twisted to a pigtail wire. Once twisted together, twist the pigtail wire and supply wire clockwise until they meet. Then, twist the wire nuts over the wire joint. If the toggle switch is soldered, insert a wire nut over the wire joint and tighten it. Now, you’re ready to install the switch. If you’re using screw terminals, make sure to loosen the screws on the toggle switch.
Inline fuse for motorcycle LED lights
Motorcycle LED lights use a very small amount of current. Using an inline fuse will protect them from overheating and electrical fires. This DIY guide teaches you how to install an inline fuse on your bike. You should also select the correct wire size for your LED lights. The fuse size will depend on the size of the LEDs. You can use a fuse with a 10A or higher rating depending on the wattage and current draw of your lights.
A motorcycle LED light installation is relatively simple. To install an LED light kit, you will need additional electrical wire with different colors to differentiate between positive and negative connections. You’ll also need velcro strips, screwdrivers, pliers, and additional 18 or 20 gauge electrical wire. You should also purchase a fuse kit designed for your motorcycle and a pair of pliers. Make sure you purchase a fuse that is rated for 10A or higher.
You should also consider placing the main fuse as close to the battery as possible. You will want to reduce the amount of wiring exposed to extreme temperatures and dirt, and ideally, the fuse will be located near the battery. Then, you can install an inline fuse next to the main fuse in the battery case. You should make sure to secure the fuse with the battery clamp before installing the new LED light.
Before installing an inline fuse, you should ensure that the wiring connections are firmly ground. The electrical components inside of an unfused connection can cause serious damage, including fire. Always remember to ground any new component you add to your bike with the correct grounding. You can do this by connecting it to the main chassis ground, the wiring harness, or the battery negative terminal. If you have an existing circuit, you can connect it to a main chassis ground using a wire-stripper pliers.
Using butt connectors to run wires
One way to wire up a toggle switch is to use butt connectors. This type of connector is typically found in old-time electrical shops and doesn’t have a plastic base. It can be used in a variety of applications, including environmental and outdoor ones. The wires can be insulated from the connector, which will help it survive high temperatures.
When wiring a toggle switch on a motorcycle, you’ll need black shrink wrap, crimp connectors, and some wire. A general-purpose 16-gauge wire will do, but a heavier wire covered with cloth will work better. The wire should be measured before connecting it to the switch, and you’ll need to allow for a little extra to make sure you don’t cut too many wires.
To install a toggle switch, cut two lengths of red electrical wire. You’ll need a length of wire that’s about six inches long, trimmed at 1/4” and stripped on one end. Then, cut the other end. Twist the factory wire to connect with the remote turn on wire. Finally, crimp the ends together using an electrical crimping tool or needle-nose pliers. Connect the two ends of the switch wires together and test them by gently tugging on them.
When running the wires for a toggle switch, you should cut them at the appropriate location and crimp one end of them into the butt connector. Once the butt connectors are crimped properly, you should cut the second wire and then crimp it into the other end of the connector. Once the wires are crimped, wrap the wires with electrical tape. Heat shrink tubing can also be used to prevent moisture from getting into the wiring.
About The Author

Mindy Vu is a part time shoe model and professional mum. She loves to cook and has been proclaimed the best cook in the world by her friends and family. She adores her pet dog Twinkie, and is happily married to her books.