
Last Updated on September 17, 2022
If you’ve ever wanted to paint a panel, but haven’t been sure how to get started, you’ve come to the right place. Here we will explain how to make cradled wood panels, a cheaper alternative to stretched canvas. Before you start, make sure to prep the wood surface by raising the grain and sanding it smooth. Then, you’ll be able to use Titebond III ultimate wood glue to attach the pieces.
Titebond III ultimate wood glue
If you’re working with cradled wood panels, you’ve probably heard of Titebond III, an aliphatic resin wood glue. While the name suggests that it’s stronger than straight PVA white glue, the glue’s performance does differ. Titebond III will not crack or swell, even if the panels’ edges aren’t perfectly square. Unlike PVA glue, Titebond III will stand up to outdoor exposure.
Franklin Titebond III (16 oz.) Ultimate Wood Glue is a water-clean-up, one-part wood glue that offers superior bond strength and tack. Its low application temperature and long open-assembly time ensure superior adhesion. It is also FDA-approved for indirect food contact and is non-toxic. This water-based wood glue is packaged in convenient pint tubes (16 oz) to make cleanup easy.
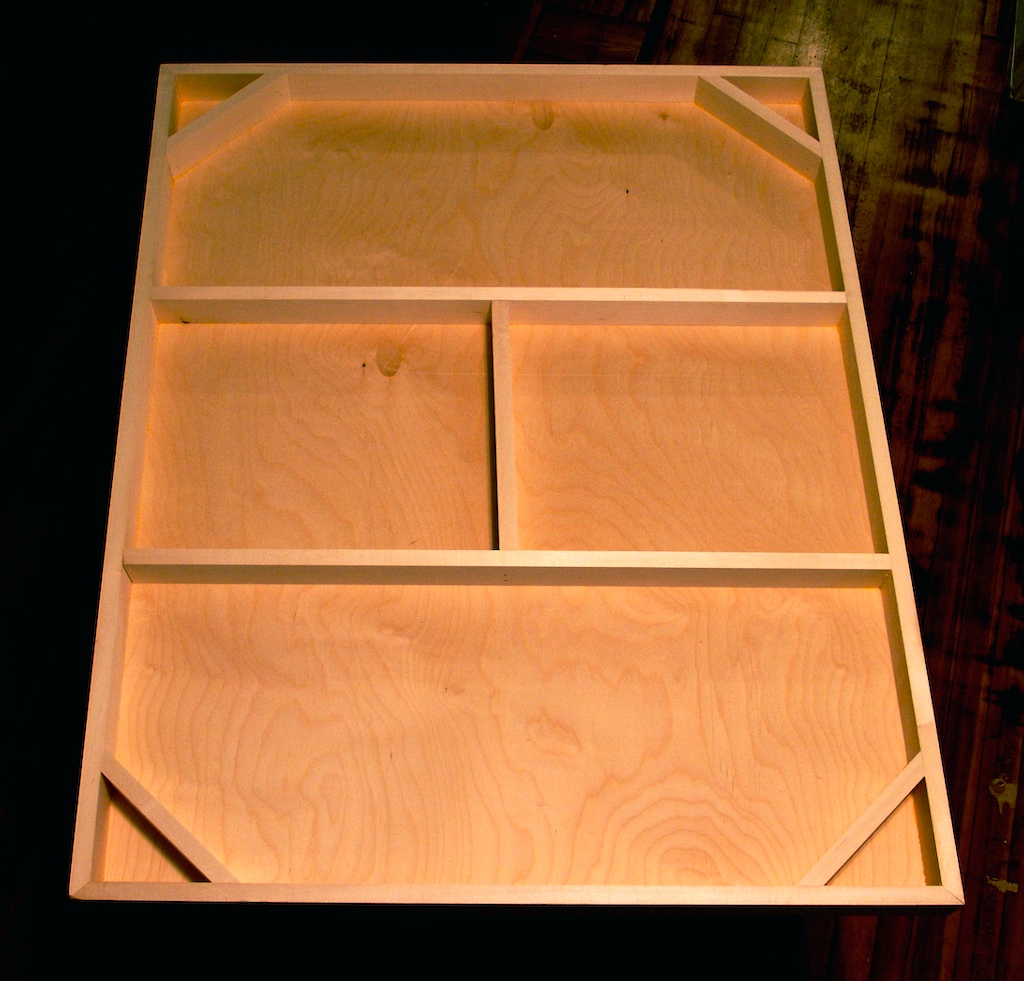
Birch plywood
The first step in constructing cradled wood panels is gluing a sheet of birch plywood to a solid wooden base frame. The plywood sheet is made of layers of birchwood that are pressed with the grain running one way and the other. The wood frame is cut at a 45 degree angle to match the exact size of the sheet. Most cradled wood panels are precut to the exact length and width, and they are individually wrapped for protection. Adding a little bit of gesso to the panel will prevent future warping, allowing you to paint it right away.
Birchwood panels can be used as a base for sculptural works. You can paint them a solid color or apply a textured medium. You can also add a riser on top of the panel for extra height. These panels are also a less expensive option than canvas and can be used to create multi-panel wall hangings or a grid of 6×6-inch pieces for a tabletop.
Cradled wood panels are an inexpensive way to display three dimensional art. They are inexpensive and available in any size. Sculptures can be glued to the base using wood hardware or adhesives. Alternatively, straps can be threaded through drilled holes in the panels to secure the artwork. You can create cradled wood panels out of Birch plywood using any medium you like!
To create cradled wood panels from Birch panel, first prepare the surface of the plywood. Lay it flat on the table and use jars to prop it up. The jars will prevent drips and make the painting process easier. Also, if you want to use the panel as a canvas for your artwork, you can use the flat side of the panel instead of the cradled one.
Another step in creating cradled wood panels from Birch panel is to select a 13 ply birch plywood. This type of plywood has better dimensional stability than solid wood, which can expand and contract with humidity changes. Lastly, you need to decide how to attach the panel to the bracing system. A professional grade wood glue is a good choice for gluing the panel to the bracing system.
Before gluing the panel together, you should first prime the edges and cradles of the plywood. Then, paint them the same way as you would unprimed plywood. Don’t forget to allow the finished product to dry completely. This way, you won’t have to deal with cracks and splinters. It is easier to glue plywood panels together with this method than to build them from scratch.
Once the cradle is ready, you can start painting the wood panel. To do so, you must remove the protective layer. The cradles are separate units that are attached to the plywood panel using C-clamps or glue. For larger cradles, the cradles may have cross-braces, like canvas stretcher bars. Generally, you should use a high quality multi-ply plywood for the cradles. Solid wood, despite its uniform grain, will warp and buckle over time. You should also avoid nailing or screwing the cradles to the panels. This will cause blemishes on the finished product.
Birch plywood with veneer
How to make cradled wood panels is an excellent project for beginners. This easy-to-follow guide will teach you how to make cradled panels from Birch plywood with veneer. Plywood with a veneer layer is usually birch, and birch veneer is the most popular type. You can also purchase wood panels with canvas already glued to the surface, and a primer.
To prep a wood panel for painting, apply two coats of sealer. A layer of primer helps with adhesion and helps bring back the tooth of the raw wood. It also helps whiten the surface to achieve the optimal paint color. The raw wood surface must be free of dust and other debris, and clean. Once the gesso has dried, you can apply the cradles.
First, choose a high-quality plywood. For exterior applications, choose marine or aviation grade. Avoid craft plywood from hobby stores as they have thin top veneers and poor adhesives. The worst of the bunch is the Art Alternatives brand of Baltic birch plywood. Although it is much cheaper than most other brands, it has inferior quality and uses exterior-grade adhesives. When choosing plywood, always remember to check the grade and wood type before buying it.
For cradled wood panels from Birch plywood, you can glue veneer to the fiberboard. A single layer of veneer on fiberboard will prevent warping. You can use hide glue, PVA glue, or starch to stick the veneer to the fiberboard. If you have any trouble with warping, you can try steaming or low-heat treatment to straighten the veneer. The same goes for gluing the veneer to the panel, although different cuts will have different results.
Lastly, you should take note of the moisture content of the panel. Ensure that it is low enough to avoid excessive warping. If the panel is too moist, moisture content may damage the paint substrate. Make sure to prime both sides of the panel. If not, you’ll risk excessive warping or sagging. So, when choosing your painting substrate, check the moisture content.
If you’re painting with acrylics, the medium density fiberboard (MDF) panel will suit you best. These panels are slightly denser than plywood, but they’re still very versatile. MDF is a better choice if you’re planning to apply acrylic paints or mount miniature sculptures. This versatile material is perfect for sign-making and other similar tasks.
If you don’t want to go to the trouble of buying pre-cut Birch plywood with veneer, you can buy the full sheet at a lumberyard. They’re less expensive than canvas, and you can create a multi-panel wall hanging with the same size panels. In addition, you can paint them like wall art and finish them with a clear coat for added protection.
About The Author

Mindy Vu is a part time shoe model and professional mum. She loves to cook and has been proclaimed the best cook in the world by her friends and family. She adores her pet dog Twinkie, and is happily married to her books.