
Last Updated on September 16, 2022
If you‚ve never tried plastering a floor before, there are a few things you should know. First, you should know that the plaster itself is difficult to mix, so you should rent a mixing drill at a home construction store. Next, level the floor by placing a level in the middle and on the sides of the floor. Then, mark the uneven spots with a level and use a drop cloth to cover the floor and protect your eyes.
BS EN 166 type 2A5
The plaster used for a floor needs to adhere to the standards laid down by BS EN 166 type 2A5 and British Gypsum. The standard specifies the minimum amount of cement, plaster, fine aggregate and water required to form a good bond with concrete. Generally, a concrete floor should be rough and textured to facilitate application of plaster. To prepare plaster, slurry of cement, coarse sand and water is mixed in equal amounts until a runny consistency is achieved. The slurry is then added to the concrete surface, and fine aggregate is mixed with it to achieve the desired consistency. The prepared plaster should be applied within two hours of preparation.
When it comes to undercoat thickness, a standard rule is 11mm for walls and 8mm for soffits, and no more than twomm for floors. Any areas with greater thicknesses should be supported by expanded metal lathing fixed mechanically to the concrete. Fully compacted lightweight aggregate concrete has a different thermal movement value than plaster, and can cause difficulties with the application of plaster. PVAC bonding agent can help overcome these issues.
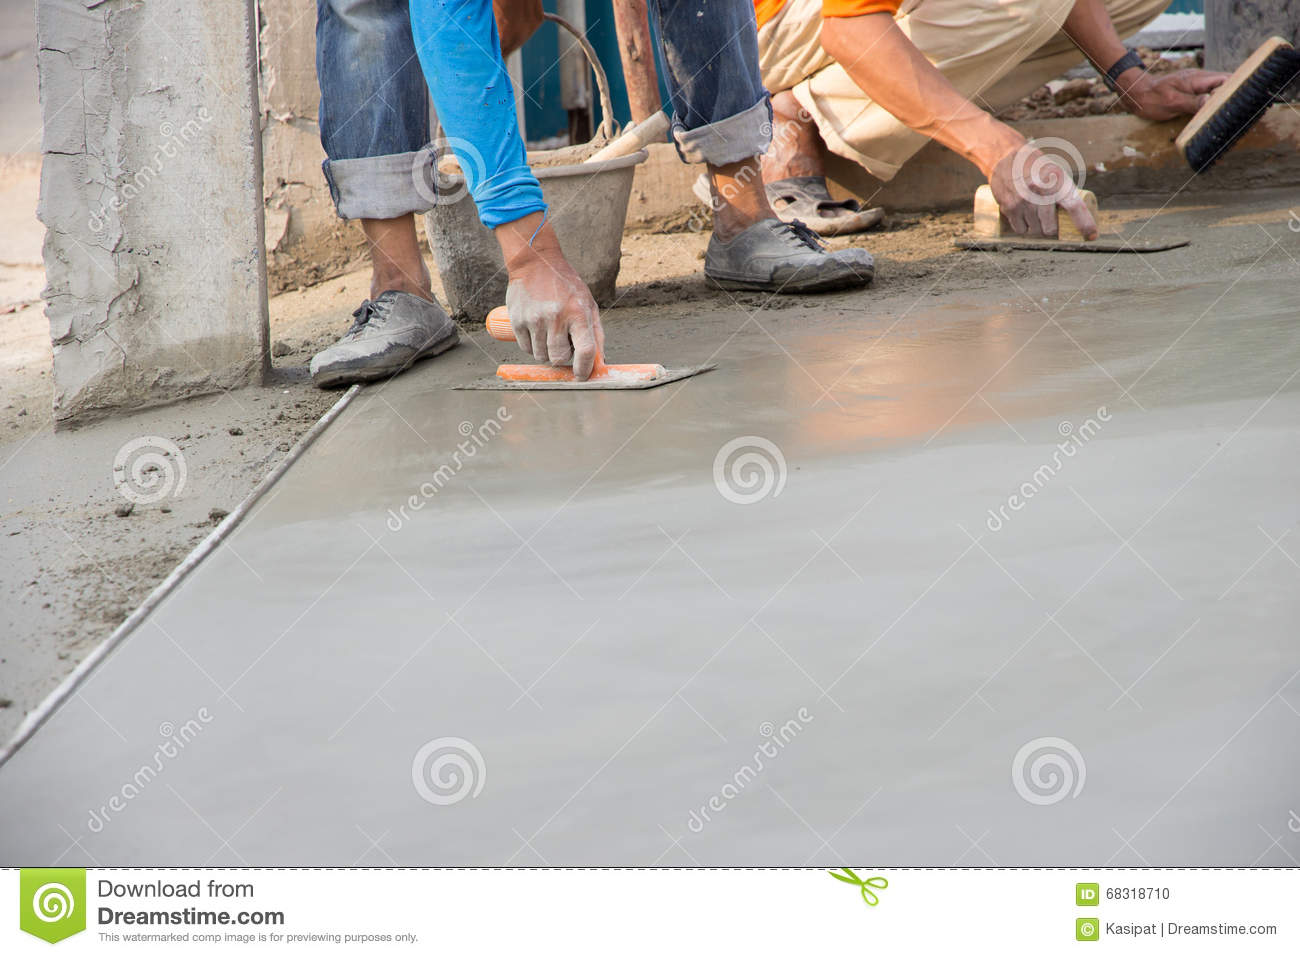
Preparing the concrete surface
One of the first steps in plastering a concrete floor is to prepare it for the finished product. This process can be difficult if the concrete surface is deformed or has cracks. Luckily, there are several different ways to ensure that the surface is ready for plastering. This article covers four of these methods in detail. Follow these steps for a successful plastering project. Listed below are the tips for preparation.
To prepare the concrete surface for plastering, the surface must be sufficiently rough. To achieve this, mix a slurry of one part cement with one and a half parts coarse sand. Add enough water to make the slurry runny. Next, mix the cement and fine aggregate together to make the consistency of the plaster. This mixture should be applied within two hours of being prepared. Once the plaster is dry, it is time to apply the finish.
After preparing the concrete surface, apply the plaster. Use a chemical release agent instead of mould oils. Make sure to check for contamination and then apply the plaster. GypPrime and proprietary bonding agents are good options for dense concrete surfaces. Apply the plaster to the surface with firm pressure. After it dries, check the plaster to ensure that it is not hollow. Wear a half-face mask to limit dust while plastering.
Applying slurry
If you are planning to lay a plaster floor on your home, the first step is to apply a base coat. You may want to use a cheap primer, preferably one that is oil-based rather than acrylic. Dust can cause plaster to crack when it is too thick. Before you apply the second coat, remove the bubbles and re-prime the area. It will be easier to apply the last coat of plaster if you do a thin layer first.
Before you apply slurry to your plaster floor, make sure that your concrete wall is rough enough to hold it. Mix 1 part cement with one and a half parts coarse sand. Add enough water to make the slurry runny enough. Next, mix the sand with the cement until it reaches the desired consistency. The prepared plaster should be used within two hours. Depending on how rough the concrete surface is, you may need to use a sand-lime mixture instead of fine aggregate.
To apply slurry to plaster floor, you must first prepare your work space. To do this, you need to remove the old layer of plaster. If you notice the layers are uneven or cracked, spray water on the area to make them look smoother. After you have done this, you can proceed to apply the second layer. Remember that the second coat will behave differently than the first one. So, take your time and work on small sections at a time until you get the desired result.
Applying plaster
If you want a smooth finish to your floor, you can apply a preliminary coat of plaster before you pour the actual plaster. The initial coat will prevent the substrate from absorbing moisture from the plaster, which could cause it to crumble or crack later. You should mix the plaster in a bucket of approximately five or seven gallons and fill it halfway. After you fill the bucket with clean water, take a fresh bag of plaster mix and stir it until it forms a mound above the water. You can then use a stirring rod or plunger to incorporate any dry plaster particles.
To begin, clean the surface of the concrete to be plastered. Make sure it is clean and free of any oil or paint that may have been there before the floor was constructed. If it is a smooth, bare floor, you can apply a layer of Thistle GypPrime to provide a bonding agent for the plaster. Be sure to allow the concrete to dry before you start. Thistle GypPrime will also prevent the undercoat plaster from dehydrating quickly.
Cleaning dried plaster off a hardwood floor
If you‚ve noticed a patch of dried plaster on your hardwood floor, you‚ll likely want to remove it as quickly as possible. Fortunately, removing plaster from wooden floors is much easier than removing it from carpet. To begin removing the plaster, first wipe it with warm water and a soft rag. You may also use a work knife to break up the clumps. Then, use a wet rag to wipe away any remaining plaster.
The best way to remove dry plaster from your hardwood floor is to apply a little warm water to the area first. This will help soften the plaster and keep it from drying out. You may also want to place a towel soaked in water on the floor to keep it wet longer. Be sure to apply warm water when cleaning the floor to avoid warping and rotting. Once the plaster has soaked up a bit, you can use a scraper or a metal spoon to scrape the excess plaster off.
To remove the most stubborn stains, use a non-abrasive sponge. You can also use a degreasing solution if the plaster is still fresh. Use the soft side of the sponge to tap in the solution, and then scrub the area with the other side. Don‚t rub too hard or you‚ll end up damaging the hardwood floor further. Once you‚ve removed the dried plaster, you can apply a new wood finish.
Acid staining
If you‚ve ever wondered how to plaster floor with acid staining, you‚re not alone. Acid staining is a common application, but the results can be unattractive. This process requires careful surface preparation. Applying too much stain, or too few coats, can make it hard to penetrate the plaster. Luckily, there are ways to minimize these issues. Using the correct materials and applying the stain correctly will make the entire process easier.
To apply acid staining, first prepare a wet area on the slab. Dumond recommends that you choose a small area of the slab, preferably 6 inches by six inches. Choose a location that won‚t be visible from the rest of the floor. The area will not blend in with the rest of the concrete when the stain is dry, and the shadows it casts will show through.
Before applying acid staining, make sure the floor is properly prepared. Acid staining will result in a mottled color. This is an expensive process and requires more experience and safety precautions than other types of stains. The acid staining process typically involves using hydrochloric or muriatic acid, and there is some risk associated with it. However, because acid stains are toxic, TSP is usually used to neutralize fumes. If you are worried about the toxic fumes, you can also make sure your floor is insulated against natural elements and foot traffic.
Preventing cracks from forming in the plaster
The first step to minimizing plaster cracks is hiring a highly experienced general contractor and subcontractors. An experienced plaster system owner, who oversees knowledgeable subcontractors, and a qualified third-party inspector can also help prevent plaster cracking. Proper project planning and bidding will set up the proper conditions for the plastering process. Ultimately, these professionals will prevent cracks in the plaster floor and ensure the best possible finish for the room or building.
When applying the patch, always remember that a small amount of filler is insufficient to form a strong bond. Never apply too much filler, as this will only cause the patch to shrink. In addition, make sure that the patching material is of a thick buttery consistency. Plaster putty is widely available. You will need to mix the putty with water first, but the better the dampness, the better the bond.
Plaster cracks on ceilings are a common occurrence in old buildings, and they can return if the underlying cause is not addressed. A plaster repair should be carried out in a typical manner to correct the problem, but if the cracking is a result of uneven load distribution, you should consider adjusting the plaster mix accordingly. In this way, you can minimize the risk of cracks in the future.
About The Author

Zeph Grant is a music fanatic. He loves all types of genres and can often be found discussing the latest album releases with friends. Zeph is also a hardcore content creator, always working on new projects in his spare time. He's an amateur food nerd, and loves knowing all sorts of random facts about food. When it comes to coffee, he's something of an expert - he knows all the best places to get a good cup of joe in town.