
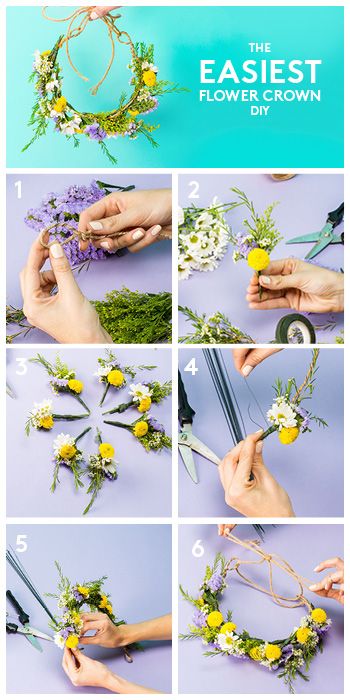
If you are planning to wear a flower crown for a special occasion or a formal occasion, this how-to diagram will help you make a stunning flower headpiece. Follow the instructions carefully to ensure that the flowers look their best! In this step-by-step guide, we will show you how to make a flower crown in a few simple steps. We’ll start at the back and wrap the flowers in thin wire to hold them flush with the crown.
How do you make a flower crown step by step?
If you’re looking for a detailed Flower Crown diagram, you’ve come to the right place. Here, you’ll discover how to make a beautiful flower crown for your special day. First, measure yourself. The measuring tape should be above your eyebrow line, just above your ears. Make sure you don’t pull it too tight, as you will need extra room to add the flowers and other embellishments.
Next, gather your flowers and greenery. You’ll need to cut the stems to approximately two inches in length. Once you’ve done that, you can begin arranging the blooms. Choose a pattern. Try to include both statement flowers and filler ones. Try to incorporate greenery as well, since it will give your crown a sophisticated look. Once you’ve chosen your pattern, add the flowers and greenery to the wire.
The fifth step involves completing the flower crown. The final elements and details should be added. Make sure to leave some space between the band and the last flower. If you want to use different types of flowers, you should try to alternate colors and textures. Alternate them as much as possible. This way, you’ll end up with a beautiful, unique flower crown. This craft will be both fun and beautiful!
How do you make a crown flower arrangement?
First, you should choose a pattern for your flower crown. Select a pattern in which you will alternate blooms with greenery. Secure the stems of the first flower with floral tape, then add a second flower on top of it. Repeat this process to create a circle of greenery and petals. Alternate flowers and greenery and add a filler flower as well. You can make a full flower crown using two large flowers or one small flower.
Begin by adding small clusters of flowers. Try arranging several small blooms at once. Keep checking to see if any new flowers have opened. Also, alternate colors and textures. If you want the arrangement to look more natural, use dried flowers. As you add more blooms, alternate colors and textures. If you want to make it more unique, try using different kinds of flowers. Try mixing and matching the colors of each flower and try varying the types and sizes.
How do you make a real flower crown?
Before you start your flower crown, you need to decide on a pattern for the blooms and the greenery. The first flower is placed on the center of the wire, followed by another flower and the stem. Secure these flowers with floral tape. Repeat the process with a third flower, then a fourth. Alternate flowers and greenery in the same manner. Filler flowers are added to complete the crown.
Use floral tape to secure the stems and protect your hands from the sharp ends of the wire. You can also use it to attach additional flowers. The second flower should be placed on top of the first one. This will hide the stems and create a seamless circle of petals and green leaves. Alternatively, you can make the entire crown from one flower. Remember that you can make a big flower to cover the entire wire crown.
Measure your head carefully before starting the process. The length of the floral wire should sit above your eyebrows, but not so tight that it pulls your head. Leave some room to add flowers. Once you’re satisfied with the measurement, you can proceed with the actual process of making the flower crown. There are many different flower crown designs to choose from. Just make sure to choose one that best suits your style. You can always experiment with different flower designs to see what looks best on you.
How do you make a flower headpiece?
To make a flower crown, you must know how to work with floral tape. First, you should determine the size of your head. Then, choose the pattern of blooms and greenery you want to use. Use floral tape to secure the stems and flowers around the ring. Alternate the placement of the flowers and greenery, and place clusters of filler flowers as needed. Once you have the size you want, you can wrap the floral tape around the ring.
Secondly, you need to choose the type of flowers that will look best with your crown. Depending on your taste and style, you may opt for flowers that look best in different arrangements. You can use Bouq flowers to create a flower crown that is both elegant and unique. To start creating your flower crown, cut stems of each flower to about one to two inches long. Next, arrange the flowers evenly around the ring, starting with the largest bloom. Alternate flower types with greens to create a more sophisticated pattern.
How do you make a cheap flower crown?
When making a flower crown, a simple yet elegant design is essential. This design will make you look gorgeous, regardless of the event you’re attending. Here’s how to make a flower crown yourself:
Cut a length of floral wire long enough to wrap around the head twice, leaving a few inches of extra space on each end. Wrap the wire in a loop and secure it to the head. Add flowers and greenery alternately, creating a beautiful flower crown. Add clusters of filler flowers to fill the gaps. If you’re creating a flower crown for a birthday, try placing several flowers in clusters.
You can make a cheap flower crown using garden roses, chrysanthemums, and peonies. Choose flowers that you like and are in season. Try to select ones that stay fresh for hours without water. Make sure you have several different sizes of flowers. Several blooms in one cluster will look awkward. Also, you can try to alternate the types of textures and colors when you’re arranging the flowers.
How do you make a halo crown?
A halo crown adds elegance and flair to any outfit. It’s easy to make, and you can show off your artistic side on your wedding day with it. All you need are a few simple supplies, like wire, feather boas, and a few other small accessories. The perfect wedding accessory is a halo crown, so make one for yourself today! Whether you’re going for a fairytale wedding or a classic romantic theme, this crown will make a stunning accessory.
The halo crown is a simple, protective style that works on any length and texture of naturally curly hair. Using a styling product like Miss Jessie’s Stylers, you can create a halo crown with any length of hair. This look is a great way to show off your angelic hair. It’s also a great look for any occasion. You can wear it to your next formal event or just wear it to show off your angelic hairstyle.
How do you make a flower girl headpiece?
There are several ways to make a flower girl headpiece. This DIY project is sponsored by Paper Mart. I have made some adjustments since publishing the original article. As always, the opinions expressed here are my own. First, you’ll need to cut the flowers’ stems. Then, wrap the wire around the stems and tuck them into the braids. Then, cut a piece of ribbon about two inches (5.08 centimeters) longer than the headband.
Other simple options include adding greenery or pine needles, or making a crown with olive leaves. If you don’t have flowers to spare, you can use dried grasses and moss. This gives the look of peasant-chic, rustic, or spring-like. Adding lace or berries can also add a rustic touch. You can even find dried plants and berries to use in the crown.
Choose flowers that will suit the season. Winter flower varieties are more durable and symbolize the beauty of the season. Choose poinsettias, amaryllis, carnations, paperwhites, or white roses. If the wedding will take place in the winter, consider using evergreens, such as pine needles. These can be used as flower girl headpieces. However, you’ll have to choose the color palette carefully.
How do you make a daisy flower crown?
For the simplest type of crown, gather a bunch of small daisies. Cut the stems of the shortest flowers to roughly the same length. Cross the remaining stems and wrap them under the stems of the top daisies. Bend the stems of the bottom flower to the right, so that they cross over the head of the flower. Add more flowers until the crown is covered with small bouquets of daisies.
Firstly, measure the head. The flower crown should fit on your head comfortably. To make sure it fits, use a measuring tape. The width of the head should be approximately two inches. Ensure that the measurement is not too narrow; leave room for the flowers. Next, wrap a piece of floral tape around the top of the head. Once that is done, the crown is ready to be worn!
Using floral snips, cut the ends of the thick aluminum wire. Bend these ends of the wire into loops and slide them through the other end to form the crown shape. Once completed, try wearing the crown on a head. Adjust the loops as necessary to make the crown larger or smaller. Use floral tape to secure the ends. A flower crown is a unique way to express yourself and add color to your outfit.
About The Author

Mindy Vu is a part time shoe model and professional mum. She loves to cook and has been proclaimed the best cook in the world by her friends and family. She adores her pet dog Twinkie, and is happily married to her books.