
Last Updated on August 3, 2023
Welcome to our comprehensive guide on how to engrave a gun slide. Whether you’re a seasoned gun enthusiast or just starting out, this article will provide you with all the information you need to create a stunning and personalized design on your gun slide. Engraving a gun slide not only adds a touch of individuality to your firearm, but it also enhances its aesthetic appeal. In this guide, we will walk you through the purpose of engraving gun slides, the tools and materials you’ll need, the step-by-step process of preparing and engraving the slide, as well as important safety precautions to consider. Let’s dive in!
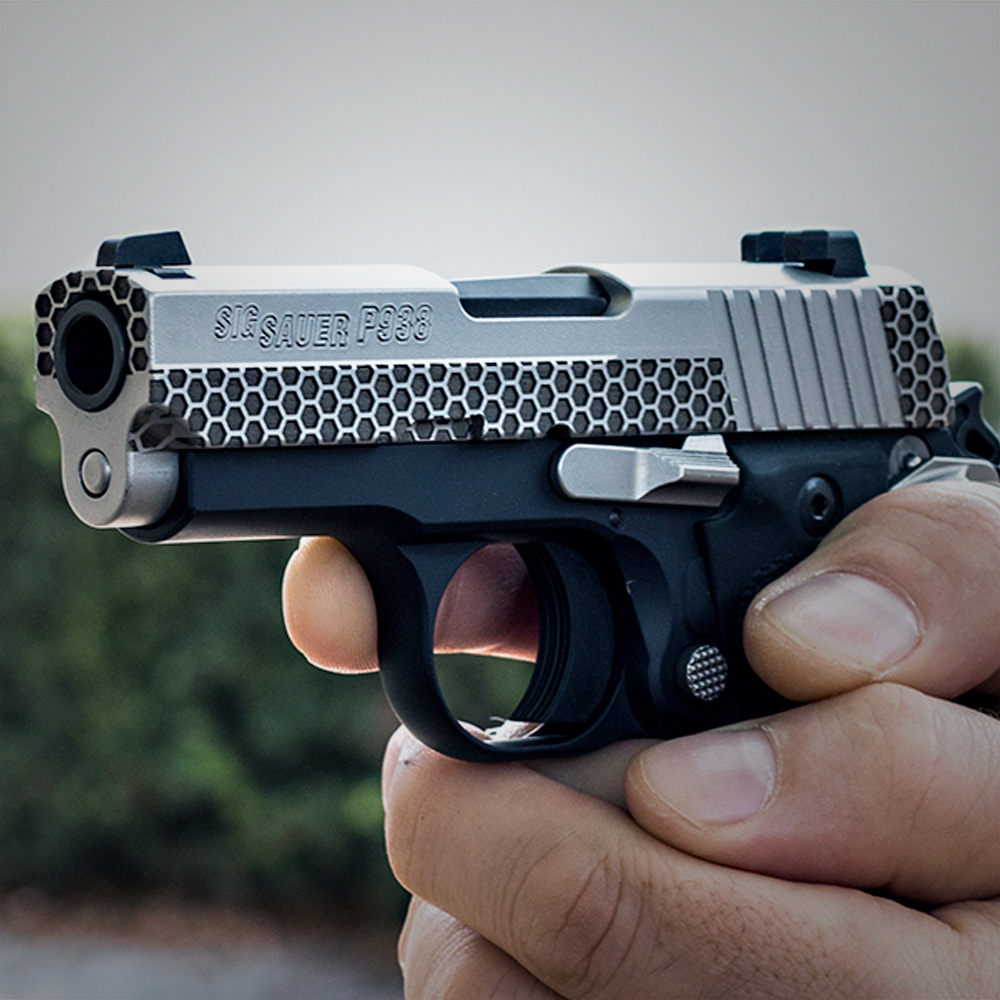
Understanding the Purpose of Engraving Gun Slides
Engraving gun slides is a popular practice among gun enthusiasts and collectors. It serves both functional and aesthetic purposes, enhancing the overall look and performance of the firearm. Here are some key points to understand about the purpose of engraving gun slides:
- Personalization: Engraving allows gun owners to personalize their firearms, making them unique and reflective of their individual style and taste.
- Identification: Engraving can be used to mark the gun slide with important information such as the owner’s name, serial number, or other identifying details.
- Enhanced Grip: Engraving patterns on the gun slide can provide better grip and control, especially in wet or slippery conditions.
- Collectibility: Engraved gun slides are highly sought after by collectors, as they add value and rarity to the firearm.
Understanding the purpose of engraving gun slides is essential before embarking on the process. It allows gun owners to make informed decisions about the design, technique, and overall outcome of the engraving.
Gathering the Necessary Tools and Materials
Before you begin engraving your gun slide, it is important to gather all the necessary tools and materials. This will ensure that you have everything you need to complete the task efficiently and effectively.
First and foremost, you will need a high-quality engraving tool. Look for one that is specifically designed for engraving metal surfaces, as this will provide the best results. Additionally, you will need various engraving bits or tips, depending on the type of design you plan to create.
In addition to the engraving tool, you will also need a vice or clamp to securely hold the gun slide in place while you work. This will prevent any accidental movement or slipping, which could result in mistakes or damage to the slide.
Lastly, gather some safety equipment, such as safety glasses and gloves, to protect yourself while engraving. Engraving can produce sharp metal shavings, so it is important to take precautions to avoid injury.
By gathering all the necessary tools and materials before you begin, you will be well-prepared to tackle the engraving process with confidence and precision.
Preparing the Gun Slide for Engraving
Before you begin engraving your gun slide, it is crucial to properly prepare the surface to ensure a clean and precise engraving. Here are the steps to follow:
Step 1: Disassemble the Gun
Start by disassembling the gun and removing the slide. This will allow you to work on the slide separately and avoid any damage to other parts of the gun.
Step 2: Clean the Slide
Thoroughly clean the slide using a degreaser or solvent to remove any dirt, oil, or residue. This will help the engraving tools to glide smoothly and prevent any imperfections in the engraving.
Step 3: Sand the Slide
Use fine-grit sandpaper to gently sand the surface of the slide. This will create a smooth and even surface for the engraving. Be careful not to apply too much pressure or sand too aggressively, as this can damage the slide.
Step 4: Apply a Masking Solution
To protect the areas of the slide that you do not want to engrave, apply a masking solution or tape. This will create a barrier and ensure that the engraving is confined to the desired area.
By following these steps, you will be able to prepare your gun slide for engraving and achieve professional-looking results. Remember to take your time and work with precision to create a design that truly stands out.
Choosing the Design and Marking the Slide
When it comes to engraving a gun slide, choosing the right design is crucial. Here are some tips to help you choose the perfect design and mark the slide:
- Consider the style: Decide whether you want a traditional, intricate design or a more modern and minimalist one. This will depend on your personal preference and the overall aesthetic you want to achieve.
- Research and gather inspiration: Look for inspiration online or in books to get ideas for your design. You can also consult with professional engravers or gun enthusiasts for guidance.
- Sketch your design: Once you have an idea in mind, sketch it out on paper. This will help you visualize the design and make any necessary adjustments before marking the slide.
- Transfer the design: Use transfer paper or a stencil to transfer your design onto the gun slide. Make sure to position it accurately and securely before proceeding.
- Mark the slide: Use a fine-point marker or scribe to mark the outline of your design on the slide. This will serve as a guide for the engraving process.
By carefully choosing the design and marking the slide accurately, you can ensure a successful and visually appealing engraving result.
Engraving Techniques and Tips
Once you have prepared the gun slide and chosen your design, it’s time to start engraving. Here are some techniques and tips to help you achieve the best results:
- Choose the right engraving tool: There are various tools available for engraving, such as hand engravers, rotary tools, or laser engravers. Choose the one that suits your skill level and the type of engraving you want to do.
- Practice on scrap material: Before engraving the gun slide, practice on a scrap piece of metal to get a feel for the tool and the pressure needed. This will help you avoid mistakes on the actual slide.
- Start with shallow cuts: Begin by making shallow cuts on the slide, gradually increasing the depth as you gain confidence. This will prevent you from making deep, irreversible mistakes.
- Use proper technique: Hold the engraving tool firmly but not too tightly. Use smooth, controlled movements to create clean and precise lines. Take breaks if your hand gets tired to maintain accuracy.
- Experiment with different patterns and textures: Don’t be afraid to try different engraving patterns and textures to add depth and visual interest to your design. Practice on scrap material to see what works best for you.
- Take your time: Engraving requires patience and attention to detail. Take your time to ensure each cut is precise and clean. Rushing can lead to mistakes and a less professional-looking result.
By following these techniques and tips, you can achieve beautiful and professional-looking engravings on gun slides. Remember to practice and experiment to develop your own unique style.
Cleaning and Finishing the Engraved Gun Slide
Once you have completed the engraving process on your gun slide, it is important to properly clean and finish the slide to ensure a professional and polished look. Cleaning the slide will remove any debris or residue left behind from the engraving process, while finishing will protect the engraved design and enhance its appearance.
To clean the engraved gun slide, start by using a soft brush or cloth to gently remove any loose debris. Be careful not to scratch or damage the engraved design. Next, use a mild cleaning solution and a clean cloth to wipe down the slide, removing any remaining dirt or grime. Make sure to dry the slide thoroughly to prevent any water spots or damage.
After cleaning, it is important to apply a protective finish to the engraved gun slide. This can be done using a clear coat or a gun oil specifically designed for this purpose. Apply the finish according to the manufacturer’s instructions, making sure to cover the entire surface of the slide. Allow the finish to dry completely before handling the slide.
By properly cleaning and finishing the engraved gun slide, you can ensure that your design is protected and looks its best. This final step will give your gun slide a professional and polished appearance that will impress others.
Safety Precautions to Consider
When it comes to engraving gun slides, safety should always be a top priority. Here are some important precautions to keep in mind:
1. Wear Protective Gear
Before you begin engraving, make sure to wear the necessary protective gear. This includes safety glasses to protect your eyes from flying debris, gloves to protect your hands, and a dust mask to prevent inhalation of any particles.
2. Work in a Well-Ventilated Area
Engraving can produce dust and fumes, so it’s important to work in a well-ventilated area. Open windows or use a fan to ensure proper air circulation.
3. Secure the Gun Slide
Before engraving, securely clamp the gun slide in place to prevent any movement. This will help ensure accurate and precise engraving.
4. Use the Correct Engraving Tools
Using the right tools for the job is crucial. Make sure to use high-quality engraving tools that are specifically designed for gun slides. This will help you achieve clean and professional results.
5. Take Breaks and Stay Focused
Engraving can be a time-consuming process, so it’s important to take regular breaks to rest your hands and maintain focus. This will help prevent fatigue and potential mistakes.
By following these safety precautions, you can ensure a safe and successful gun slide engraving project. Remember, safety should always come first when working with firearms.
Troubleshooting Common Engraving Issues
Engraving gun slides can be a challenging task, and even experienced engravers can encounter issues along the way. In this section, we will discuss some common problems that may arise during the engraving process and provide troubleshooting tips to help you overcome them.
1. Uneven Depth
One common issue is achieving an uneven depth in the engraved lines. This can result in an unprofessional and inconsistent appearance. To avoid this problem, make sure to apply consistent pressure and maintain a steady hand while engraving. Practice on scrap material before working on the actual gun slide to improve your technique.
2. Slippage
Another issue that engravers may face is slippage, where the engraving tool slips and creates unintended marks on the gun slide. To prevent this, ensure that you have a firm grip on the engraving tool and maintain a stable position while working. Additionally, using a vise or clamp to secure the gun slide can provide added stability.
By being aware of these common engraving issues and implementing the troubleshooting tips provided, you can enhance your engraving skills and achieve better results. Remember, practice makes perfect, so don’t be discouraged if you encounter difficulties along the way. With time and patience, you will become a skilled engraver.
Wrapping it Up: The Art of Engraving Gun Slides
After delving into the intricacies of engraving gun slides, it is clear that this art form requires a keen eye for detail and a steady hand. By understanding the purpose of engraving and gathering the necessary tools and materials, one can embark on a journey of transforming a plain gun slide into a work of art.
Choosing the right design and skillfully marking the slide are crucial steps in achieving a stunning result. Engraving techniques and tips, such as using the right pressure and angle, can greatly enhance the final outcome. However, it is equally important to consider safety precautions to ensure a smooth and accident-free process.
Should any issues arise during the engraving process, troubleshooting techniques can come in handy. By addressing common problems like uneven lines or smudging, one can overcome obstacles and create a flawless masterpiece.
Ultimately, engraving a gun slide is a labor of love that requires patience, precision, and a passion for craftsmanship. With the right knowledge and skills, anyone can turn a simple gun slide into a personalized and unique piece of art.
Learn how to engrave gun slides with this comprehensive guide. Discover the tools, techniques, and safety precautions needed for successful engraving.
About The Author

Mindy Vu is a part time shoe model and professional mum. She loves to cook and has been proclaimed the best cook in the world by her friends and family. She adores her pet dog Twinkie, and is happily married to her books.