
Last Updated on July 27, 2023
Kappa, a starchy tuber also known as tapioca or cassava, is a popular ingredient in certain cuisines around the world. Its versatility and unique texture make it a favorite among food enthusiasts. If you’re looking for a quick and efficient way to cook kappa, using a pressure cooker is the way to go. Not only does it save time, but it also helps to retain the nutrients and flavors of the kappa. In this article, we will guide you through the step-by-step process of cooking kappa in a pressure cooker, from preparing the kappa to seasoning it with spices and herbs. So, let’s get started and enjoy the delicious and nutritious kappa cooked perfectly in a pressure cooker.
Benefits of using a pressure cooker for cooking Kappa:
- Time-saving: Pressure cookers cook food faster than traditional cooking methods.
- Retains nutrients: The high-pressure environment helps to retain the nutrients in the Kappa.
- Tenderizes the Kappa: The pressure cooker breaks down the tough fibers of the Kappa, making it tender and easy to eat.
- Enhances flavors: The pressure cooker allows the flavors of the seasonings to penetrate the Kappa, resulting in a more flavorful dish.
- Energy-efficient: Pressure cookers use less energy compared to other cooking methods.
- Safe and convenient: Pressure cookers have safety features that prevent accidents, and they require less monitoring during cooking.
Step 1: Preparing the Kappa – peeling, washing, and cutting.
Before you can start cooking Kappa in a pressure cooker, you need to properly prepare it. Start by peeling the Kappa using a sharp knife or a peeler. Make sure to remove the outer skin completely to ensure a smooth texture. Once peeled, wash the Kappa thoroughly under running water to remove any dirt or impurities.
After washing, it’s time to cut the Kappa into small pieces. You can choose to cut it into cubes or slices, depending on your preference. Keep in mind that smaller pieces will cook faster in the pressure cooker.
By following these simple steps, you can ensure that your Kappa is ready to be cooked to perfection in the pressure cooker.
Step 2: Preparing the pressure cooker – adding water and seasoning.
Once you have prepared the Kappa, it’s time to get the pressure cooker ready. Start by adding enough water to cover the Kappa pieces. The amount of water may vary depending on the quantity of Kappa you are cooking, but a general rule of thumb is to add about 1-2 cups of water.
In addition to water, you can also add some seasoning to enhance the flavor of the Kappa. This can include salt, pepper, turmeric, or any other spices of your choice. The seasoning will infuse into the Kappa as it cooks, giving it a delicious taste.
By properly preparing the pressure cooker with water and seasoning, you can ensure that your Kappa is cooked to perfection with all the flavors locked in.
Step 2: Preparing the pressure cooker – adding water and seasoning
Once you have prepared the Kappa by peeling, washing, and cutting it into desired pieces, it is time to move on to the next step – preparing the pressure cooker. This step is crucial as it sets the foundation for the cooking process.
Firstly, ensure that your pressure cooker is clean and in good working condition. Check for any damages or leaks that may affect the cooking process. It is important to have a reliable pressure cooker to ensure the Kappa cooks evenly and thoroughly.
Next, add water to the pressure cooker. The amount of water needed may vary depending on the quantity of Kappa you are cooking. As a general rule, add enough water to cover the Kappa pieces. This will help create the steam necessary for the pressure cooker to work its magic.
Now, it’s time to season the water. This step is crucial as it adds flavor to the Kappa while it cooks. You can add salt, pepper, and any other desired seasonings to enhance the taste. Be mindful of the amount of seasoning you add, as it can affect the overall flavor of the dish.
Once you have added water and seasoning, give it a gentle stir to ensure the seasoning is evenly distributed. Now, your pressure cooker is ready for the next step – cooking the Kappa to perfection.
Step 3: Cooking the Kappa in the pressure cooker
Once you have prepared the Kappa and the pressure cooker, it’s time to start cooking. Follow these steps to ensure that your Kappa is cooked to perfection:
- Place the prepared Kappa into the pressure cooker.
- Add enough water to cover the Kappa. The amount of water will depend on the quantity of Kappa you are cooking.
- Close the lid of the pressure cooker tightly.
- Turn on the heat and set it to high.
- Wait for the pressure cooker to reach full pressure. This will be indicated by the release of steam and the whistling sound.
- Once the pressure cooker has reached full pressure, reduce the heat to low and start the timer.
- Cook the Kappa for about 10-15 minutes. The exact cooking time will depend on the size and freshness of the Kappa.
- After the cooking time is up, turn off the heat and let the pressure cooker cool down naturally.
Now that the Kappa is cooked, it’s time to move on to the next step – releasing the pressure and checking the doneness of the Kappa.
Step 4: Releasing the pressure and checking the doneness of the Kappa
Once the cooking time is complete, it is important to release the pressure from the pressure cooker before opening it. Here are the steps to safely release the pressure:
- Turn off the heat and allow the pressure cooker to cool down for a few minutes.
- Use the natural release method by letting the pressure cooker sit for about 10-15 minutes. This allows the pressure to gradually decrease on its own.
- If you’re in a hurry, you can use the quick release method. Carefully move the pressure release valve to the “venting” position to release the steam. Be cautious as the steam can be hot and may cause burns.
Once the pressure has been released, it’s time to check the doneness of the Kappa. Here’s how:
- Carefully open the pressure cooker lid, ensuring that any remaining steam is released away from your face.
- Insert a fork or a knife into a piece of Kappa to check its tenderness. It should be soft and easily pierced.
- If the Kappa is not fully cooked, you can continue cooking it for a few more minutes in the pressure cooker. Make sure to reseal the lid and bring the pressure back up before cooking further.
By following these steps, you can ensure that your Kappa is cooked to perfection in a pressure cooker.
Step 5: Seasoning the cooked Kappa with spices and herbs
Once the Kappa is cooked to perfection in the pressure cooker, it’s time to add some flavor and enhance its taste. Seasoning the cooked Kappa with spices and herbs will take it to a whole new level of deliciousness.
You can start by heating a small amount of oil in a pan over medium heat. Add some mustard seeds and let them splutter. Then, add some curry leaves, chopped onions, and green chilies. Sauté them until the onions turn translucent.
Next, add some turmeric powder, red chili powder, and salt to taste. Mix well and let the spices cook for a minute. Then, add the cooked Kappa to the pan and gently mix it with the spices. Make sure the Kappa is well coated with the flavorful mixture.
Finally, sprinkle some freshly chopped coriander leaves on top for a burst of freshness. You can also squeeze some lemon juice for a tangy twist. Serve the seasoned Kappa hot and enjoy the explosion of flavors in every bite.
Tips for enhancing the flavor and texture of the cooked Kappa
While cooking Kappa in a pressure cooker is a convenient and efficient method, there are a few tips you can follow to enhance its flavor and texture.
1. Soak the Kappa
Before cooking, it is recommended to soak the Kappa in water for at least 30 minutes. This helps to soften the Kappa and reduce the cooking time in the pressure cooker.
2. Add spices and herbs
To infuse the Kappa with delicious flavors, add spices and herbs to the pressure cooker along with water. Common options include turmeric, cumin, coriander, and curry leaves. These aromatic ingredients will give the Kappa a delightful taste.
3. Use coconut milk
For a creamy and rich texture, substitute some of the water with coconut milk. This will add a subtle sweetness to the Kappa and make it more indulgent.
4. Sauté the Kappa
After cooking the Kappa in the pressure cooker, you can further enhance its taste by sautéing it in a pan with some oil or ghee. This will give it a crispy exterior and a delicious golden color.
By following these tips, you can take your Kappa to the next level and impress your family and friends with your culinary skills. Enjoy!
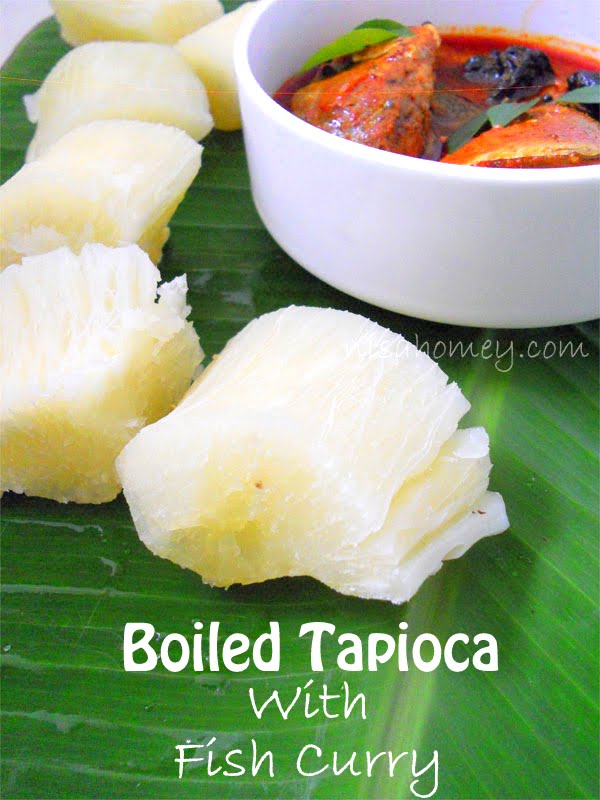
Serving suggestions and popular accompaniments for Kappa
Now that you have successfully cooked the Kappa in a pressure cooker, it’s time to think about how to serve it and what to pair it with. Kappa is a versatile ingredient that can be enjoyed in various ways, depending on your personal preferences and the cuisine you are preparing.
One popular way to serve Kappa is as a side dish with a main course. It pairs well with a wide range of dishes, such as grilled meats, roasted vegetables, or even curries. The mild flavor and soft texture of the Kappa complement the bold flavors of these dishes, creating a well-balanced meal.
Another option is to use Kappa as a base for a hearty and filling meal. You can add cooked Kappa to soups or stews to add thickness and substance. It can also be mashed and formed into patties or cutlets, which can be pan-fried or baked for a delicious and satisfying vegetarian meal.
If you prefer a lighter option, you can serve Kappa as a salad or a cold side dish. Simply toss cooked Kappa with fresh vegetables, herbs, and a tangy dressing for a refreshing and nutritious salad. It can also be mixed with yogurt or mayonnaise to create a creamy and flavorful coleslaw.
Experiment with different serving suggestions and accompaniments to discover your favorite way to enjoy Kappa. Whether you choose to serve it as a side dish, a main course, or a salad, the versatility of Kappa will surely impress your taste buds.
Experience the Perfectly Cooked Kappa with a Pressure Cooker
After following the step-by-step guide on how to cook Kappa in a pressure cooker, you can now enjoy the delicious and nutritious dish that is loved in certain cuisines. The benefits of using a pressure cooker for cooking Kappa are numerous. Not only does it save time, but it also helps retain the nutrients and flavors of the root vegetable.
By peeling, washing, and cutting the Kappa before placing it in the pressure cooker, you ensure that it cooks evenly and thoroughly. Adding water and seasoning to the pressure cooker enhances the taste of the Kappa, infusing it with aromatic flavors.
Once the Kappa is cooked, releasing the pressure and checking its doneness is crucial. This ensures that it is perfectly cooked and ready to be seasoned with spices and herbs. These additional seasonings enhance the flavor and texture of the Kappa, making it even more enjoyable.
Now that you have mastered the art of cooking Kappa in a pressure cooker, you can explore various serving suggestions and popular accompaniments to elevate your culinary experience. So go ahead, savor the taste of the perfectly cooked Kappa and impress your friends and family with your newfound cooking skills.
Learn how to cook Kappa in a pressure cooker for a delicious and nutritious meal. Perfect for high school students.
About The Author

Pat Rowse is a thinker. He loves delving into Twitter to find the latest scholarly debates and then analyzing them from every possible perspective. He's an introvert who really enjoys spending time alone reading about history and influential people. Pat also has a deep love of the internet and all things digital; she considers himself an amateur internet maven. When he's not buried in a book or online, he can be found hardcore analyzing anything and everything that comes his way.