
Last Updated on July 26, 2023
Short Answer
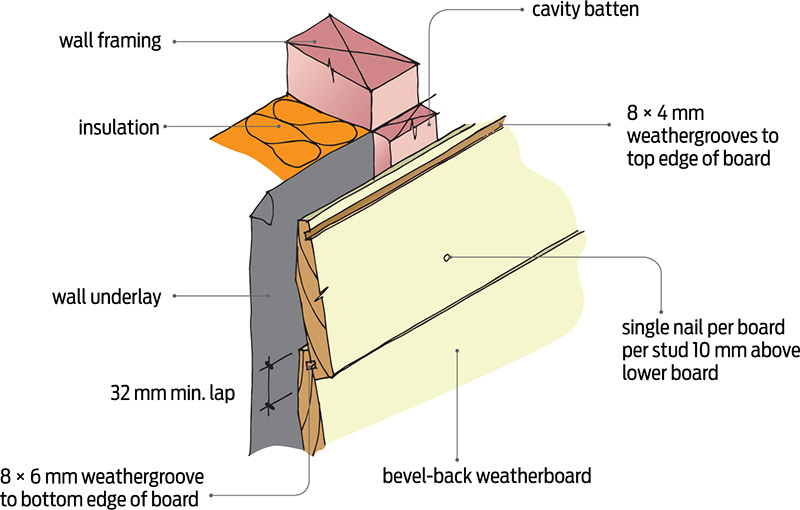
Installing bevel back weatherboards requires careful planning and attention to detail. Begin by measuring and marking the desired height and width of the weatherboards on the wall. Next, cut the weatherboards to size using a saw, ensuring they are beveled on one edge. Apply a weatherproofing membrane to the wall, then attach the weatherboards using nails or screws. Make sure to leave a small gap between each board for expansion. Finally, paint or stain the weatherboards to protect them from the elements. With the right tools and techniques, anyone can successfully install bevel back weatherboards.
Bevel Back Weatherboards are a popular choice for homeowners looking to enhance the exterior of their homes. These weatherboards not only provide protection against the elements but also add a touch of elegance to any property. In this article, we will guide you through the process of installing Bevel Back Weatherboards, step by step. From preparing the surface to applying the primer and paint, nailing and securing the weatherboards, to finishing touches and maintenance tips, we will cover it all. By following these instructions, you will be able to achieve a professional and seamless finish with Bevel Back Weatherboards.
Tools and materials needed for installing Bevel Back Weatherboards:
- Hammer
- Nails
- Tape measure
- Pencil
- Circular saw
- Paintbrush
- Primer
- Paint
- Weatherboards
- Level
- Chalk line
- Safety goggles
- Gloves
Step 1: Preparing the surface for installation
Before installing Bevel Back Weatherboards, it is crucial to properly prepare the surface. This step ensures a smooth and long-lasting installation. Start by cleaning the surface thoroughly to remove any dirt, debris, or loose paint. Use a power washer or a stiff brush to scrub the surface. Next, inspect the surface for any signs of damage or rot. Replace any damaged or rotten boards to ensure a solid foundation for the weatherboards. Additionally, it is important to check for any protrusions or uneven areas on the surface. Sand down any rough spots and fill in any gaps or holes with a suitable filler. Finally, apply a coat of primer to the surface to enhance adhesion and protect against moisture. Allow the primer to dry completely before proceeding to the next step.
Step 1: Preparing the surface for installation
Properly preparing the surface is a crucial step in installing Bevel Back Weatherboards. This ensures a smooth and long-lasting installation. Start by thoroughly cleaning the surface to remove dirt, debris, and loose paint. Use a power washer or a stiff brush to scrub the surface. Inspect the surface for any signs of damage or rot and replace any damaged boards. It is also important to check for protrusions or uneven areas and sand them down. Fill in any gaps or holes with a suitable filler. Applying a coat of primer is essential to enhance adhesion and protect against moisture. Allow the primer to dry completely before moving on to the next step. By taking the time to properly prepare the surface, you will create a solid foundation for the Bevel Back Weatherboards and ensure a professional and seamless finish.
Step 2: Measuring and cutting the Bevel Back Weatherboards
Once you have prepared the surface for installation, the next step in installing Bevel Back Weatherboards is to measure and cut the boards to the appropriate size. This is a crucial step to ensure a precise and seamless finish.
First, measure the length of the area where you will be installing the weatherboards. Use a tape measure to accurately determine the length, and make note of the measurement.
Next, transfer the measurement onto the Bevel Back Weatherboards. Use a pencil or marker to mark the length on the boards.
Now, it’s time to cut the boards. Use a circular saw or a handsaw to carefully cut along the marked lines. Take your time and make sure to follow the lines accurately for a clean cut.
Remember to wear appropriate safety gear, such as goggles and gloves, when cutting the boards.
Once the boards are cut to the correct size, you are ready to move on to the next step of the installation process.
Step 3: Applying the primer and paint to the weatherboards
- Before installing the Bevel Back Weatherboards, it is important to apply a primer and paint to protect the wood and enhance its appearance.
- Here are the steps to follow:
Step 3.1: Prepare the weatherboards
- Ensure that the weatherboards are clean and free from any dust or debris.
- Use sandpaper to smooth out any rough edges or imperfections.
Step 3.2: Apply the primer
- Choose a high-quality primer that is suitable for exterior wood surfaces.
- Using a paintbrush or roller, apply an even coat of primer to the weatherboards.
- Allow the primer to dry completely before moving on to the next step.
Step 3.3: Paint the weatherboards
- Select a paint color that complements the overall design of your home.
- Apply the paint using a brush or roller, making sure to cover the entire surface of the weatherboards.
- Allow the paint to dry completely before installing the weatherboards.
By applying a primer and paint to the Bevel Back Weatherboards, you not only protect them from the elements but also enhance their visual appeal. This step is crucial in achieving a professional and seamless finish for your installation.
Step 4: Installing the first row of Bevel Back Weatherboards
Once you have prepared the surface and cut the Bevel Back Weatherboards to the correct size, it’s time to start installing them. Follow these steps to ensure a successful installation:
- Start at the bottom of the wall and work your way up. This will prevent water from seeping behind the weatherboards.
- Apply a generous amount of adhesive to the back of the first weatherboard. This will help secure it in place.
- Hold the weatherboard at a slight angle and align it with the bottom edge of the wall. Make sure it is level using a spirit level.
- Once the weatherboard is in position, use a nail gun or hammer and nails to secure it to the wall. Place the nails at regular intervals along the length of the weatherboard.
- Repeat this process for the rest of the weatherboards in the first row, making sure to leave a small gap between each board for expansion.
- Check that each weatherboard is level and secure before moving on to the next row.
By following these steps, you will be able to install the first row of Bevel Back Weatherboards with ease. Remember to take your time and double-check your measurements to ensure a professional and seamless finish.
Step 5: Nailing and securing the weatherboards in place
Once you have installed the first row of Bevel Back Weatherboards, it is time to secure them in place. This step is crucial to ensure the durability and stability of your weatherboard installation.
Start by using a nail gun or hammer and nails to attach the weatherboards to the wall. It is important to use galvanized nails or stainless steel nails to prevent rusting and corrosion over time.
Place the nails approximately 200-300mm apart along the length of each weatherboard. Make sure to drive the nails in at a slight angle to ensure a secure hold.
As you nail each weatherboard, use a spirit level to ensure they are straight and level. This will help you achieve a professional and seamless finish.
Continue nailing and securing the weatherboards row by row until you have completed the installation. Take your time and double-check each board to ensure they are securely fastened.
Once all the weatherboards are in place, give them a final inspection to make sure they are aligned and secure. Make any necessary adjustments before moving on to the next step.
Step 6: Installing the subsequent rows of Bevel Back Weatherboards
Once the first row of Bevel Back Weatherboards is securely in place, it’s time to move on to installing the subsequent rows. This step is crucial in achieving a professional and seamless finish for your weatherboard installation.
Before starting, make sure you have all the necessary tools and materials at hand. Begin by measuring the length of the area where the next row of weatherboards will be installed. Use a pencil to mark the measurements on the weatherboards, ensuring accuracy.
Next, apply a generous amount of adhesive to the back of each weatherboard, focusing on the top and bottom edges. This will help secure the weatherboards in place and prevent any movement or warping over time.
Align the weatherboards with the previous row, making sure they are level and straight. Use a spirit level to ensure accuracy. Once aligned, firmly press the weatherboards against the surface, ensuring a tight fit.
Continue this process for each subsequent row, taking care to maintain consistent spacing between the weatherboards. Use nails or screws to secure the weatherboards in place, ensuring they are flush with the surface.
Remember to periodically check the alignment and levelness of the weatherboards as you progress. This will help you achieve a professional and seamless finish.
Step 7: Finishing touches and maintenance tips for Bevel Back Weatherboards
Once you have installed the Bevel Back Weatherboards, it’s important to pay attention to the finishing touches and maintenance to ensure a long-lasting and professional finish. Here are some tips to help you:
1. Seal the edges: Use a high-quality sealant to seal the edges of the weatherboards. This will prevent moisture from seeping in and causing damage.
2. Paint touch-ups: Inspect the weatherboards regularly and touch up any areas where the paint has chipped or faded. This will keep your weatherboards looking fresh and protect them from the elements.
Clean regularly: Use a soft brush or cloth to remove any dirt or debris from the weatherboards. Avoid using harsh chemicals or abrasive materials that can damage the paint or surface.
4. Check for rot or damage: Periodically inspect the weatherboards for any signs of rot or damage. If you notice any issues, it’s important to address them promptly to prevent further damage.
5. Maintain the surrounding area: Keep the area around the weatherboards clean and free from vegetation. This will prevent moisture buildup and reduce the risk of damage.
By following these maintenance tips, you can ensure that your Bevel Back Weatherboards remain in excellent condition and continue to enhance the aesthetic appeal of your home.
Master the Art of Installing Bevel Back Weatherboards
By following the step-by-step guide outlined in this article, you can achieve a professional and seamless finish with Bevel Back Weatherboards. These popular weatherboards not only enhance the aesthetic appeal of your home but also provide protection against the elements.
From preparing the surface to applying the primer and paint, each step is crucial in ensuring a successful installation. By measuring and cutting the weatherboards accurately, you can achieve a precise fit that adds to the overall charm of your home.
Securing the weatherboards in place with nails and installing subsequent rows with precision will result in a durable and long-lasting finish. Don’t forget the finishing touches and maintenance tips to keep your Bevel Back Weatherboards looking their best for years to come.
So, whether you’re a seasoned DIY enthusiast or a beginner, with the right tools and materials, you can confidently install Bevel Back Weatherboards and transform the exterior of your home.
Frequently Asked Questions
What are Bevel Back Weatherboards and why are they popular?
Bevel Back Weatherboards are a type of exterior cladding that are popular due to their durability, versatility, and aesthetic appeal. They are designed to provide protection against the elements while adding a stylish and timeless look to any building.
What tools and materials do I need for installing Bevel Back Weatherboards?
To install Bevel Back Weatherboards, you will need a range of tools and materials including a measuring tape, circular saw, hammer, nails, primer, paint, paintbrushes, and a level. It is also recommended to have safety equipment such as gloves and safety glasses.
How do I prepare the surface for installation?
Before installing Bevel Back Weatherboards, it is important to ensure that the surface is clean, dry, and free from any debris. This can be achieved by removing any existing cladding, repairing any damaged areas, and applying a suitable primer to create a smooth and even surface for the weatherboards to adhere to.
How do I measure and cut the Bevel Back Weatherboards?
To measure and cut the Bevel Back Weatherboards, start by measuring the length of the area you wish to cover. Mark the measurements on the weatherboards and use a circular saw to make precise cuts. It is important to double-check your measurements and ensure that the weatherboards are cut at the correct angles for a seamless fit.
How do I apply the primer and paint to the weatherboards?
Before installing the Bevel Back Weatherboards, it is recommended to apply a primer to the surface of the weatherboards. This will help to protect the wood and ensure that the paint adheres properly. Once the primer is dry, you can apply the desired paint color using a paintbrush, ensuring even coverage and allowing sufficient drying time between coats.
How do I install the first row of Bevel Back Weatherboards?
To install the first row of Bevel Back Weatherboards, start by aligning the first board with the bottom edge of the wall and ensuring it is level. Secure the board in place using nails, making sure to leave a small gap between each board for expansion. Repeat this process for the entire length of the wall, ensuring each board is securely fastened.
How do I nail and secure the weatherboards in place?
To nail and secure the Bevel Back Weatherboards in place, use a hammer to drive nails through the boards and into the wall studs. It is important to space the nails evenly and ensure they are driven in at a slight angle to prevent splitting. Additionally, be mindful of the recommended nailing pattern and spacing provided by the manufacturer.
How do I install the subsequent rows of Bevel Back Weatherboards?
To install the subsequent rows of Bevel Back Weatherboards, overlap each board with the one below it, ensuring a tight fit. Secure the boards in place using nails, following the same nailing pattern and spacing as the first row. Repeat this process for each row until the desired height is achieved.
What are some finishing touches and maintenance tips for Bevel Back Weatherboards?
To achieve a professional and seamless finish with Bevel Back Weatherboards, it is important to fill any gaps or cracks with appropriate filler. Sand the surface to ensure smoothness, and apply additional coats of paint if desired. Regular maintenance includes cleaning the weatherboards and inspecting for any signs of damage or wear.
About The Author

Fernánda Esteban is a food fanatic. She can't go more than a few hours without eating, and she loves trying new foods from all over the world. Her friends know that they can always count on her for a good conversation, and she's an animal lover who will never turn down an opportunity to pet a dog or cat. Fernánda also enjoys learning about random facts, and she's a social media practitioner who loves to share what she knows with others.