
Last Updated on July 27, 2023
Welcome to our guide on how to wax a wooden skimboard! Whether you’re a seasoned skimboarder or just starting out, waxing your board is an essential step to ensure optimal performance on the water. In this article, we will take you through the step-by-step process of waxing your wooden skimboard, from gathering the necessary materials to maintaining the waxed board. So, let’s dive in and get started!
Gather the necessary materials
Before you begin waxing your wooden skimboard, it’s important to gather all the necessary materials. Here’s what you’ll need:
- A wooden skimboard
- Wax specifically designed for skimboards
- A wax comb
- A clean cloth or rag
- A hairdryer (optional)
Having all these materials ready will ensure a smooth and efficient waxing process.
Prepare the skimboard
Before applying the wax, it’s crucial to prepare the skimboard properly. Follow these steps:
- Clean the skimboard thoroughly using a mild soap and water solution.
- Remove any existing wax residue using a wax comb.
- Dry the skimboard completely to ensure proper adhesion of the new wax.
Preparing the skimboard will help the wax adhere better and provide a more even application.
Prepare the skimboard
Before applying wax to your wooden skimboard, it is important to properly prepare the surface. Start by cleaning the board with a mild soap and water solution to remove any dirt or debris. Use a soft cloth or sponge to gently scrub the surface, making sure to get into all the nooks and crannies. Rinse the board thoroughly and allow it to dry completely before moving on to the next step.
Next, inspect the skimboard for any damage or imperfections. Look for any cracks, dents, or splinters that may need to be repaired before waxing. If you notice any issues, use sandpaper to smooth out the surface and fill in any gaps with wood filler. Once the repairs are complete, sand the entire board to create a smooth and even surface for the wax to adhere to.
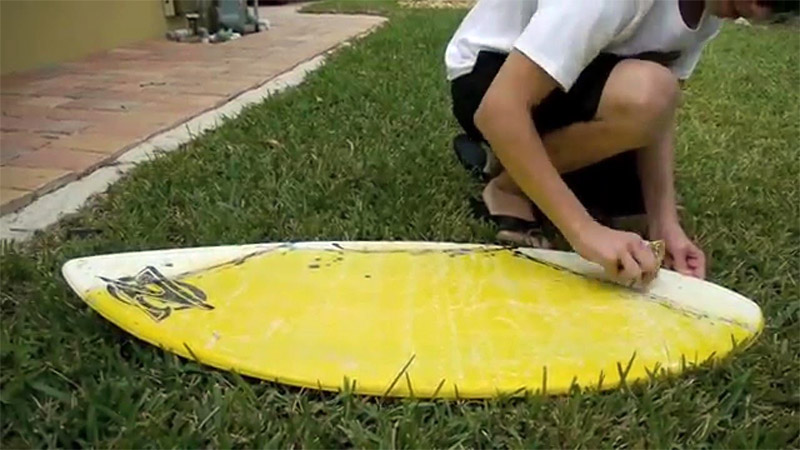
Applying the Wax
Once you have prepared your skimboard, it’s time to apply the wax. Waxing your skimboard is essential for providing grip and traction while riding the waves. Here’s how you can do it:
-
Choose the right wax
There are different types of wax available for skimboards, so make sure to choose one that is suitable for your board and the water conditions you’ll be riding in. Some waxes are designed for warm water, while others are better for cold water.
-
Start with a clean board
Before applying the wax, make sure your skimboard is clean and free from any dirt or debris. Use a mild soap and water to wash the board and let it dry completely.
-
Apply the base coat
Start by applying a thin layer of wax to the entire surface of the board. Use long, even strokes to spread the wax evenly. This base coat will help the additional layers of wax adhere better to the board.
-
Add additional layers
Once the base coat is dry, you can start adding additional layers of wax. Apply the wax in a circular motion, using firm pressure. Make sure to cover the entire surface of the board.
By following these steps, you can ensure that your skimboard is properly waxed and ready for your next adventure on the waves.
5. Spread the wax evenly
Once you have applied the wax to the skimboard, it is important to spread it evenly to ensure a smooth and consistent surface. Here are some steps to follow:
- Use a wax comb or a credit card to evenly distribute the wax across the surface of the skimboard.
- Start at one end of the board and work your way towards the other end, using long, sweeping motions.
- Apply gentle pressure to the comb or card to help the wax melt into the wood.
- Make sure to cover the entire surface of the skimboard, including the edges.
- Pay extra attention to areas that are prone to wear, such as the tail and the nose of the board.
- Continue spreading the wax until you have achieved a thin, even layer.
Remember, the goal is to create a surface that provides enough grip for your feet without being too sticky. If the wax feels too thick or clumpy, you can use the comb or card to smooth it out.
6. Let the wax dry
After applying the wax to your wooden skimboard, it is important to let it dry completely before using it. This will ensure that the wax adheres properly to the surface of the board and provides the necessary grip.
- Find a clean and dry area where you can leave the skimboard to dry. It should be a place where it won’t be disturbed or exposed to moisture.
- Allow the wax to dry for at least 24 hours. This will give it enough time to harden and bond with the wood.
- Avoid touching or moving the skimboard while the wax is drying. Any disturbance can affect the quality of the wax job.
- Check the wax periodically to see if it has fully dried. You can do this by gently touching the surface. If it feels tacky or sticky, it means the wax is not dry yet.
- Once the wax is completely dry, it should have a slightly rough texture. This is what provides the necessary grip for your feet.
Remember, patience is key when it comes to letting the wax dry. Rushing the process can result in a poor wax job and less effective grip on your skimboard.
Buff the wax
After allowing the wax to dry completely, it is important to buff the wax to achieve a smooth and polished finish on your wooden skimboard. Buffing the wax helps to remove any excess wax and further enhances the grip on the board. To buff the wax, you will need a clean cloth or a wax comb.
Start by gently rubbing the cloth or wax comb in circular motions over the waxed surface. Apply moderate pressure to ensure that you are effectively removing any excess wax. Continue buffing until the wax feels smooth and the surface of the skimboard appears glossy.
Buffing the wax not only improves the performance of your skimboard but also helps to prolong the lifespan of the wax. By removing any excess wax, you prevent it from building up and becoming sticky over time. This will ensure that your skimboard maintains its grip and allows for smooth gliding on the water.
Test the waxed skimboard
Once you have applied and buffed the wax onto your wooden skimboard, it’s time to put it to the test. Testing the waxed skimboard will help you determine if the wax has been applied correctly and if it provides the desired level of grip.
To test the wax, head to a nearby beach or any body of water where you can skimboard. Start by taking a few practice runs on the sand to warm up. Then, carefully step onto your waxed skimboard and glide across the water’s surface.
Pay attention to how the board feels under your feet. Does it provide enough traction? Is it easy to control? If the wax has been applied correctly, you should feel a noticeable improvement in grip and stability compared to a non-waxed board.
Take some time to experiment with different speeds and angles to fully test the waxed skimboard’s performance. If you are satisfied with the results, congratulations! You have successfully waxed your wooden skimboard and can now enjoy improved performance on the water.
Maintain the waxed skimboard
Once you have successfully waxed your wooden skimboard, it is important to maintain it properly to ensure its longevity and optimal performance. Here are some tips on how to maintain your waxed skimboard:
1. Clean the board regularly
After each use, make sure to rinse your skimboard with fresh water to remove any salt or sand residue. Use a soft cloth or sponge to gently wipe the board clean. Avoid using harsh chemicals or abrasive materials that could damage the wax or the board’s surface.
2. Reapply wax as needed
Over time, the wax on your skimboard will wear off due to use and exposure to the elements. To maintain a good grip, regularly check the wax and reapply it as needed. Use a wax comb to remove any old wax before applying a fresh coat.
3. Store the board properly
When not in use, store your waxed skimboard in a cool, dry place away from direct sunlight. Avoid leaving it in extreme temperatures or humid environments, as this can cause the wax to melt or deteriorate.
By following these maintenance tips, you can ensure that your waxed wooden skimboard remains in great condition and provides you with many enjoyable rides for years to come.
Wrapping it up: The Perfectly Waxed Skimboard
After following the step-by-step guide on how to wax a wooden skimboard, you are now equipped with the knowledge to keep your skimboard in top-notch condition. By gathering the necessary materials, preparing the skimboard, applying the wax, spreading it evenly, letting it dry, buffing it, and finally testing it, you have ensured that your skimboard is ready to hit the waves.
Remember, maintaining your waxed skimboard is crucial for its longevity and performance. Regularly check for any signs of wear and tear, and reapply wax as needed. By doing so, you can continue to enjoy the thrill of gliding effortlessly across the water.
So, whether you’re a seasoned skimboarder or just starting out, mastering the art of waxing your wooden skimboard is an essential skill. With a well-waxed board, you can confidently take on any wave and experience the exhilaration that comes with it. So grab your skimboard, head to the beach, and let the adventures begin!
Learn how to wax a wooden skimboard with this step-by-step guide. Keep your board in top shape for optimal performance.
About The Author

Zeph Grant is a music fanatic. He loves all types of genres and can often be found discussing the latest album releases with friends. Zeph is also a hardcore content creator, always working on new projects in his spare time. He's an amateur food nerd, and loves knowing all sorts of random facts about food. When it comes to coffee, he's something of an expert - he knows all the best places to get a good cup of joe in town.