
Last Updated on July 27, 2023
Properly adjusted headlights are essential for safe driving, as they ensure optimal visibility on the road. Understanding the importance of headlight adjustment screws is crucial for maintaining the functionality of your headlights. These screws play a vital role in adjusting the angle and direction of the headlights, allowing you to customize the lighting to your specific needs.
Locating the headlight adjustment screws can be a perplexing task, as different car models have varying placements. In this article, we will provide a step-by-step guide to finding these screws in popular car brands, making the process easier for you.
Additionally, we will offer tips for adjusting the headlights correctly and highlight common mistakes to avoid. Properly adjusted headlights not only enhance your visibility but also contribute to the safety of other drivers on the road.
Regular headlight maintenance is of utmost importance to ensure their longevity and functionality. We will discuss the benefits of properly adjusted headlights and the significance of routine maintenance.
Lastly, we will troubleshoot common issues that may arise with headlight adjustment screws, helping you overcome any challenges you may encounter. By the end of this article, you will have a comprehensive understanding of headlight adjustment and be able to ensure your headlights are properly adjusted for optimal visibility and safety.
The Purpose of Headlight Adjustment Screws
Headlight adjustment screws play a crucial role in ensuring that your headlights are properly aligned and provide optimal visibility while driving. These screws allow you to adjust the angle and direction of your headlights, ensuring that they are aimed correctly and not causing any glare for other drivers on the road.
Locating the Headlight Adjustment Screws in Different Car Models
- Each car model may have a different location for the headlight adjustment screws.
- Some cars have the screws located on the top or side of the headlight assembly.
- In other models, the screws may be hidden behind the front grille or inside the engine compartment.
- Consult your car’s manual or do a quick online search to find the specific location of the adjustment screws for your car model.
Step-by-Step Guide to Finding the Headlight Adjustment Screws in Popular Car Brands
- Toyota: The adjustment screws are usually located on the top or side of the headlight assembly.
- Honda: Look for the screws behind the front grille or inside the engine compartment.
- Ford: The adjustment screws can be found on the top or side of the headlight assembly.
- Chevrolet: Check for the screws on the top or side of the headlight assembly.
Tips for Adjusting the Headlights Correctly
- Always adjust your headlights in a well-lit area.
- Use a wall or garage door as a reference point to ensure proper alignment.
- Make small adjustments and test the headlights after each adjustment.
- Ensure that both headlights are adjusted to the same height and angle.
Common Mistakes to Avoid When Adjusting Headlights
- Avoid over-tightening the adjustment screws, as this can cause damage to the headlight assembly.
- Do not adjust the headlights while the engine is running, as it can lead to electrical shock.
- Do not rely solely on the adjustment screws to fix issues with your headlights. If you notice any major problems, consult a professional mechanic.
The Benefits of Properly
Locating the headlight adjustment screws in different car models
When it comes to adjusting your headlights, one of the first things you need to know is where to find the headlight adjustment screws in your specific car model. While the location may vary depending on the make and model of your vehicle, there are some general guidelines that can help you locate these screws.
In most cars, the headlight adjustment screws can be found behind the headlight assembly. To access them, you may need to open the hood of your car and look for a small panel or cover near the headlight. Once you remove this panel, you should be able to see the adjustment screws.
However, it’s important to note that not all cars have the same design. Some car models may have the adjustment screws located on the top or bottom of the headlight assembly, while others may have them on the side. It’s always a good idea to consult your car’s owner’s manual for specific instructions on locating the adjustment screws.
Step-by-step guide to finding the headlight adjustment screws in popular car brands
Adjusting the headlights of your car is crucial for optimal visibility and safety on the road. However, locating the headlight adjustment screws can be a daunting task, especially if you are not familiar with your car’s make and model. To help you out, here is a step-by-step guide to finding the headlight adjustment screws in popular car brands:
Ford:
In most Ford models, the headlight adjustment screws are located on the top and side of the headlight assembly. Look for two screws, one on top and one on the side, and use a screwdriver to adjust the headlights up or down and left or right.
Toyota:
For Toyota vehicles, the headlight adjustment screws are usually located on the back of the headlight assembly. You may need to remove a plastic cover to access them. Once you find the screws, use a screwdriver to adjust the headlights as needed.
Chevrolet:
In Chevrolet cars, the headlight adjustment screws are typically located on the top or side of the headlight assembly. Look for two screws and use a screwdriver to adjust the headlights up or down and left or right.
Honda:
Honda models usually have headlight adjustment screws located on the top or side of the headlight assembly. Look for two screws and use a screwdriver to adjust the headlights as required.
Remember, it is important to consult your car’s manual for specific instructions on adjusting the headlights. Additionally, make sure to park your car on a level surface and aim the headlights at a wall or garage door to properly align them. By following these steps, you can ensure that your headlights are properly adjusted for optimal visibility and safety on the road.
Tips for adjusting the headlights correctly
- Before adjusting the headlights, make sure your vehicle is parked on a level surface and the tires are properly inflated.
- Refer to your vehicle’s owner’s manual to determine the correct method for adjusting the headlights.
- Use a tape measure to measure the distance between the ground and the center of each headlight. This will help you ensure that the headlights are properly aligned.
- Adjust the vertical aim of the headlights first. This can usually be done by turning the adjustment screws located on the top or side of the headlight housing.
- To adjust the horizontal aim of the headlights, locate the adjustment screws on the back of the headlight housing. Turning these screws will move the headlights left or right.
- Make small adjustments and test the headlights after each adjustment to ensure they are properly aligned.
- Check the alignment of the headlights at night to ensure they are providing optimal visibility without blinding oncoming drivers.
- If you are unsure about how to adjust the headlights correctly, it is recommended to consult a professional mechanic.
Common Mistakes to Avoid When Adjusting Headlights
Adjusting headlights can be a simple task, but it’s important to avoid common mistakes that can lead to improper alignment and reduced visibility. Here are some mistakes to avoid when adjusting your headlights:
- Not checking the owner’s manual: Each car model may have different headlight adjustment screw locations and procedures. It’s crucial to consult the owner’s manual to find the correct information for your specific vehicle.
- Using incorrect tools: Using the wrong tools can damage the adjustment screws or other components. Always use the recommended tools, such as a screwdriver or socket wrench, to avoid any mishaps.
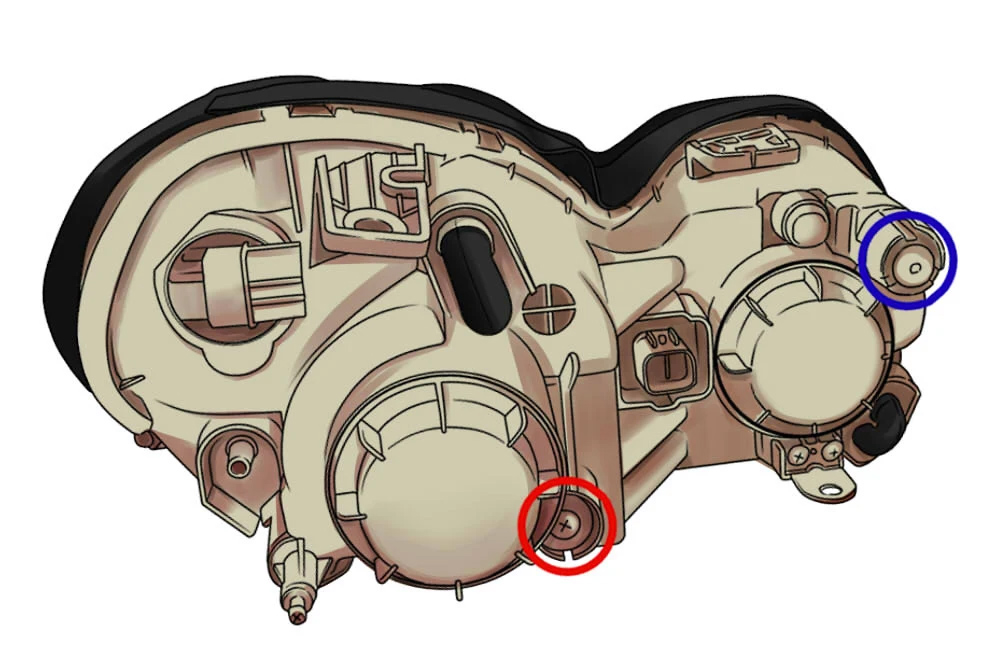
- Adjusting the wrong screws: Some cars have multiple screws that may look similar. Adjusting the wrong screws can lead to misalignment and poor visibility. Make sure to identify the correct adjustment screws before making any changes.
- Over-tightening or under-tightening: It’s important to find the right balance when adjusting the screws. Over-tightening can cause damage, while under-tightening can result in loose headlights. Follow the manufacturer’s guidelines for proper adjustment.
- Not testing the headlights after adjustment: After making adjustments, always test the headlights to ensure they are properly aligned. This will help you identify any further adjustments that may be needed.
By avoiding these common mistakes, you can ensure that your headlights are properly adjusted for optimal visibility and safety on the road.
The Benefits of Properly Adjusted Headlights
Properly adjusted headlights offer a range of benefits that contribute to both driver safety and overall road safety. When headlights are correctly aligned, they provide optimal visibility, allowing drivers to see the road ahead clearly. This is especially important during nighttime driving or in adverse weather conditions, when visibility is reduced.
Additionally, properly adjusted headlights help to prevent glare for oncoming drivers. When headlights are misaligned, they can shine directly into the eyes of other drivers, causing temporary blindness and increasing the risk of accidents. By ensuring that headlights are properly adjusted, drivers can minimize the risk of blinding other motorists and promote safer driving conditions for everyone on the road.
Furthermore, properly adjusted headlights improve the overall aesthetics of a vehicle. Misaligned headlights can give a vehicle a sloppy or unkempt appearance, while properly aligned headlights enhance the overall look and appeal of the car.
In conclusion, the benefits of properly adjusted headlights cannot be overstated. From improved visibility and reduced glare to enhanced vehicle aesthetics, ensuring that headlights are correctly aligned is essential for optimal safety and driving experience.
The Importance of Regular Headlight Maintenance
Regular headlight maintenance is crucial for ensuring optimal visibility and safety while driving. Headlights that are not properly maintained can lead to reduced visibility, which can increase the risk of accidents, especially during nighttime or in adverse weather conditions.
One important aspect of headlight maintenance is adjusting the headlights correctly. As discussed in previous sections, headlight adjustment screws play a vital role in aligning the headlights properly. These screws allow drivers to adjust the angle and direction of the headlights, ensuring that the light is focused on the road ahead and not blinding oncoming drivers.
However, it is not enough to simply adjust the headlights once and forget about them. Regular maintenance is necessary to ensure that the headlights remain properly aligned over time. This includes checking the headlight adjustment screws periodically and making any necessary adjustments.
In addition to adjusting the headlights, regular maintenance also involves cleaning the headlights to remove dirt, grime, and foggy residue that can accumulate over time. This can significantly improve the brightness and effectiveness of the headlights.
By prioritizing regular headlight maintenance, drivers can enhance their visibility on the road, reduce the risk of accidents, and ensure a safer driving experience for themselves and others.
Troubleshooting common issues with headlight adjustment screws
Headlight adjustment screws are an essential component of a car’s lighting system. They allow drivers to adjust the angle and direction of their headlights, ensuring optimal visibility on the road. However, like any other mechanical part, these adjustment screws can sometimes encounter issues that need troubleshooting.
One common issue is when the adjustment screws become loose or stripped. This can result in the headlights being misaligned or not staying in the desired position. To fix this problem, it is important to tighten the screws or replace them if necessary.
Another issue that drivers may face is difficulty in locating the adjustment screws. Different car models have different designs, and the screws may be located in various places. It is recommended to consult the car’s manual or seek professional assistance to find the exact location of the adjustment screws.
Additionally, some drivers may experience problems with the adjustment mechanism itself. This can include issues such as the screws not turning smoothly or getting stuck. In such cases, it is advisable to lubricate the screws or seek professional help to repair or replace the mechanism.
By troubleshooting these common issues with headlight adjustment screws, drivers can ensure that their headlights are properly aligned and functioning optimally for enhanced visibility and safety on the road.
Ensuring Optimal Visibility and Safety: The Importance of Properly Adjusted Headlights
Properly adjusted headlights are crucial for ensuring optimal visibility and safety on the road. Headlight adjustment screws play a vital role in achieving this. These screws allow drivers to adjust the angle and direction of their headlights, ensuring that the light is properly focused and illuminates the road ahead.
Locating the headlight adjustment screws can vary depending on the make and model of your car. However, a step-by-step guide can help you find them in popular car brands. It is important to adjust your headlights correctly to avoid common mistakes that can negatively impact visibility and safety.
Regular headlight maintenance is essential to keep your headlights in top condition. Troubleshooting common issues with headlight adjustment screws can help you identify and fix any problems that may arise.
Ultimately, ensuring that your headlights are properly adjusted is crucial for your safety and the safety of others on the road. By following the tips and guidelines provided, you can maintain optimal visibility and enhance your driving experience.
Learn how to locate and adjust the headlight adjustment screws in different car models for optimal visibility and safety.
About The Author

Alison Sowle is the typical tv guru. With a social media evangelist background, she knows how to get her message out there. However, she's also an introvert at heart and loves nothing more than writing for hours on end. She's a passionate creator who takes great joy in learning about new cultures - especially when it comes to beer!