
Last Updated on July 27, 2023
Welcome to our guide on how to disable AutoRCM on an iPatch Switch. In this article, we will explore what AutoRCM is and why you might want to disable it. We will also discuss the risks and benefits associated with disabling AutoRCM.
To begin, we will provide a step-by-step guide on how to check if your Switch is iPatch and how to back up your NAND before disabling AutoRCM. We will then walk you through the process of downloading and installing the necessary tools, as well as disabling AutoRCM on your iPatch Switch.
Once the process is complete, we will guide you on how to verify that AutoRCM has been successfully disabled. Additionally, we will address common issues that may arise during the process and provide troubleshooting tips.
Finally, we will highlight important considerations and precautions to keep in mind throughout the process. By the end of this guide, you will be able to enjoy the benefits of a non-AutoRCM Switch while staying cautious. Let’s get started!
Understanding the risks and benefits of disabling AutoRCM
Disabling AutoRCM on your iPatch Switch can have both risks and benefits. It is important to understand these before proceeding with the process. Here are some key points to consider:
- Risks:
- Disabling AutoRCM can potentially brick your Switch if not done correctly.
- You may lose access to certain features and functionalities that rely on AutoRCM.
- There is a risk of getting banned from online services if you modify your Switch.
- Benefits:
- Disabling AutoRCM allows you to boot your Switch into the regular firmware without the need for a payload injection.
- You can update your Switch firmware without the risk of burning fuses.
- It gives you more control over your Switch and the ability to customize it to your liking.
- First, download the latest version of Hekate from the official website.
- Extract the downloaded file to a location on your computer.
- Connect your Switch to your computer using a USB cable.
- Put your Switch into RCM mode by following the instructions provided in the previous step-by-step guide.
- Launch the Hekate tool on your computer.
- Select the “Tools” option from the main menu.
- Choose the “Backup” option to start the NAND backup process.
- Follow the on-screen instructions to complete the backup.
- Once the backup is finished, safely disconnect your Switch from your computer.
- Start by connecting your Switch to a stable internet connection.
- Open the Homebrew App Store on your Switch.
- Navigate to the “Utilities” section and search for “TegraRcmGUI”.
- Select “TegraRcmGUI” and choose the option to download and install it.
- Once the installation is complete, exit the Homebrew App Store.
- Next, you will need to download the “hekate” payload. Open your preferred web browser on your computer and search for “hekate payload download”.
- Look for a reliable source to download the payload from and click on the appropriate link.
- Save the payload file to a location on your computer that you can easily access.
- Connect your Switch to your computer using a USB-C cable.
- Open the TegraRcmGUI application on your computer.
- Click on the “Inject Payload” button and select the hekate payload file you downloaded earlier.
- Wait for the payload to be injected into your Switch.
- Make sure your Switch is turned off.
- Insert your SD card into your computer.
- Download the Hekate payload and TegraRcmSmash tool from the internet.
- Extract the downloaded files to a folder on your computer.
- Open the TegraRcmSmash tool and select the Hekate payload file.
- Connect your Switch to your computer using a USB-C cable.
- Put your Switch into RCM mode by holding down the Volume Up button and pressing the Power button.
- Click the “Inject Payload” button in the TegraRcmSmash tool.
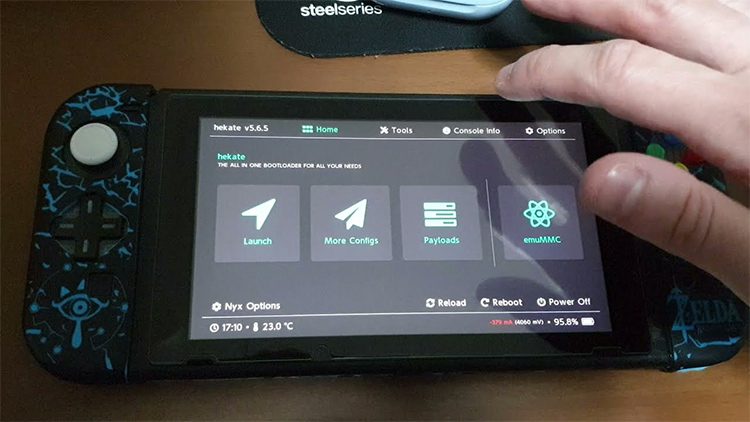
- Your Switch should now boot into the Hekate menu.
- Navigate to the “Tools” section and select “Backup eMMC” to create a backup of your NAND.
- Once the backup is complete, go back to the main menu and select “Options”.
- Scroll down and find the “AutoRCM” option.
- Disable the “AutoRCM” option by selecting it and pressing the A button.
- Exit the Hekate menu and turn off your Switch.
- Disconnect your Switch from your computer.
- Turn on your Switch and it should now boot normally without AutoRCM enabled.
Before proceeding with disabling AutoRCM, it is important to weigh these risks and benefits and make an informed decision.
Step-by-step guide: Checking if your Switch is IPATCHED.
Before you proceed with disabling AutoRCM on your Switch, it is crucial to determine whether your device is IPATCHED or not. This step is essential because the process of disabling AutoRCM varies depending on the type of Switch you have.
To check if your Switch is IPATCHED, you will need to access the serial number located on the back of your device. Look for the serial number that starts with “XAJ” or “XAW.” If your serial number starts with any other letter, then your Switch is not IPATCHED.
If your serial number matches the IPATCHED criteria, you can proceed with the next steps. However, if it does not, it means that your Switch is not compatible with the method described in this guide, and you should not attempt to disable AutoRCM.
Remember, it is crucial to follow the correct steps for your specific Switch model to avoid any potential issues or damage to your device.
Step-by-step guide: Backing up your NAND before disabling AutoRCM
Before proceeding with disabling AutoRCM on your IPATCHED Switch, it is crucial to back up your NAND. The NAND is the internal storage of your Switch, which contains important system files and data. By creating a backup, you can restore your Switch to its original state if anything goes wrong during the process.
To back up your NAND, you will need a tool called Hekate. Hekate is a custom firmware that allows you to perform various functions on your Switch, including NAND backup and restore.
It is recommended to store the NAND backup in a safe location, such as an external hard drive or cloud storage. This backup will serve as a safeguard in case anything goes wrong during the process of disabling AutoRCM.
Step-by-step guide: Downloading and installing the necessary tools
Before you can disable AutoRCM on your IPATCHED Switch, you will need to download and install a few necessary tools. Follow these steps:
Once you have successfully downloaded and installed the necessary tools, you are ready to proceed to the next step of disabling AutoRCM on your IPATCHED Switch.
Step-by-step guide: Disabling AutoRCM on your IPATCHED Switch
Disabling AutoRCM on your IPATCHED Switch is a relatively straightforward process. Follow the steps below to disable it:
It is important to note that disabling AutoRCM may void your warranty and can potentially brick your Switch if not done correctly. Make sure to follow the steps carefully and take all necessary precautions.
Step-by-step guide: Verifying that AutoRCM has been successfully disabled
After following the previous steps to disable AutoRCM on your IPATCHED Switch, it is important to verify that the process was successful. This will ensure that your Switch is no longer vulnerable to potential risks associated with AutoRCM.
To verify the status of AutoRCM, power off your Switch completely. Then, hold down the Volume Up button and press the Power button to turn on your Switch. Keep holding the Volume Up button until the Nintendo logo appears on the screen.
If you see the Nintendo logo and the Switch boots up normally, without any additional prompts or warnings, it means that AutoRCM has been successfully disabled. Congratulations!
However, if you see a prompt asking you to enter the RCM mode or any other indication that AutoRCM is still active, it means that the disabling process was not successful. In this case, you may need to repeat the steps or seek further assistance from reliable sources or professionals in the field.
Remember, it is crucial to ensure that AutoRCM has been disabled before proceeding with any modifications or customizations on your Switch to avoid any potential risks or issues.
Troubleshooting common issues during the process
While disabling AutoRCM on your IPATCHED Switch can be a straightforward process, there are some common issues that you may encounter along the way. It’s important to be aware of these potential problems and know how to troubleshoot them effectively.
1. Error messages during the backup process
When backing up your NAND before disabling AutoRCM, you may come across error messages indicating that the backup failed. This could be due to a faulty SD card or insufficient storage space. To resolve this issue, try using a different SD card or freeing up space on your current one.
2. Firmware compatibility issues
Downloading and installing the necessary tools may require specific firmware versions. If you encounter compatibility issues, make sure to check the requirements of the tools and ensure that your Switch’s firmware is up to date. Updating your firmware may resolve any compatibility problems.
3. Switch not booting up after disabling AutoRCM
In some cases, your Switch may not boot up properly after disabling AutoRCM. This could be due to a mistake during the process or a compatibility issue with the tools used. To troubleshoot this problem, carefully review the steps you followed and consider seeking assistance from online forums or communities dedicated to Switch hacking.
By being aware of these common issues and knowing how to troubleshoot them, you can ensure a smoother experience when disabling AutoRCM on your IPATCHED Switch. Remember to always proceed with caution and seek help if needed to avoid any potential risks or complications.
Important considerations and precautions to keep in mind
Before proceeding with disabling AutoRCM on your IPATCHED Switch, there are several important considerations and precautions that you should keep in mind. These will help ensure a smooth and successful process, while also minimizing any potential risks or issues that may arise.
1. Understand the risks: Disabling AutoRCM involves modifying the firmware of your Switch, which can void your warranty and potentially lead to system instability or bricking. It is crucial to fully understand these risks and accept the consequences before proceeding.
2. Backup your NAND: As mentioned in the previous step-by-step guide, it is highly recommended to back up your NAND before disabling AutoRCM. This will serve as a safety net in case anything goes wrong during the process, allowing you to restore your system to its previous state.
3. Follow instructions carefully: Make sure to carefully follow the step-by-step guide provided in this article, as well as any additional instructions or warnings from trusted sources. Skipping or incorrectly executing any steps can result in errors or issues.
4. Use trusted tools: When downloading and installing the necessary tools, ensure that you are using reputable sources and verified software. This will help minimize the risk of malware or other harmful programs being installed on your system.
5. Stay updated: Keep yourself informed about the latest developments and updates in the Switch hacking community. This will help you stay aware of any new risks, precautions, or alternative methods that may arise.
By keeping these important considerations and precautions in mind, you can proceed with disabling AutoRCM on your IPATCHED Switch with confidence and minimize any potential risks or issues that may arise.
Enjoying the Benefits of a Non-AutoRCM Switch while Staying Cautious
After following the step-by-step guide to disable AutoRCM on your IPATCHED Switch, you can now enjoy the benefits of a non-AutoRCM Switch. By disabling AutoRCM, you regain control over your device and eliminate the risk of accidental bricking. This means that you can update your firmware without any worries and continue to use your Switch as intended.
However, it is important to stay cautious even after disabling AutoRCM. While the process itself is relatively safe if done correctly, there are still risks involved. It is crucial to follow the instructions carefully and double-check each step to avoid any potential issues.
Additionally, it is recommended to keep your NAND backup safe and up to date. This backup serves as a safety net in case anything goes wrong during the process or if you decide to revert back to AutoRCM in the future.
By understanding the risks and benefits of disabling AutoRCM and taking the necessary precautions, you can confidently enjoy the freedom and flexibility that comes with a non-AutoRCM Switch.
Learn how to disable AutoRCM on an iPatch Switch with this step-by-step guide. Enjoy the benefits of a non-AutoRCM Switch while staying cautious.
About The Author

Zeph Grant is a music fanatic. He loves all types of genres and can often be found discussing the latest album releases with friends. Zeph is also a hardcore content creator, always working on new projects in his spare time. He's an amateur food nerd, and loves knowing all sorts of random facts about food. When it comes to coffee, he's something of an expert - he knows all the best places to get a good cup of joe in town.