
Last Updated on July 27, 2023
Welcome to our guide on how to install the Xinetd service in Ubuntu. Xinetd is a powerful and flexible super-server that allows you to manage multiple network services efficiently. Whether you’re a seasoned Linux user or just starting out, this step-by-step tutorial will walk you through the process of installing, configuring, and testing the Xinetd service on your Ubuntu system.
Step 1: Update the Ubuntu System
Before installing the Xinetd service, it is important to ensure that your Ubuntu system is up to date. Updating the system will not only provide you with the latest security patches and bug fixes, but it will also ensure that you have the necessary dependencies for the Xinetd service.
- Open the terminal by pressing Ctrl+Alt+T on your keyboard.
- Type the following command and press Enter: sudo apt update
- Enter your password when prompted and press Enter.
- The system will now update the package lists and check for any available updates.
- Once the update process is complete, you can proceed to the next step.
Updating your Ubuntu system regularly is essential for maintaining the security and stability of your system. It is recommended to perform system updates on a regular basis to ensure that you have the latest software and security patches.
Troubleshooting Common Issues
While installing and configuring the Xinetd service in Ubuntu, you may encounter some common issues. It is important to be aware of these issues and know how to troubleshoot them effectively.
One common issue is the Xinetd service not starting or failing to start. This can be due to incorrect configuration settings or conflicts with other services. To troubleshoot this issue, you can check the Xinetd configuration file (/etc/xinetd.conf) for any errors or typos. Additionally, you can use the command sudo systemctl status xinetd to check the status of the service and identify any error messages.
Another common issue is the Xinetd service not responding to incoming connections. This can be caused by firewall settings blocking the necessary ports. To troubleshoot this issue, you can check the firewall rules using the command sudo ufw status. If the necessary ports are not open, you can use the command sudo ufw allow [port] to open them.
By being aware of these common issues and knowing how to troubleshoot them, you can ensure a smooth installation and configuration process for the Xinetd service in Ubuntu.
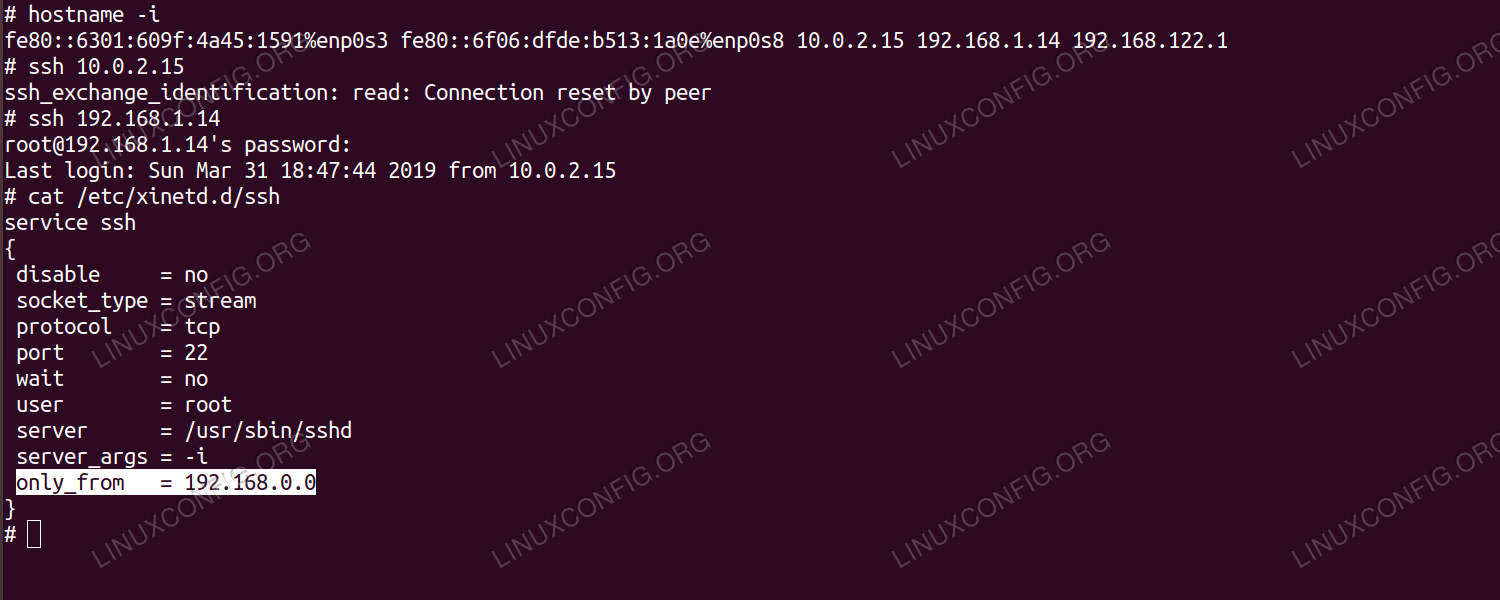
Step 3: Configure the Xinetd Service
Once you have successfully installed the Xinetd service on your Ubuntu system, the next step is to configure it according to your needs. The configuration file for Xinetd is located at /etc/xinetd.conf.
Open the configuration file using a text editor of your choice. You will see a list of services that can be enabled or disabled. Each service is defined by a block of configuration settings.
To configure a specific service, locate its corresponding block of configuration settings. You can enable or disable the service by changing the value of the disable parameter. Set it to no to enable the service, or yes to disable it.
Additionally, you can modify other parameters such as the port number, protocol, and server executable path to customize the behavior of the service.
Once you have made the necessary changes, save the configuration file and exit the text editor.
It is important to note that any changes made to the Xinetd configuration file require a restart of the Xinetd service for the changes to take effect. You can do this by running the command sudo systemctl restart xinetd.
Step 4: Enable and Start the Xinetd Service
Once you have successfully installed the Xinetd service on your Ubuntu system, the next step is to enable and start the service. This will ensure that the Xinetd service is running and ready to accept incoming connections.
Here are the steps to enable and start the Xinetd service:
- Open a terminal window on your Ubuntu system.
- Type the following command to enable the Xinetd service:
- Press Enter and enter your password when prompted.
- Next, start the Xinetd service by typing the following command:
- Press Enter and enter your password when prompted.
- Verify that the Xinetd service is running by typing the following command:
- If the service is running, you will see a message indicating that the service is active and running.
sudo systemctl enable xinetdsudo systemctl start xinetdsudo systemctl status xinetdBy enabling and starting the Xinetd service, you have successfully configured your Ubuntu system to use the Xinetd service for managing network services.
Step 5: Test the Xinetd Service
After configuring and enabling the Xinetd service, it is important to test it to ensure that it is functioning correctly. Here are the steps to test the Xinetd service in Ubuntu:
- Open a terminal window.
- Type the following command to test the Xinetd service:
telnet localhost [port]- Replace
[port]with the port number that you specified in the Xinetd configuration file. - If the Xinetd service is running properly, you should see a connection established message.
- You can also test the Xinetd service by trying to connect to it from another computer on the same network.
- If the connection is successful, it means that the Xinetd service is working correctly.
- If the connection fails or you encounter any errors, you may need to review your configuration settings and troubleshoot any issues.
Testing the Xinetd service is an important step to ensure that it is functioning as expected. By following these steps, you can verify that the service is running properly and ready to accept incoming connections.
Troubleshooting Common Issues
While installing and configuring the Xinetd service in Ubuntu, you may encounter some common issues. Here are a few troubleshooting tips to help you resolve them:
1. Service not starting
If the Xinetd service fails to start, check if the configuration file is correct. Make sure all the necessary parameters are properly set and there are no syntax errors. Additionally, check if the service is enabled and started using the appropriate commands.
2. Port already in use
If you receive an error message stating that the port is already in use, it means that another service is already using that port. You can either stop the conflicting service or change the port number in the Xinetd configuration file.
3. Firewall blocking connections
If the Xinetd service is not accessible from external networks, it could be due to a firewall blocking the connections. Ensure that the necessary ports are open in the firewall settings to allow incoming connections to the Xinetd service.
By following these troubleshooting tips, you should be able to overcome common issues and successfully install and configure the Xinetd service in Ubuntu.
Additional Tips and Recommendations
When installing and configuring the Xinetd service in Ubuntu, there are a few additional tips and recommendations that can help ensure a smooth and successful process.
1. Security Considerations
It is important to keep in mind the security implications of enabling the Xinetd service. By default, Xinetd listens on all network interfaces, which can potentially expose your system to external threats. To mitigate this risk, consider configuring Xinetd to only listen on specific IP addresses or interfaces.
2. Regular Updates
Like any software, it is crucial to keep the Xinetd service up to date with the latest security patches and bug fixes. Regularly check for updates and apply them promptly to ensure the stability and security of your system.
3. Monitoring and Logging
Enable logging for the Xinetd service to keep track of any suspicious or unauthorized access attempts. Monitoring the logs can help identify potential security breaches and take appropriate action.
4. Documentation and Support
If you encounter any issues or have questions about the Xinetd service, refer to the official documentation and community forums for guidance. There are often helpful resources available that can assist in troubleshooting and resolving problems.
By following these additional tips and recommendations, you can enhance the security and performance of the Xinetd service in Ubuntu. Remember to always prioritize security and stay informed about the latest best practices in system administration.
Conclusion
In conclusion, the Xinetd service is a powerful tool that allows for the efficient management of network services in Ubuntu. By following the steps outlined in this article, you can easily install, configure, and test the Xinetd service on your system.
Throughout this guide, we have covered the necessary steps to update the Ubuntu system, install the Xinetd service, configure it to meet your specific needs, and enable and start the service. We have also discussed common issues that may arise during the installation and provided troubleshooting tips to help you resolve them.
It is important to note that the Xinetd service should be used with caution, as misconfiguration or improper management can lead to security vulnerabilities. Therefore, it is recommended to follow best practices and regularly update and monitor the service to ensure the security and stability of your system.
By implementing the Xinetd service, you can enhance the performance and security of your network services, making it an essential tool for system administrators and network administrators alike. So, go ahead and give it a try on your Ubuntu system!
Wrapping Up: Final Thoughts on Installing the Xinetd Service in Ubuntu
After following the step-by-step guide on how to install and configure the Xinetd service in Ubuntu, you should now have a fully functional and secure system. By updating your Ubuntu system, installing the Xinetd service, configuring it to meet your specific needs, and enabling and starting the service, you have taken the necessary steps to enhance the functionality and security of your system.
Throughout this process, it is important to keep in mind that troubleshooting common issues may arise. However, with the tips and recommendations provided, you should be able to overcome any challenges that come your way.
Installing the Xinetd service in Ubuntu is a valuable skill to have, as it allows you to manage network services efficiently. Whether you are a system administrator or a curious individual looking to expand your knowledge, this guide has provided you with the necessary information to successfully install and configure the Xinetd service in Ubuntu.
So, go ahead and put your newfound knowledge into practice. Enjoy the enhanced functionality and security that the Xinetd service brings to your Ubuntu system!
Learn how to install and configure the Xinetd service in Ubuntu with this step-by-step guide. Troubleshoot common issues and get additional tips for a successful installation.
About The Author

Zeph Grant is a music fanatic. He loves all types of genres and can often be found discussing the latest album releases with friends. Zeph is also a hardcore content creator, always working on new projects in his spare time. He's an amateur food nerd, and loves knowing all sorts of random facts about food. When it comes to coffee, he's something of an expert - he knows all the best places to get a good cup of joe in town.