
Last Updated on September 16, 2022
In this article, we will talk about Clipping and adjusting oboe reed resistance, as well as Coaxing a reed into cooperation. We will also cover how to make sure your reed does not spread. Hopefully, these tips will prove helpful. After reading this article, you will be able to do this yourself! Once you’ve done this, you will be well on your way to sounding great!
Clipping oboe reeds
You may be wondering whether clipping oboe rees is necessary. After all, the reed is the most valuable part of your instrument. But you have to be careful! Over-clipping is not good for the sound of your instrument. Besides, your reed will not be as resonant as it should be. Here are some tips on clipping.
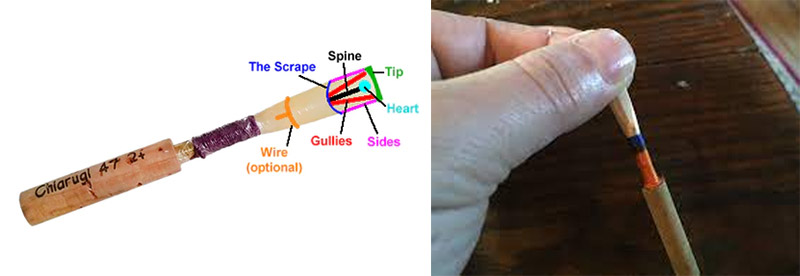
When clipping oboe rees, keep in mind the “Big Three” of oboe reed: spine, heart, edges, and tip. Make sure your oboe reeds have the right balance. When clipping, try to leave the spine intact. Otherwise, you’ll be damaging the reed.
Before clipping oboe rees, you should measure the length of the reed and determine how much cane it has. You should try to clip as little cane as possible. Remember, once you remove the cane, you can’t add it back. You should also keep in mind the pitch of your oboe. Generally, you should aim for a pitch that is between flat and buzzy.
Unlike normal reeds, oboe reed clipping is a simple process that makes it easy to make. You can clip oboe reeds using C clamp, FF thread, shaped cane, and a reed mandrel. You can also use beeswax to reinforce the reeds and make them last longer.
Generally, clipping oboe rees is done with a knife. Generally, this involves making a small bevel or burr that helps you scrape the reed. To ensure a sharp edge, run your fingers along the knife’s edge. Avoid touching the blade as this could cause a sharp injury. Most reed makers test the sharpness of their blades by catching it on their thumb or finger.
Another important thing to remember is that reeds are not made from a single piece of cane. If you are not sure about how to do this, you can use different knives for different stages. For example, a curved oboe cane should be discarded, as it will cause the reed to leak. The length of the cane is also important.
Changing reed’s resistance
Changing the reed’s resistance is a critical aspect of oboe playing. While there is no one-size-fits-all method, it can be achieved through experimentation, knowledge, and conceptual understanding. Listed below are some of the strategies you can use to alter the resistance of your oboe reed. Here is a step-by-step guide to reed adjusting.
To begin, first determine the resistance of the reed. There are two main types of reeds: low and high-resistance. Low-resistance reeds can be played with little or no embouchure action. High-resistance reeds are tiring and require constant embouchure action. Too-easy reeds are easy to blow.
If you’re planning to use your oboe for several hours a day, it’s important to rotate your reeds to ensure that they are performing as well as possible. Different reeds behave differently depending on atmospheric pressure and humidity. Therefore, it is wise to buy at least three reeds. After all, your favorite reed might not be the best option for a rainy day!
Changing your oboe reed doesn’t have to be a complicated process. Make sure that you scrape the gullies and general areas of the reed. A reed that has too much cane should be scraped to get rid of it. Remember that this may alter your intonation. So, remember to use a scraper for this.
If you’re not sure about how to make a reed, ask someone who has experience in this area. It can be difficult to change the resistance of a reed, but an outside eye will help you make the correct choice. The resistance of an oboe reed will affect its pitch and intonation, so a good reed will not only increase the tone quality, but also improve the health of the player.
Changing oboe re-ed’s resistance is essential to make your oboe playable and respond well to your playing. The reed’s resistance should be within the range of the oboe’s natural resistance. Otherwise, the reed will not respond as well as it should. For this reason, changing the reed’s resistance should be your next step.
Coaxing a reed into cooperation
Coaxing a reede into cooperation when playing the oboe is possible if you follow these steps: make sure that your hands are covering the keys of the instrument. You may need to touch the keys very lightly, or you may be trying to force a reed to cooperate. Remember that a good reed should make a C sound in three octaves when blown and crowed.
Once you have made the necessary adjustments, you need to ensure that the reed does not leak. The pressure node is the region of high atmospheric pressure, and it is the same for the lower note. This means that opening the bore at this pressure point makes no difference in the note. The pressure nodes are different in each register, so if you had separate register holes in the instrument, you would need multiple keys. The oboe has three register holes and a bassoon has five. The tone holes also serve as register holes.
Another trick for coaxing a reed is to play at a slower speed. Once the reed is in the right position, it will respond to repeated attempts to play. This technique will ensure that the instrument produces a beautiful sound in every performance. However, it will require patience. You should also take note of the technique that is necessary to coax a reed into cooperation when playing the oboe.
Tongue-tonguing is one of the most common mistakes made by oboists. Tongue-tonguing is better, but not necessarily a more efficient method. Tongue-tonguing requires a more coordinated movement of the tongue with the moving fingers. Tonguing the notes requires more coordination between the tongue and the moving fingers.
To increase air flow through the reed, you need to raise the pressure difference between the mouthpiece and the volume inside the reed. When the pressure differential increases, so should the air flow through the reed’s blades. This graph of pressure versus flow rises quickly. By following these tips, you can effectively coax a reed into cooperation when playing the oboe.
Ensure a reed doesn’t have a spread sound
To fix the spread sound, you need to check whether the oboe reed has a spine, heart, and edges. If these elements are not in place, you should scrape the spine and edges of the reed. Then, you should make a few adjustments to the reed. When you are done, you should be able to play the instrument with a consistent sound.
The reed’s tip should be as thin as possible. Sadly, many reeds have tips of just a few millimetres thick. The opening should also be the right size. Having too large of a hole will distort the sound. The key is to balance everything you do to your reed.
To fix a wooden reed with a spread sound, try removing some of its wood from the heart. The heart of an oboe reed is a valve between the back of the oboe and the tip. A thick wooden heart will prevent vibrations in the tip. However, a thin reed’s heart will make the reed lose a lot of volume, making it unusable for playing.
The tone quality of the reed is a matter of personal preference, but it is important to ensure that the reed has an overall balance of the lower and upper partials. If one side is thinner than the other, the low notes will sound laborious. Likewise, if the reed is too thick at the tip, the low notes will be shrill, making the reed sound spread.
As mentioned, the size of the instrument also matters. Compared to other mass-produced instruments, oboes are smaller and require more handcrafting. In addition, they have small holes and springs. This means that their reeds must be extra special. A spread sound is a sign that the reed doesn’t have a proper balance, and a narrowed reed will be too wide.
To make sure an oboe reet doesn’t have a spread sound, you need to test the resistance of the reed. To do this, you should use a neutral embouchure and gently blow through the reed until it speaks on its own. The dynamic level of the reed should be mezzo-piano. Too loud or too soft a reed will make playing difficult or will limit its range of expressiveness. The reed’s resistance should match your physical capacity. Any deviations from this will cause rapid fatigue for the player.
About The Author

Orochi Konya is a student of the web. He has been dabbling in it since he was young, and has become an expert in his own right. He loves all things digital, from making websites to programming to social media. In his spare time, Orochi enjoys indulging in his other passion: music. He loves listening to all kinds of music and often spends hours creating playlists on Spotify. He also enjoys drawing manga and watching anime in his free time. Orochi is a friendly pop-culture guru who is always happy to chat about the latest trends in both Japan and the U.S.