
Last Updated on July 26, 2023
Short Answer
Making a Japanese bamboo flute requires careful craftsmanship and attention to detail. To begin, select a suitable piece of bamboo and cut it to the desired length. Next, remove the nodes and sand the inside of the bamboo to create a smooth surface. Then, carve the embouchure hole and finger holes using a sharp knife or drill. Finally, apply a coat of varnish or lacquer to protect the flute and enhance its appearance. With patience and practice, anyone can create a beautiful and functional Japanese bamboo flute.Welcome to the world of Japanese bamboo flutes! In this article, we will delve into the art of making a Japanese bamboo flute, exploring its significance in traditional music and guiding you through the process step by step. Whether you are a music enthusiast or simply looking for a unique DIY project, this guide will provide you with all the necessary information and techniques to create your very own bamboo flute. From preparing the bamboo to carving the embouchure hole and finger holes, we will cover every aspect of flute-making. So, let’s embark on this journey and embrace the beauty of traditional Japanese music with your own handmade bamboo flute.
Understanding the significance of the Japanese bamboo flute in traditional music
- The Japanese bamboo flute, also known as the shakuhachi, has a rich history and plays a vital role in traditional Japanese music.
- It is believed to have originated in China and was later introduced to Japan, where it became an integral part of Zen Buddhist meditation.
- The shakuhachi is known for its hauntingly beautiful sound and is often used to evoke a sense of tranquility and introspection.
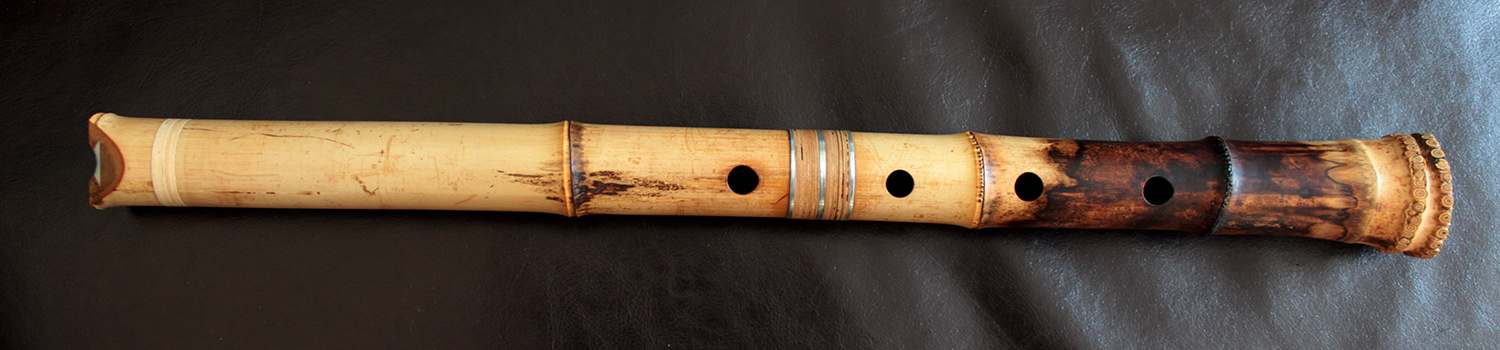
- It is traditionally made from a single piece of bamboo, which is carefully selected for its acoustic properties.
- The flute’s design and construction allow for a wide range of tones and expressive techniques, making it a versatile instrument.
Understanding the significance of the Japanese bamboo flute in traditional music
The Japanese bamboo flute, also known as the shakuhachi, holds a deep significance in traditional Japanese music. It is a key instrument in the practice of Zen Buddhism and is often associated with meditation and spiritual enlightenment. The hauntingly beautiful sound of the shakuhachi has captivated listeners for centuries, evoking a sense of tranquility and introspection.
Traditional Japanese music is deeply rooted in nature and the shakuhachi perfectly embodies this connection. The flute is made from bamboo, a material that symbolizes strength, flexibility, and resilience. The process of making a homemade Japanese bamboo flute allows one to not only appreciate the craftsmanship involved but also to connect with the rich cultural heritage of Japan.
Gathering the necessary materials for your homemade Japanese bamboo flute
Before embarking on the journey of making your own Japanese bamboo flute, it is important to gather all the necessary materials. The main component, of course, is the bamboo itself. Look for a piece of bamboo that is straight, sturdy, and free from cracks or blemishes. It should be approximately 2 feet in length.
In addition to the bamboo, you will need a sharp knife or saw for cutting, sandpaper for smoothing, and a protective coating such as lacquer or varnish. It is also helpful to have a ruler or measuring tape for precise measurements, as well as a drill or carving tools for creating the embouchure hole and finger holes.
Gathering these materials is the first step towards creating your own homemade Japanese bamboo flute. With the right tools and materials in hand, you are ready to embark on a journey of craftsmanship and musical exploration.
Step 4: Sanding and smoothing the bamboo flute for a polished finish
Once you have carved the embouchure hole and finger holes on your homemade Japanese bamboo flute, it is time to move on to the next step: sanding and smoothing the flute for a polished finish. This step is crucial in ensuring that your flute not only looks beautiful but also feels comfortable to hold and play.
Start by using a fine-grit sandpaper to gently sand the entire surface of the flute. This will help to remove any rough edges or imperfections left from the carving process. Be sure to sand in the direction of the bamboo’s grain to avoid damaging the flute.
After sanding, use a damp cloth to wipe away any dust or debris from the flute. This will give you a clear view of the flute’s surface and allow you to identify any areas that still need smoothing.
Next, switch to a finer-grit sandpaper and continue sanding the flute, paying extra attention to any rough spots or uneven areas. Take your time and work slowly, as this will ensure a smooth and polished finish.
Once you are satisfied with the smoothness of the flute, use a soft cloth to apply a thin layer of wood polish or varnish. This will not only enhance the flute’s appearance but also protect it from moisture and wear.
Allow the polish or varnish to dry completely before moving on to the next step. This may take a few hours or overnight, depending on the product you are using.
By sanding and smoothing your homemade Japanese bamboo flute, you are not only adding a professional touch to your creation but also ensuring that it will last for years to come.
Step 2: Measuring and cutting the bamboo to create the flute’s body
- Measure the desired length of the flute using a ruler or measuring tape.
- Mark the measurements on the bamboo using a pencil or marker.
- Use a saw or bamboo cutting tool to carefully cut the bamboo at the marked points.
- Ensure that the cuts are straight and clean for a professional-looking flute.
- Smooth the edges of the cut bamboo using sandpaper or a file.
Step 5: Applying a protective coating to enhance durability and longevity
After sanding and smoothing the bamboo flute, it is important to apply a protective coating to ensure its durability and longevity. This will help to protect the flute from moisture and other environmental factors that could potentially damage it.
- Choose a suitable coating: There are various options for coating the bamboo flute, such as lacquer, varnish, or oil. Consider the specific needs of your flute and choose a coating that will provide the desired level of protection.
- Prepare the flute for coating: Before applying the protective coating, make sure the flute is clean and free from any dust or debris. You can use a soft cloth or brush to gently remove any particles.
- Apply the coating: Follow the instructions provided with the chosen coating to apply it evenly onto the flute. Use a brush or cloth to ensure a smooth and even application.
- Allow the coating to dry: Give the flute sufficient time to dry and cure according to the instructions provided. This will ensure that the coating sets properly and provides the desired level of protection.
- Repeat if necessary: Depending on the type of coating used, you may need to apply multiple coats to achieve the desired level of protection. Follow the instructions and allow each coat to dry before applying the next one.
By applying a protective coating to your homemade Japanese bamboo flute, you can ensure that it will withstand the test of time and continue to produce beautiful music for years to come.
Step 4: Sanding and smoothing the bamboo flute for a polished finish
Once you have carved the embouchure hole and finger holes on your homemade Japanese bamboo flute, it is time to move on to the next step: sanding and smoothing the flute for a polished finish. This step is crucial in ensuring that your flute not only looks beautiful but also feels comfortable to hold and play.
Start by using a fine-grit sandpaper to gently sand the entire surface of the flute. This will help to remove any rough edges or imperfections left from the carving process. Be sure to sand in a circular motion, applying even pressure to achieve a smooth and even finish.
After sanding, use a damp cloth to wipe away any dust or debris from the flute. This will give you a clear view of the flute’s surface and allow you to identify any areas that may need further sanding.
Once you are satisfied with the smoothness of the flute, you can proceed to the final step: applying a protective coating to enhance its durability and longevity.
Step 5: Applying a protective coating to enhance durability and longevity
After you have sanded and smoothed your bamboo flute, it is important to apply a protective coating to ensure its durability and longevity. This step will help to protect the flute from moisture and other environmental factors that could potentially damage it.
There are several options for protective coatings that you can use on your bamboo flute. One popular choice is a clear lacquer, which provides a glossy finish and helps to seal the bamboo. Another option is a natural oil, such as linseed oil or tung oil, which can penetrate the bamboo and provide a protective barrier.
Before applying the coating, make sure to clean the flute thoroughly to remove any dust or debris. Then, using a brush or cloth, apply a thin and even layer of the chosen coating to the entire surface of the flute. Allow the coating to dry completely before applying additional layers.
By applying a protective coating to your homemade Japanese bamboo flute, you can ensure that it will withstand the test of time and continue to produce beautiful music for years to come.
Step 6: Tuning and testing your homemade Japanese bamboo flute
After completing the previous steps of making your own Japanese bamboo flute, it is now time to tune and test your creation. This step is crucial to ensure that your flute produces the desired sound quality.
Tuning involves adjusting the length and size of the finger holes to achieve the correct pitch. This can be done by carefully measuring and making small adjustments to the holes. It may require some trial and error, as even a slight change in hole size can greatly affect the sound produced.
Testing your flute involves playing different notes and scales to evaluate its sound quality and responsiveness. You can experiment with different blowing techniques and finger placements to achieve the desired tones. It is important to listen carefully and make any necessary adjustments to improve the sound.
Remember, the process of tuning and testing may take some time and patience. It is a skill that develops with practice, so don’t be discouraged if it doesn’t sound perfect right away. With perseverance, you will be able to create a beautiful and harmonious sound with your homemade Japanese bamboo flute.
Discover the Melodies of Traditional Japanese Music with Your Own Handmade Bamboo Flute
Through this step-by-step guide, you have delved into the art of crafting a Japanese bamboo flute, uncovering its significance in traditional music. By gathering the necessary materials and following each meticulous step, you have learned how to prepare, measure, cut, carve, sand, and apply a protective coating to your flute. The final result is a polished instrument that not only showcases your craftsmanship but also produces optimal sound quality.
Now, armed with your homemade Japanese bamboo flute, you can fully embrace the beauty of traditional Japanese music. Whether you are a seasoned musician or a curious beginner, this flute will allow you to explore the melodies and rhythms that have captivated audiences for centuries. So, let your creativity soar and immerse yourself in the enchanting world of Japanese music with your very own handmade bamboo flute.
Frequently Asked Questions
Q: What is the significance of the Japanese bamboo flute in traditional music?
A: The Japanese bamboo flute, also known as the shakuhachi, holds a deep cultural and spiritual significance in traditional Japanese music. It is often associated with Zen Buddhism and is used in meditation and religious ceremonies.
Q: What materials do I need to make a homemade Japanese bamboo flute?
A: To make a homemade Japanese bamboo flute, you will need a piece of bamboo, a saw, a carving knife, sandpaper, a protective coating, and a tuning device.
Q: How do I prepare the bamboo for flute-making?
A: To prepare the bamboo for flute-making, you will need to remove the outer layer of the bamboo and clean it thoroughly. This can be done by soaking the bamboo in water and scrubbing it with a brush.
Q: How do I measure and cut the bamboo to create the flute’s body?
A: To measure and cut the bamboo, you will need to determine the desired length of the flute and mark it on the bamboo. Then, using a saw, carefully cut the bamboo at the marked point.
Q: How do I carve the embouchure hole and finger holes for optimal sound quality?
A: Carving the embouchure hole and finger holes requires precision and skill. Using a carving knife, carefully carve the embouchure hole near one end of the bamboo and the finger holes along the length of the flute. It is important to ensure that the holes are evenly spaced and properly sized for optimal sound quality.
Q: How do I sand and smooth the bamboo flute for a polished finish?
A: After carving the flute, use sandpaper to sand and smooth the bamboo. Start with a coarse grit sandpaper and gradually move to a finer grit to achieve a polished finish. Be sure to sand both the exterior and interior of the flute.
Q: How do I apply a protective coating to enhance durability and longevity?
A: To enhance the durability and longevity of your bamboo flute, apply a protective coating such as lacquer or varnish. This will help protect the bamboo from moisture and other environmental factors.
Q: How do I tune and test my homemade Japanese bamboo flute?
A: To tune your homemade bamboo flute, use a tuning device or a reference pitch to adjust the length of the flute. This can be done by carefully adjusting the position of the embouchure hole. Once tuned, test the flute by playing different notes and adjusting the finger holes if necessary.
Q: What is the beauty of traditional Japanese music?
A: Traditional Japanese music is known for its simplicity, tranquility, and deep connection to nature. It often evokes a sense of calmness and serenity, allowing listeners to immerse themselves in the beauty of the melodies and rhythms. Making a homemade Japanese bamboo flute allows you to embrace and experience this beauty firsthand.
About The Author

Orochi Konya is a student of the web. He has been dabbling in it since he was young, and has become an expert in his own right. He loves all things digital, from making websites to programming to social media. In his spare time, Orochi enjoys indulging in his other passion: music. He loves listening to all kinds of music and often spends hours creating playlists on Spotify. He also enjoys drawing manga and watching anime in his free time. Orochi is a friendly pop-culture guru who is always happy to chat about the latest trends in both Japan and the U.S.