
Last Updated on September 17, 2022
If you’ve ever wondered how to remove the front fairing on an Electra glide, you’ve come to the right place. The fairings are secured to the frame with screws, but they don’t come off easily. Here’s how to do it safely. First, locate the fairing’s mounting screws. Then, unscrew each one. Afterward, carefully remove the fairing.
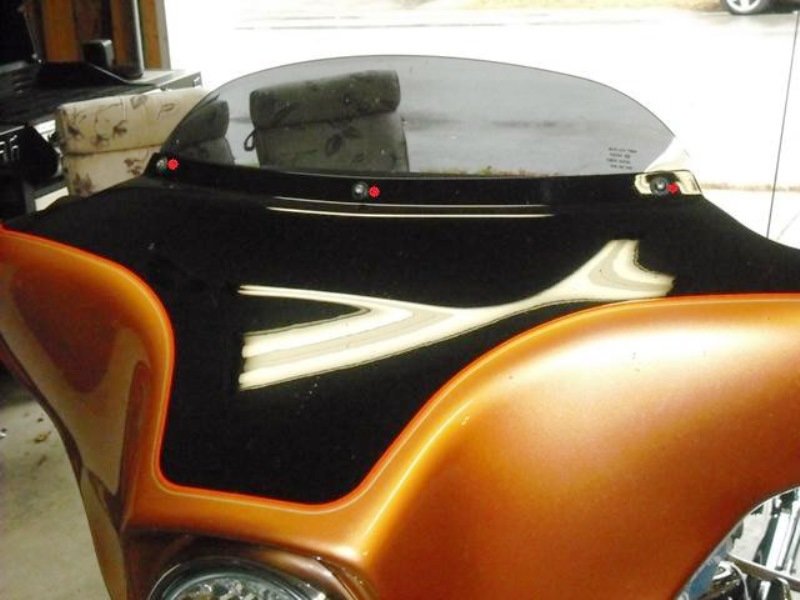
Sharknose fairing is mounted to the frame of the motorcycle
The Sharknose fairing is the most prominent feature of the motorcycle. It encloses the headlight and handles, as well as covers the entire front of the motorcycle. Some batwing fairing kits contain only the outer fairing and windshield, while others come with both an inner and outer fairing. The inner fairing is less visible from the front, but it has plenty of room for a speaker and other electronics.
The Road Glide was last updated in the MY17 model year, replacing its Twin Cam engine with a Milwaukee-Eight engine. The Milwaukee-Eight engine will remain in production through the 2022 model year. The motorcycle’s overall design hasn’t changed significantly since then, with very few aesthetic changes since the MY17 model year. The current-year Road Glide features plush suspension, premium paint packages, and an advanced infotainment system. The motorcycle also boasts a Milwaukee-Eight 107 engine, allowing you to experience the mighty torque of this engine.
The design of the sharknose fairing is similar to that of the batwing fairings found on cruisers. However, the frame-mounted design means that the fairing stays in place and isn’t prone to buffeting when compared to a fork-mounted model. This results in a smoother ride, and less wind resistance. A sharknose fairing is also equipped with multiple locations for speakers, gauges, and screens.
The Road Glide is the most famous example of a batwing fairing, and the Electra Glide was the first bike to feature a batwing-style fairing. It was made in 1969, but it became standard equipment in 1971. The first model to incorporate the Batwing fairing included instrumentation in the fairing. The Batwing fairing was used until 1983, when the FLHT model received the Tour Glide frame.
The Road Glide has a ’Shark Nose’ frame-mounted fairing. This fixed fairing may take some getting used to, but the fixed fairing allows for better wind coverage and handling. The road glide also offers more room, with the handlebars positioned closer to the rider. Its unique design is the key to this bike’s appeal. And it does not cost much to install.
The FLHTCU fairing keeps traffic buffeting at bay. It is equipped with the Boom! Box GTS infotainment system and two fairing-mounted speakers. The Sharknose fairing is also equipped with a hidden radio antenna. The bike also comes with independent ABS and premium brakes. The sharknose fairing is mounted to the motorcycle frame, allowing it to be more secure and comfortable when riding.
Mounted to the frame of the motorcycle by screws
Motorcycle mountings attach to the bike’s frame using screws. The top U-Clamp is mounted on the motorcycle’s frame, while the bottom one attaches to a cross-member of the frame or a wire. Depending on the bike model, the top U-Clamp may have to be extended to make room for the front end of the sidecar. Mountings are generally done in pairs, but can be adjusted individually depending on the motorcycle’s engine casing.
Removal of the sharknose fairing
The Electra Glide’s sharknose fairing can be removed easily without disassembling the motorcycle’s frame. The motorcycle’s fairing is attached to the frame, not to the forks. The batwing fairing was originally made to be removable, and over time the instruments were moved into the sharknose. Today, the two types of fairing are similar, but there are some key differences.
First, remove the headlight assy. To remove the light bar, loosen the top and bottom torx screws. Be careful not to let the light bar drop onto the fender, as it could damage the headlight. Next, remove the four nuts in the headlight. The outer fairing will slide away from the studs. Ensure that the side “slot wings” engage on both sides.
To install the speaker, remove the seat. The speaker wiring should be routed through the fairing using the front speaker input harness. Connect the new speaker wires to the factory terminals. To install the amp, you must also remove the factory HD Connect Module. Disconnect the HD Connect Module and move the connector to the clutch side. Secure it with two 8-inch zip ties. Now, you’re ready to install the new sharknose speaker.
About The Author

Pat Rowse is a thinker. He loves delving into Twitter to find the latest scholarly debates and then analyzing them from every possible perspective. He's an introvert who really enjoys spending time alone reading about history and influential people. Pat also has a deep love of the internet and all things digital; she considers himself an amateur internet maven. When he's not buried in a book or online, he can be found hardcore analyzing anything and everything that comes his way.