
Last Updated on July 27, 2023
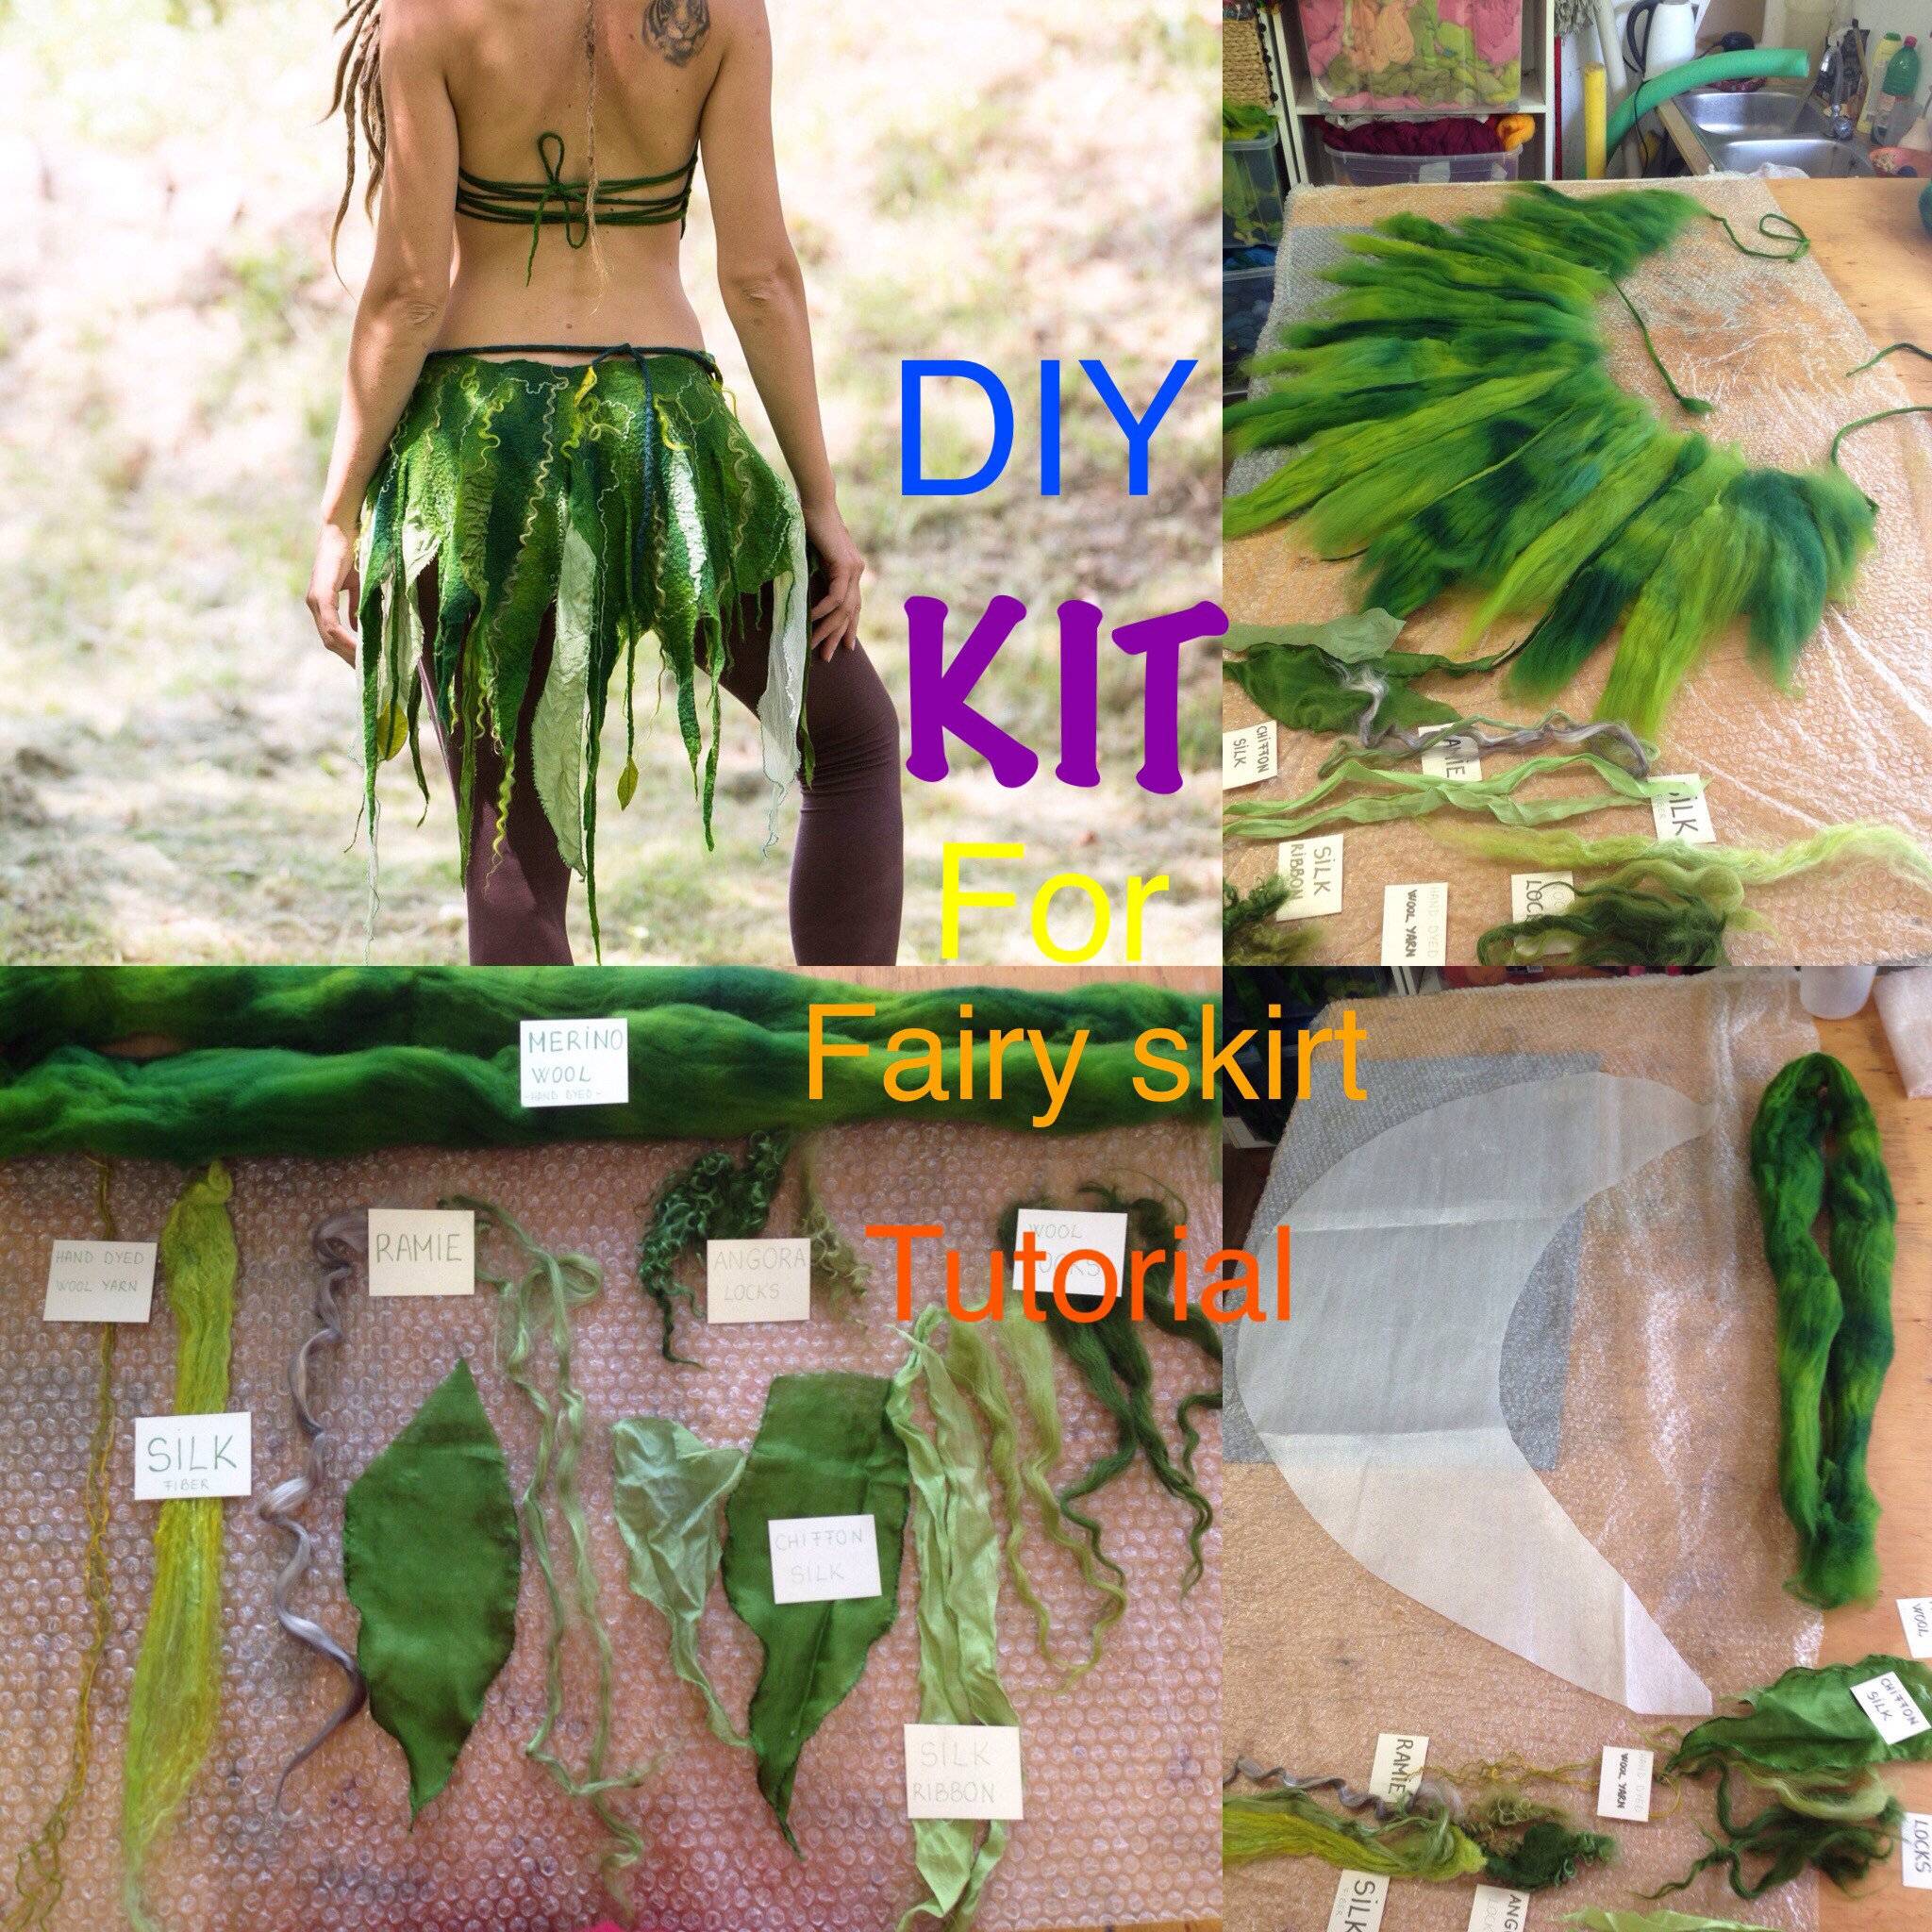
Welcome to our DIY tutorial on how to create a stunning tattered fairy wrap skirt! If you’re looking to add a touch of whimsy and uniqueness to your wardrobe, this is the perfect project for you. In this tutorial, we will guide you through each step, from choosing the fabric to adding tattered details and creating the wrap closure. We will also provide tips and tricks for styling and wearing your finished skirt. So, grab your materials and let’s get started on this enchanting journey of creating your very own tattered fairy wrap skirt!
Materials needed for the DIY tattered fairy wrap skirt:
- Fabric of your choice
- Scissors
- Measuring tape
- Needle and thread
- Elastic or ribbon for the waistband
- Embellishments such as lace, ribbons, or beads
- Pins
- Sewing machine (optional)
Step 1: Choosing the fabric for your tattered fairy wrap skirt
When selecting the fabric for your tattered fairy wrap skirt, consider using lightweight and flowy materials such as chiffon, silk, or cotton. These fabrics will give your skirt a whimsical and ethereal look. You can choose a solid color or opt for a patterned fabric to add more visual interest.
Step 2: Measuring and cutting the fabric for the skirt
Measure your waist and hips to determine the length and width of the fabric needed for your skirt. Add a few inches to the measurements for seam allowances and ease. Use the measurements to cut out a rectangular piece of fabric.
Step 3: Adding tattered details to the fabric
To create the tattered look, use scissors to cut small slits or fringes along the edges of the fabric. You can also tear the fabric slightly to achieve a more distressed appearance. Be creative and experiment with different techniques to achieve the desired tattered effect.
Step 4: Creating the wrap closure for the skirt
To create the wrap closure, fold one edge of the fabric over and sew a straight line along the edge to create a hem. Attach a piece of elastic or ribbon to the other edge of the fabric to serve as the waistband. This will allow you to adjust the fit of the skirt.
Step 5: Adding additional embellishments to the skirt
Enhance the look of your tattered fairy wrap skirt by adding embellishments such as lace, ribbons, or beads. Sew or glue these embellishments onto the fabric to create a unique and personalized design.
Step 6: Finishing touches and final adjustments
Once you have added all the desired details and
Step 1: Choosing the fabric for your tattered fairy wrap skirt.
When it comes to creating your own tattered fairy wrap skirt, the first step is to choose the perfect fabric. The fabric you select will determine the overall look and feel of your skirt, so it’s important to choose wisely. Consider opting for lightweight and flowy fabrics such as chiffon or silk, as they will give your skirt a whimsical and ethereal look. Alternatively, you can go for a more rustic and earthy vibe by choosing fabrics like linen or cotton. It’s also a good idea to select fabrics in colors that complement your personal style and the rest of your wardrobe. Remember, the fabric you choose will be the foundation of your tattered fairy wrap skirt, so take your time and choose something that speaks to you.
Step 2: Measuring and cutting the fabric for the skirt
Now that you have chosen the perfect fabric for your tattered fairy wrap skirt, it’s time to move on to the next step: measuring and cutting the fabric. This step is crucial in ensuring that your skirt fits you perfectly and looks flattering.
First, you will need to take accurate measurements of your waist and hips. Use a measuring tape to measure around the narrowest part of your waist and the widest part of your hips. Write down these measurements as you will need them later.
Next, lay your fabric flat on a clean and spacious surface. Make sure it is free from any wrinkles or creases. Using a fabric marker or chalk, mark the measurements you took earlier on the fabric. This will serve as a guide for cutting.
Using sharp fabric scissors, carefully cut along the marked lines. Take your time and make sure to cut in a straight line. It’s always better to cut a little bit bigger than your measurements, as you can always make adjustments later.
Once you have cut the fabric, you can now move on to the next step of adding tattered details to give your skirt that whimsical and unique look.
Step 3: Adding tattered details to the fabric
Once you have chosen and cut your fabric, it’s time to add some tattered details to give your skirt a whimsical and ethereal look. Here are the steps to follow:
- Start by fraying the edges of the fabric. You can do this by gently pulling on the threads or using a pair of scissors to create small cuts along the edges.
- Next, create some intentional tears in the fabric. This can be done by making small cuts and then tearing the fabric further to create a distressed look.
- If you want to add some additional texture, you can use sandpaper or a wire brush to rough up the fabric. This will give it a more worn and aged appearance.
- For a more dramatic effect, you can also add some rips and holes to the fabric. This can be done by cutting small slits and then tearing the fabric further.
- Once you are satisfied with the tattered details, give the fabric a gentle wash to soften the edges and enhance the distressed look.
Adding tattered details to your fabric will give your skirt a unique and vintage-inspired look. Have fun experimenting with different techniques and creating a one-of-a-kind piece!
Step 4: Creating the wrap closure for the skirt
Once you have added the tattered details to your fabric, it’s time to create the wrap closure for your skirt. This closure will allow you to adjust the fit of the skirt and ensure that it stays securely in place.
- Start by folding over one edge of the fabric to create a hem. Use a sewing machine or needle and thread to secure the hem in place.
- Next, measure and mark where you want the closure to be on the opposite edge of the fabric. This will be where the skirt wraps around your waist.
- Attach a button or snap to one side of the closure and a corresponding buttonhole or loop to the other side. This will allow you to fasten the skirt securely.
- Make sure that the closure is positioned at a comfortable and flattering spot on your waist. You may need to try on the skirt and make adjustments before finalizing the placement of the closure.
- Once you are satisfied with the placement of the closure, sew it securely in place.
Creating a wrap closure for your tattered fairy wrap skirt adds functionality and allows you to customize the fit of the skirt to your body. It also adds a unique and whimsical touch to the overall design.
Step 5: Adding additional embellishments to the skirt
Now that you have created the basic structure of your tattered fairy wrap skirt, it’s time to add some extra flair and personality to it. This step allows you to unleash your creativity and make your skirt truly unique.
One popular option is to add lace or ribbon trim to the edges of the skirt. This adds a delicate and feminine touch to the overall look. You can choose a color that complements the fabric of your skirt or go for a contrasting shade to create a bold statement.
Another way to embellish your skirt is by adding decorative buttons or beads. These can be sewn onto the fabric in a pattern or randomly scattered for a more whimsical effect. Be sure to choose buttons or beads that match the style and theme of your skirt.
If you want to take it a step further, you can also incorporate embroidery or appliqué designs onto the fabric. This allows you to create intricate and detailed patterns that will truly make your skirt stand out.
Remember, the key is to have fun and let your imagination run wild. Experiment with different embellishments and techniques until you achieve the desired look. Your tattered fairy wrap skirt should reflect your personal style and make you feel like a magical fairy whenever you wear it.
Step 6: Finishing touches and final adjustments
Now that you have completed the main steps of creating your tattered fairy wrap skirt, it’s time to add the finishing touches and make any final adjustments. This is where you can really personalize your skirt and make it unique to your style.
First, take a close look at the tattered details you added in Step 3. If there are any loose threads or edges that need to be secured, use a needle and thread to stitch them in place. This will ensure that your skirt stays intact and doesn’t unravel over time.
Next, try on the skirt and check the fit. If it feels too loose or too tight, you can make adjustments by adding or removing fabric from the wrap closure. Remember to leave enough room for the skirt to wrap around your waist comfortably.
Finally, consider adding some additional embellishments to enhance the whimsical look of your skirt. You can sew on some beads, sequins, or lace trim to give it a touch of sparkle and elegance.
Once you are satisfied with the final look and fit of your tattered fairy wrap skirt, it’s time to show it off! Pair it with a simple tank top or a flowy blouse, and accessorize with some fairy-inspired jewelry or a flower crown. Embrace your inner fairy and enjoy the magic of your unique creation!
Tips and tricks for styling and wearing your tattered fairy wrap skirt
Now that you have successfully created your own tattered fairy wrap skirt, it’s time to explore different ways to style and wear it. This unique and whimsical piece can be a versatile addition to your wardrobe, perfect for both casual and dressy occasions.
1. Pair it with a simple top: Let the skirt be the focal point of your outfit by pairing it with a plain, solid-colored top. This will allow the tattered details and embellishments to stand out.
2. Add layers: For a bohemian-inspired look, layer your tattered fairy wrap skirt with a flowy cardigan or a lace kimono. This will add dimension and create a romantic and ethereal vibe.
3. Play with accessories: Experiment with different accessories to enhance the fairy-like feel of the skirt. Try adding a flower crown, delicate jewelry, or even fairy wings for a whimsical touch.
4. Mix and match textures: Don’t be afraid to mix different textures and fabrics. Pair your tattered fairy wrap skirt with a chunky knit sweater or a leather jacket for a contrasting look that adds edge to the feminine skirt.
5. Dress it up or down: Depending on the occasion, you can dress your tattered fairy wrap skirt up or down. Pair it with heels and a blouse for a more formal look, or with sandals and a t-shirt for a casual and effortless ensemble.
Remember, the key to styling your tattered fairy wrap skirt is to embrace its unique and whimsical nature. Have fun experimenting with different looks and let your creativity shine!
Creating Your Own Tattered Fairy Wrap Skirt
After following the step-by-step instructions in this DIY tutorial, you are now the proud owner of a one-of-a-kind tattered fairy wrap skirt. This whimsical garment is sure to turn heads and make you feel like a true fairy princess. The process of making this skirt may have been time-consuming and intricate, but the end result is well worth the effort.
By carefully selecting the fabric, measuring and cutting it to the perfect length, and adding tattered details, you have created a skirt that is truly unique. The wrap closure adds a touch of elegance and allows for a customizable fit. And let’s not forget about the additional embellishments that make this skirt truly magical.
Now that your tattered fairy wrap skirt is complete, it’s time to show it off and let your imagination run wild. Pair it with a simple tank top and sandals for a casual bohemian look, or dress it up with a lace blouse and heels for a more formal occasion. The possibilities are endless!
So go ahead, enjoy your new creation and embrace your inner fairy. Let your tattered fairy wrap skirt be a symbol of your creativity and individuality. Wear it with pride and let it transport you to a world of enchantment and wonder.
Learn how to make a stunning tattered fairy wrap skirt with this DIY tutorial. Create your own unique and whimsical style!
About The Author

Alison Sowle is the typical tv guru. With a social media evangelist background, she knows how to get her message out there. However, she's also an introvert at heart and loves nothing more than writing for hours on end. She's a passionate creator who takes great joy in learning about new cultures - especially when it comes to beer!