
Last Updated on July 27, 2023
Welcome to the world of sewing! In this article, we will delve into the fascinating concept of inset corners and how to sew them with precision and skill. Whether you’re a seasoned seamstress or just starting out, understanding the techniques involved in sewing inset corners is essential for creating beautiful and professional-looking projects. We will guide you through the process step-by-step, providing tips and tricks along the way to ensure your corners are clean and flawless. Additionally, we will explore common mistakes to avoid and troubleshoot any issues you may encounter. So, let’s get started on this exciting journey to mastering the art of sewing inset corners!
Gathering the necessary materials and tools for sewing inset corners
When it comes to sewing inset corners, having the right materials and tools is essential. Here are the items you will need:
- Fabric: Choose a fabric that is suitable for your project and has enough drape to create clean corners.
- Pattern: Make sure you have a pattern that includes inset corners or modify an existing pattern to add them.
- Scissors: Invest in a good pair of fabric scissors for cutting your fabric accurately.
- Pins: Use pins to hold your fabric in place while sewing.
- Needles: Depending on your fabric, you may need different types of needles. Be sure to have a variety on hand.
- Thread: Choose a thread color that matches your fabric for a seamless finish.
- Sewing machine: A sewing machine will make the process faster and more efficient.
- Iron: An iron is essential for pressing your fabric and creating crisp corners.
Having these materials and tools ready will ensure that you can sew inset corners with ease and achieve professional-looking results.
Preparing the fabric and pattern for sewing inset corners
Before you can start sewing inset corners, it is important to properly prepare your fabric and pattern. First, make sure you have chosen a fabric that is suitable for inset corners. Next, wash and iron the fabric to remove any wrinkles or creases. This will ensure that your corners turn out neat and crisp. Then, lay out your fabric and pattern on a flat surface. Make sure that the pattern is aligned correctly with the grain of the fabric. Take your time to carefully pin the pattern to the fabric, ensuring that it is secure and won’t shift during sewing. Finally, use a fabric marker or chalk to mark the corners on the fabric. This will serve as a guide when sewing the inset corners.
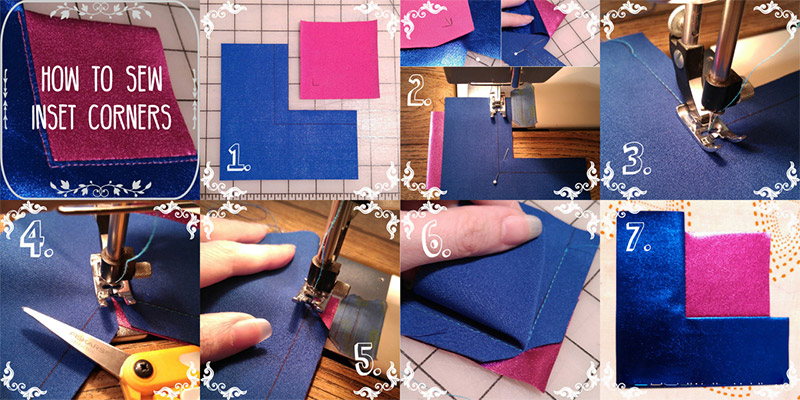
Step-by-step instructions for sewing inset corners
Now that you have prepared your fabric and pattern, it’s time to sew the inset corners. First, fold the fabric along the marked corner lines, aligning the edges. Pin the folded edges together to hold them in place. Next, sew along the folded edges using a straight stitch, making sure to backstitch at the beginning and end to secure the stitches. Then, trim the excess fabric from the corners, being careful not to cut into the stitches. Finally, press the corners with an iron to flatten them and give them a polished look. Remember to follow these steps for each inset corner in your sewing project to achieve clean and professional-looking results.
Step-by-step instructions for sewing inset corners
Now that you have gathered all the necessary materials and prepared your fabric and pattern, it’s time to dive into the process of sewing inset corners. Follow these step-by-step instructions to achieve perfect results:
-
Mark the corners
Using a fabric marker or chalk, mark the corners where you want to sew the inset corners. Make sure the marks are precise and evenly spaced.
-
Pin the fabric
Take the fabric pieces that you want to sew together and align them with right sides facing each other. Pin the corners together, ensuring that the marks align perfectly.
-
Sew the corners
Using a sewing machine or needle and thread, start sewing from one mark to the other, following the seam allowance specified in your pattern. Backstitch at the beginning and end to secure the stitches.
-
Trim the excess fabric
After sewing the corners, trim the excess fabric close to the seam to reduce bulk and create a clean finish.
-
Press the corners
Using an iron, press the sewn corners to set the stitches and create crisp edges. Be careful not to stretch or distort the fabric while pressing.
By following these instructions carefully, you will be able to sew inset corners with precision and achieve a professional-looking finish. Practice and patience are key to mastering this technique, so don’t be discouraged if it takes a few tries to get it right. With time, you will become confident in sewing inset corners and be able to incorporate them into various sewing projects.
Tips and tricks for achieving clean and professional-looking inset corners
- Use a pressing tool, such as a tailor’s ham or a clapper, to press the seams open and create crisp corners.
- Trim the seam allowance at the corners to reduce bulk and allow for easier turning.
- Clip the corners diagonally before turning to help them lay flat and prevent them from bunching up.
- Use a point turner or a blunt pencil to gently push out the corners and create sharp points.
- Press the corners again after turning to ensure they are well-defined and neat.
- Consider using a contrasting fabric for the inset corners to add visual interest to your project.
- Practice on scrap fabric before sewing inset corners on your actual project to gain confidence and improve your technique.
- Take your time and sew slowly when approaching the corners to ensure accuracy and precision.
- If you’re struggling with achieving clean corners, try using a smaller seam allowance or adjusting the tension on your sewing machine.
By following these tips and tricks, you can achieve clean and professional-looking inset corners in your sewing projects. Remember to practice and be patient, as mastering this technique takes time and experience.
Common Mistakes to Avoid When Sewing Inset Corners
When sewing inset corners, it’s important to pay attention to detail and avoid common mistakes that can compromise the quality of your finished project. Here are some common mistakes to avoid:
- Not marking the corners accurately: Before sewing, make sure to mark the corners accurately on your fabric. This will help you sew the corners in the right place and achieve a clean finish.
- Using the wrong stitch length: Using a stitch length that is too long can cause the fabric to pucker at the corners. Make sure to adjust your stitch length to a shorter setting for better results.
- Not clipping the corners: Clipping the corners is an essential step in sewing inset corners. It helps reduce bulk and allows the fabric to lay flat. Be careful not to clip too close to the stitching to avoid fraying.
- Skipping the pressing step: Pressing the fabric at each stage of sewing is crucial for achieving crisp and professional-looking inset corners. Take the time to press the fabric before and after sewing the corners.
- Not securing the corners properly: To ensure that the corners stay in place and don’t unravel, make sure to backstitch or reinforce the stitching at the corners. This will add strength and durability to your finished project.
By avoiding these common mistakes, you can improve the quality of your sewing and achieve flawless inset corners in your projects.
Troubleshooting common issues encountered when sewing inset corners
While sewing inset corners can add a beautiful and professional touch to your projects, it can also present some challenges. Here are some common issues that you may encounter and how to troubleshoot them:
1. Uneven corners
If your corners are not symmetrical or evenly shaped, it could be due to inaccurate cutting or sewing. Make sure to measure and cut your fabric accurately, and use pins or clips to hold the fabric in place while sewing.
2. Puckering or gathering
If you notice puckering or gathering around the corners, it could be a result of too much tension on the fabric. Adjust the tension on your sewing machine or use a lighter weight fabric to prevent this issue.
3. Fraying fabric
If your fabric is fraying at the corners, it may be because you haven’t finished the raw edges. Consider using a serger or a zigzag stitch to finish the edges and prevent fraying.
By troubleshooting these common issues, you can ensure that your inset corners turn out clean and professional-looking, adding a polished finish to your sewing projects.
Alternative techniques for sewing inset corners
While the traditional method of sewing inset corners involves folding and stitching, there are alternative techniques that can be used to achieve the same result. One such technique is the mitered corner method. This involves cutting the fabric at a 45-degree angle and then folding and stitching the corners. This creates a neat and clean finish, with no visible seams.
Another alternative technique is the bias tape method. This involves using bias tape to finish the corners, instead of folding and stitching. The bias tape is sewn onto the fabric, covering the raw edges and creating a clean and professional look.
Additionally, some sewers prefer to use a serger or overlock machine to sew inset corners. This machine creates a finished edge while sewing, eliminating the need for folding and stitching.
It is important to note that these alternative techniques may require some practice and experimentation to master. However, they can offer a unique and creative approach to sewing inset corners, allowing for endless possibilities in design and style.
Exploring creative ways to incorporate inset corners in sewing projects
Once you have mastered the basic technique of sewing inset corners, you can start exploring creative ways to incorporate them into your sewing projects. Inset corners can add a unique and stylish touch to various items, such as clothing, home decor, and accessories.
One creative way to use inset corners is by adding them to the hem of a skirt or dress. This can create a beautiful and eye-catching detail that sets your garment apart from the rest. You can choose to use contrasting fabric for the inset corners to make them stand out even more.
Another idea is to incorporate inset corners into quilt blocks or patchwork designs. By strategically placing inset corners in your quilt, you can create interesting patterns and shapes that add visual interest to your project.
Additionally, you can experiment with different fabrics and textures to create unique inset corners. For example, you can use lace or embroidered fabric for a delicate and feminine look, or leather or denim for a more edgy and modern feel.
Remember, the possibilities are endless when it comes to incorporating inset corners into your sewing projects. Don’t be afraid to think outside the box and let your creativity shine!
Mastering the art of sewing inset corners for flawless and polished results
After following the step-by-step instructions and gathering the necessary materials, you are now equipped with the knowledge and skills to sew inset corners with confidence. By understanding the concept of inset corners and preparing the fabric and pattern correctly, you can achieve clean and professional-looking results.
However, it is important to keep in mind some tips and tricks to ensure flawless and polished inset corners. Pay attention to the grainline of the fabric, use proper pressing techniques, and trim excess fabric to reduce bulk. These small details can make a significant difference in the final outcome of your sewing project.
While sewing inset corners, it is common to encounter some challenges. Common mistakes such as inaccurate cutting or sewing too close to the edge can lead to unsatisfactory results. By being aware of these mistakes and troubleshooting common issues, you can overcome any obstacles and achieve the desired outcome.
Lastly, don’t be afraid to explore alternative techniques and get creative with inset corners in your sewing projects. Whether it’s using contrasting fabrics or incorporating unique shapes, inset corners can add a touch of elegance and sophistication to your creations.
So, go ahead and practice sewing inset corners. With time and experience, you will master this art and achieve flawless and polished results in your sewing projects.
Learn how to sew inset corners like a pro with this step-by-step guide. Achieve flawless and polished results every time!
About The Author

Alison Sowle is the typical tv guru. With a social media evangelist background, she knows how to get her message out there. However, she's also an introvert at heart and loves nothing more than writing for hours on end. She's a passionate creator who takes great joy in learning about new cultures - especially when it comes to beer!