
Last Updated on September 6, 2022
If you’ve ever wondered how to make a kenney style tie dye, look no further! This article will give you step-by-step instructions to create this unique tie-dye style. The folding and dyeing process is precise, and fishing line cordage is needed for the proper knot. Though this type of tie-dye is traditionally reserved for experienced tie-dyers, you can easily give it a try if you’re new to the craft.
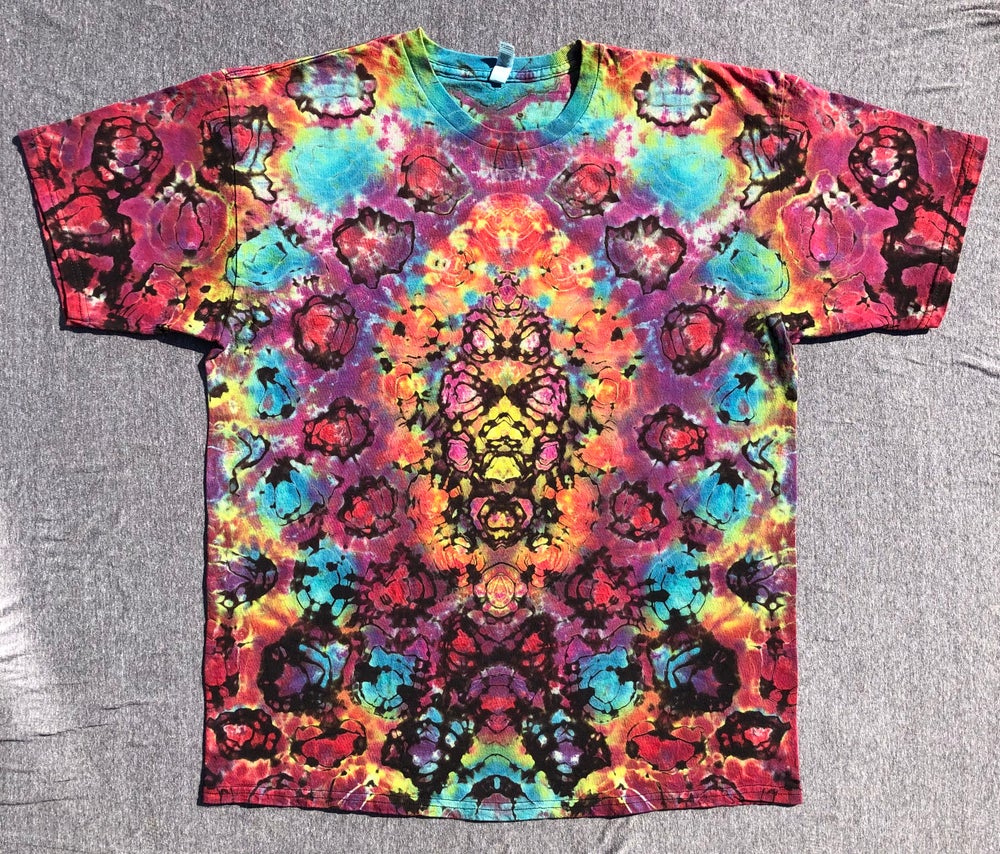
Geode technique
The Geode technique for kenney style tie-dyeing begins by dampening a shirt. Then, using a piece of cord, bind one or more sections tightly together. Depending on the desired effect, you can repeat this process multiple times with the same shirt, resulting in concentric rings. For best results, use a continuous length of cord and tie it so that it is easy to remove without tearing the fabric.
The Geode technique can be used alone, or combined with other techniques to create a multi-pattern tie-dye design. In addition to its ability to create rings, this technique can also produce designs that resemble geodes. In addition to creating rings, this method can create any number and shape of rings. The key is to tie a tightly knotted cord to avoid leaving any white or uncolored area under the colored area. Artificial sinew is an ideal choice for this technique because it can be woven to extremely tight knots.
The most advanced version of the Geode technique is called the Kenney style and features hundreds of individual rings on a single piece of fabric. This method is named after renowned tie dye artist Paul Kenney. While the Geode technique is a good choice for novices, it’s worth the extra effort if you’re a true artist. A great way to test the Geode technique is by dyeing a swatch of your own shirt first, and then repeating the process as necessary.
Shibori
The shibori tie dye process dates back to the eighth century, when the technique of pleating fabric was popularized. It uses indigo, a dye readily available in east Asia. Though it is widely considered tie-dye, different techniques are used to achieve different results. In the traditional style, the fabric is bound with thread or rubber bands, while the Arashi technique involves wrapping the fabric around a pole.
For the Itajime style, the dye bath is filled with hot water at 140 degrees Fahrenheit. The blanket is dipped into the dye bath. For a higher contrast pattern, five to 10 minutes of dipping is sufficient, while a maximum of 30 minutes is required for more dye to bleed into white areas. Once the blanket is ready, it is best to remove it from the pole and wash it in cold water.
If you want to try the shibori method, the first step is to prepare the fabric. Prepare it by washing and pre-drying it. If you plan to dye a whole cloth, you can use a small container or sealable bag to put the fabric in. After this step, you can place the dyed cloth into the bag and let it sit in the cold for about six to eight hours. If the dye sets quickly, you can skip the ice process.
To create a Kenney style tie dye, prepare the fabric beforehand. It can be dyed using fabric dye or paint. Food coloring is used, but be sure to add several drops of water. It is best to use polyester fabric or other material that will retain its color better. Once it has been dried, you can weave the dyed fabric or tie it with a thread to make it more durable.
The Geode technique can be used to create a geometric design on the shirt. This design looks great with jeans and other outfits. To tie dye a shirt in this way, you will need a pre-soaked white T-shirt, a washable marker, and a string. You can also use a washable marker to draw a heart shape on the fabric. In this method, you will need a small amount of dye to dye the shirt.
Reverse tie-dye technique
The Reverse tie-dye technique is one of the hottest trends in fashion today, and it’s a great way to create your own unique apparel. The process is similar to tie-dyeing, with the exception that you bleach the garment first to create light spots for the dye. This process will produce a much lighter hue than traditional tie-dyeing.
Start by selecting a black 100% cotton t-shirt. If you’re using a different color, you can use a Color Changer to get a more dramatic result. To begin, make sure that the fabric is completely dry before you start. Then, crinkle, swirl, and fold the shirt until it is the desired design. The basic swirl is a classic design, so stick with that at first. Once you’ve mastered this technique, you can try more elaborate designs.
You’ll also need a large plastic container or dish drying rack to prepare the apparel for the process. Once you’ve done that, you’re ready to add the dye. To make the process even simpler, you’ll need a white T-shirt that has been presoaked in a dye, a small dish drying rack, and some rubber bands. Before you begin, be sure that the fabric is completely dry to avoid damaging it.
After you’ve applied the dye, your shirt is ready for the next step: applying it to the fabric. Apply the dye to the entire shirt, making sure to place the rubber bands evenly around the shirt. You can use varying colors of dye to get a vibrant result. To wash the finished shirt, simply rinse it and hang it up to dry. Your finished shirt will look fabulous!
Adding more stripes
If you’re looking to add more stripes to your kenney style tie dye T-shirt, you can begin by drawing a heart shape on the shirt. Start about four inches below the shoulder and draw stripes every two inches. Repeat this pattern until the entire shirt is covered. Start with a section of blue fabric, then move to red, then white, and so on. Then, place the shirt on a baking rack to prevent any puddling. Let the shirt sit in a warm area for at least six to eight hours before washing. Rinse it with water, and repeat the process until the dye is completely clear.
Creating stripes is simple and fun. Use any t-shirt of your choice, and mix paint or fabric dye to get the desired result. You can also use food coloring. Just mix a few drops of food coloring in water to make a color that works on your shirt. Use different colors for the stripes, and choose polyester fabric to avoid losing color. Adding stripes will make your t-shirt look unique!
About The Author

Pat Rowse is a thinker. He loves delving into Twitter to find the latest scholarly debates and then analyzing them from every possible perspective. He's an introvert who really enjoys spending time alone reading about history and influential people. Pat also has a deep love of the internet and all things digital; she considers himself an amateur internet maven. When he's not buried in a book or online, he can be found hardcore analyzing anything and everything that comes his way.