
Last Updated on July 26, 2023
Short Answer
To make a lightning bolt friendship bracelet, you will need embroidery floss in different colors, scissors, and a clipboard or tape to hold the bracelet in place. Start by cutting six strands of floss, each measuring about 60 inches long. Arrange the strands in the order you want the colors to appear in the bracelet. Then, follow a specific knotting pattern to create the lightning bolt design. This involves making forward and backward knots with the strands. Once you have completed the pattern, tie the ends of the bracelet together and trim any excess floss. Enjoy your unique lightning bolt friendship bracelet!
Friendship bracelets have always been a popular way to show appreciation and strengthen bonds between friends. In recent years, the DIY trend has taken over, with people opting to create their own unique bracelets rather than buying them. One particular design that has gained popularity is the lightning bolt friendship bracelet. In this article, we will guide you through the process of making your own lightning bolt bracelet, from choosing the right materials to adding the finishing touches. Whether you’re a beginner or an experienced crafter, this step-by-step guide will help you create a vibrant and eye-catching bracelet that showcases your creativity and friendship.
Choosing the right materials for your lightning bolt friendship bracelet
- Consider the type of thread or string you want to use for your bracelet. Options include embroidery floss, nylon cord, or hemp.
- Choose a color palette that complements the lightning bolt design. You can go for bold and vibrant colors or opt for a more subtle and monochromatic look.
- Gather the necessary tools such as scissors, tape, and a clipboard or safety pin to hold your bracelet in place while you work.
Step 1: Creating the base of your bracelet with the knotting technique
When it comes to making a lightning bolt friendship bracelet, the first step is to create the base using a knotting technique. This is the foundation upon which the rest of the bracelet will be built. To start, you will need a piece of string or embroidery floss in the color of your choice. Measure the string to the desired length, keeping in mind that it will shrink slightly once the knots are tied.
Next, fold the string in half and create a loop at the top. This loop will serve as the starting point for your bracelet. Take the loose ends of the string and thread them through the loop, pulling tight to secure the knot. Now you are ready to begin the knotting process.
Using the knotting technique known as the forward knot, take the left string and cross it over the middle strings, creating a loop. Then, take the right string and cross it over the left string, threading it through the loop. Pull both strings tight to create a knot. Repeat this process, alternating between the left and right strings, until you have reached the desired length for your bracelet.
Creating the base of your lightning bolt friendship bracelet may take some practice, but with time and patience, you will master the knotting technique and be on your way to creating a stunning bracelet.
Step 1: Creating the base of your bracelet with the knotting technique
When it comes to making a lightning bolt friendship bracelet, the first step is to create the base using a knotting technique. This is the foundation upon which the rest of the bracelet will be built. To start, you will need a piece of string or embroidery floss in the color of your choice. Measure the string to the desired length, keeping in mind that it will shrink slightly once the knots are tied.
Next, fold the string in half and create a loop at the top. This loop will serve as the starting point for your bracelet. Take the loose ends of the string and thread them through the loop, pulling tight to secure the knot. Now you are ready to begin the knotting process.
Using the knotting technique known as the forward knot, take the left string and cross it
Step 2: Adding the lightning bolt design to your bracelet
Now that you have created the base of your bracelet, it’s time to add the lightning bolt design. This is where the bracelet really starts to come to life!
To create the lightning bolt, you will need a contrasting color of embroidery floss. Choose a color that will stand out against the base color of your bracelet.
Start by cutting a piece of embroidery floss that is about twice the length of your bracelet. Fold it in half and tie a knot at the folded end. This will create a loop that you will use to attach the lightning bolt to your bracelet.
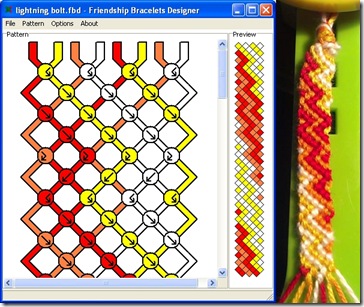
Next, take the two loose ends of the embroidery floss and position them in the shape of a lightning bolt. You can use a reference image or draw the shape on a piece of paper to guide you.
Once you are happy with the shape, use a small piece of clear tape to secure the ends of the lightning bolt to the base of your bracelet. Make sure the tape is firmly attached so that the lightning bolt stays in place.
Now, using the knotting technique from step 1, continue knotting the embroidery floss around the base of your bracelet, making sure to include the lightning bolt in each knot.
Continue knotting until you have reached the end of your bracelet. Once you are finished, tie a knot at the end to secure everything in place.
And there you have it! You have successfully added a lightning bolt design to your friendship bracelet. Now it’s time to move on to step 3 and incorporate different colors for a vibrant and eye-catching bracelet.
Step 3: Incorporating different colors for a vibrant and eye-catching bracelet
Adding different colors to your lightning bolt friendship bracelet can make it more visually appealing and unique. Here are some tips on how to incorporate different colors:
- Choose a color scheme: Decide on a color scheme that you want to use for your bracelet. You can go for a monochromatic look or mix and match different colors.
- Select your thread: Pick different colored threads that match your chosen color scheme. You can use embroidery floss or any other type of thread that is suitable for bracelet making.
- Create a pattern: Plan out a pattern for your bracelet using the different colored threads. You can create a striped pattern, a gradient effect, or any other design that you like.
- Start knotting: Begin knotting your bracelet using the different colored threads. Alternate between the colors according to your pattern.
- Experiment with different techniques: You can try out different knotting techniques to incorporate the colors. For example, you can use the chevron or the diagonal stripe technique.
By incorporating different colors, you can create a vibrant and eye-catching lightning bolt friendship bracelet that reflects your personal style.
Step 4: Finishing touches and securing your bracelet
Once you have completed the lightning bolt design and incorporated different colors into your bracelet, it’s time to add the finishing touches and secure your creation. Here are some steps to follow:
- Trim the excess thread: Use a pair of scissors to carefully trim any excess thread from the ends of your bracelet. Make sure to leave a small tail of thread to prevent unraveling.
- Secure the ends: To prevent your bracelet from coming undone, you can use a small amount of clear nail polish or fabric glue to secure the ends of the thread. Apply the adhesive to the last few knots and let it dry completely.
- Add a closure: There are various options for adding a closure to your bracelet, such as a lobster clasp, a button, or a sliding knot. Choose the closure that best suits your style and attach it to the ends of your bracelet.
- Test the fit: Before finalizing the closure, make sure to try on the bracelet and adjust the length if necessary. You want it to fit comfortably on your wrist.
By following these steps, you can ensure that your lightning bolt friendship bracelet is secure and ready to be worn with pride.
Tips and tricks for creating a professional-looking lightning bolt friendship bracelet
Creating a lightning bolt friendship bracelet can be a fun and rewarding DIY project. To ensure that your bracelet looks professional and well-crafted, here are some tips and tricks to keep in mind:
1. Choose high-quality materials:
Using high-quality threads and beads will not only make your bracelet look better, but it will also ensure that it lasts longer.
2. Practice your knotting technique:
The base of your bracelet is created using knotting techniques. Take the time to practice and perfect your knots to ensure a neat and uniform look.
Pay attention to symmetry:
When adding the lightning bolt design, make sure it is symmetrical and centered on the bracelet. This will give it a more professional and polished appearance.
4. Experiment with color combinations:
Using different colors can make your bracelet more vibrant and eye-catching. Play around with different color combinations to find the one that suits your style.
By following these tips and tricks, you can create a lightning bolt friendship bracelet that looks professional and showcases your creativity. So, grab your materials and get started on making a stunning bracelet that will impress your friends!
Personalizing your lightning bolt friendship bracelet with charms and beads
Once you have completed the steps to create your lightning bolt friendship bracelet, you can take it a step further by personalizing it with charms and beads. This will add a unique touch and make your bracelet even more special.
First, choose charms that reflect your personality or interests. You can find a wide variety of charms at craft stores or online. Some popular options include hearts, stars, animals, and initials. Select charms that are small enough to fit onto the bracelet but still stand out.
Next, consider adding beads to your bracelet. Beads can add color and texture to your design. You can choose beads in different shapes, sizes, and colors to create a pattern or mix and match for a more eclectic look.
To attach the charms and beads, you can use jump rings or small pieces of string. Simply thread the jump ring or string through the charm or bead and then attach it to the bracelet. Make sure to secure it tightly so that it doesn’t come loose.
By personalizing your lightning bolt friendship bracelet with charms and beads, you can create a one-of-a-kind piece that showcases your individuality and creativity.
Maintenance and Care for Your Lightning Bolt Friendship Bracelet
Once you have completed your lightning bolt friendship bracelet, it is important to take proper care of it to ensure its longevity. Here are some tips for maintaining and caring for your bracelet:
1. Avoid exposure to water: Water can cause the colors of your bracelet to fade or bleed. It is best to remove your bracelet before swimming or showering.
2. Store it properly: When you are not wearing your bracelet, store it in a dry and clean place. Avoid keeping it in direct sunlight, as this can also cause the colors to fade.
Avoid contact with chemicals: Chemicals such as perfume, lotion, and cleaning products can damage the threads of your bracelet. It is best to remove your bracelet before applying any of these substances.
4. Handle with care: Be gentle when wearing and removing your bracelet to prevent any unnecessary strain on the threads or charms.
5. Regularly inspect for damage: Check your bracelet for any signs of wear and tear. If you notice any loose threads or broken charms, repair them immediately to prevent further damage.
By following these maintenance and care tips, you can enjoy your lightning bolt friendship bracelet for a long time and showcase your creativity and friendship to the world.
Unleash Your Creativity and Showcase Your Friendship with a Dazzling Lightning Bolt Bracelet
Friendship bracelets have always been a beloved symbol of camaraderie, and making your own adds a personal touch that is truly special. By following these simple steps, you can create a lightning bolt friendship bracelet that is not only vibrant and eye-catching but also a testament to your creativity and friendship.
From choosing the right materials to incorporating different colors and adding personalized charms, this article has provided you with all the necessary guidance to create a professional-looking bracelet. With a little practice and attention to detail, you can craft a stunning lightning bolt design that will surely turn heads.
So, why wait? Grab your materials, gather your friends, and embark on this exciting DIY project. Let your imagination run wild and create a bracelet that not only showcases your friendship but also reflects your unique style. Get ready to show off your creativity and wear your friendship proudly with a dazzling lightning bolt bracelet.
Frequently Asked Questions
Q: What is the appeal of DIY projects like friendship bracelets?
A: DIY projects like friendship bracelets allow individuals to express their creativity and create unique, personalized accessories. They also provide a sense of accomplishment and can be a fun and relaxing activity.
Q: How do I choose the right materials for my lightning bolt friendship bracelet?
A: When choosing materials for your lightning bolt friendship bracelet, consider the type of thread or cord you want to use, the size and style of the lightning bolt charm, and any additional beads or charms you may want to incorporate. It’s important to choose materials that are durable and of good quality.
Q: Can you explain the knotting technique used to create the base of the bracelet?
A: The knotting technique used to create the base of the lightning bolt friendship bracelet is called the square knot. It involves crossing two strands of thread or cord and looping them over each other to create a knot. This technique is repeated to create a series of knots that form the bracelet’s base.
Q: How can I add the lightning bolt design to my bracelet?
A: To add the lightning bolt design to your bracelet, you can use a combination of knotting techniques such as the forward knot and backward knot. These knots are used to create diagonal lines that form the shape of a lightning bolt. You can find step-by-step instructions and diagrams online or in crafting books.
Q: How can I incorporate different colors into my lightning bolt friendship bracelet?
A: To incorporate different colors into your lightning bolt friendship bracelet, you can use multiple strands of thread or cord in different colors. You can also use different colored beads or charms to add pops of color to your bracelet. Experiment with different color combinations to create a vibrant and eye-catching design.
Q: How do I finish and secure my lightning bolt friendship bracelet?
A: To finish and secure your lightning bolt friendship bracelet, you can tie a knot at the end of the bracelet and trim any excess thread or cord. You can also use a jewelry clasp or a small button as a closure for your bracelet. Make sure the closure is secure to prevent the bracelet from coming undone.
Q: What are some tips and tricks for creating a professional-looking lightning bolt friendship bracelet?
A: Some tips and tricks for creating a professional-looking lightning bolt friendship bracelet include using high-quality materials, practicing your knotting techniques before starting the bracelet, and paying attention to detail. It’s also helpful to follow step-by-step instructions or watch video tutorials to ensure you’re using the correct techniques.
Q: How can I personalize my lightning bolt friendship bracelet with charms and beads?
A: To personalize your lightning bolt friendship bracelet, you can add charms and beads that reflect your personal style or interests. You can choose charms that represent your hobbies, favorite animals, or symbols that hold special meaning to you. Beads can also be added to create a unique and customized design.
Q: How do I maintain and care for my lightning bolt friendship bracelet?
A: To maintain and care for your lightning bolt friendship bracelet, avoid exposing it to water or harsh chemicals, as this can cause damage to the materials. When not wearing the bracelet, store it in a cool, dry place to prevent tangling or stretching. If needed, you can gently clean the bracelet with a soft cloth or mild soap and water.
About The Author

Fernánda Esteban is a food fanatic. She can't go more than a few hours without eating, and she loves trying new foods from all over the world. Her friends know that they can always count on her for a good conversation, and she's an animal lover who will never turn down an opportunity to pet a dog or cat. Fernánda also enjoys learning about random facts, and she's a social media practitioner who loves to share what she knows with others.