
Last Updated on July 27, 2023
Welcome to our article on how to stain embroidery hoops! Whether you’re a seasoned embroiderer or just starting out, staining your hoops can add a beautiful touch to your finished projects. In this guide, we will take you through the step-by-step process of staining your embroidery hoops, from gathering the necessary materials to adding the final touches. We will cover everything from preparing the hoops to choosing the perfect stain color and applying it with precision. So, let’s dive in and learn how to transform your plain hoops into stunning works of art!
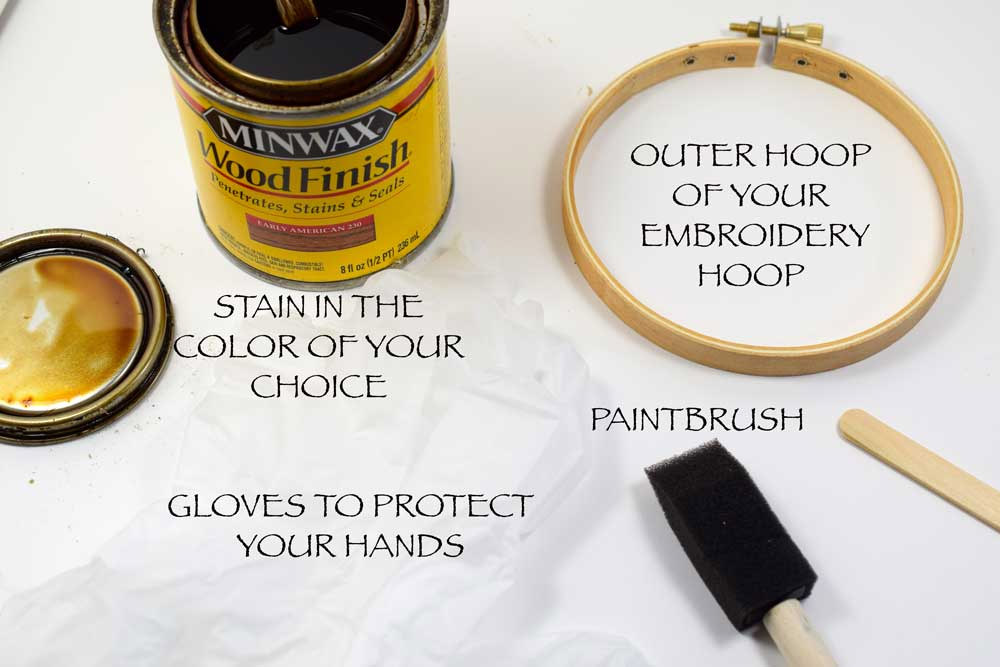
Gather Materials
Before you begin staining your embroidery hoops, it’s important to gather all the necessary materials. Here’s what you’ll need:
- Embroidery hoops
- Sandpaper
- Stain
- Brush or sponge
- Sealant
- Drop cloth or newspaper
- Disposable gloves
- Lint-free cloth
- Painters tape (optional)
Having all these materials ready will make the staining process much smoother and more efficient.
Prepare the Hoops
Before you can begin staining your embroidery hoops, it is important to properly prepare them. Start by removing any dust or debris from the surface of the hoops. You can use a soft cloth or a brush to gently wipe away any dirt. Next, check the hoops for any rough spots or imperfections. If you notice any, you can use sandpaper to smooth them out. This will ensure that the stain goes on evenly and gives your hoops a polished look.
Once you have cleaned and smoothed the hoops, you may also want to consider applying a wood conditioner. This will help the stain to absorb more evenly and prevent blotchiness. Simply apply the conditioner with a brush or cloth, following the manufacturer’s instructions. Allow the conditioner to dry completely before moving on to the next step.
Choose a Stain Color
Now that you have prepared your embroidery hoops, it’s time to choose a stain color that will enhance the beauty of your project. The stain color you choose will depend on your personal preference and the overall aesthetic you want to achieve.
When selecting a stain color, consider the type of wood your hoops are made of. Some stains work better on certain types of wood than others. For example, darker stains tend to look more dramatic on lighter woods, while lighter stains can bring out the natural grain of darker woods.
Additionally, think about the color scheme of your embroidery design. If you want your hoops to complement the colors in your embroidery, choose a stain color that harmonizes with the thread colors you plan to use.
It’s also a good idea to test the stain color on a small, inconspicuous area of the hoop before applying it to the entire surface. This will give you a better idea of how the color will look once it’s fully dried.
Once you have chosen your stain color, you’re ready to move on to the next step: applying the stain.
5. Apply the Stain
Once you have chosen the stain color for your embroidery hoops, it’s time to apply it. Follow these steps to ensure a smooth and even application:
- Prepare your work area by laying down a drop cloth or newspaper to protect the surface.
- Put on a pair of gloves to protect your hands from the stain.
- Dip a clean, lint-free cloth or sponge brush into the stain.
- Start applying the stain to the embroidery hoop, working in small sections.
- Apply the stain in the direction of the wood grain for a more natural look.
- Use even strokes to spread the stain evenly across the surface of the hoop.
- Make sure to cover all sides of the hoop, including the inside and outside.
- Allow the stain to penetrate the wood for a few minutes, then wipe off any excess with a clean cloth.
- Continue applying the stain and wiping off the excess until you achieve the desired color.
Remember to take your time and work carefully to avoid any drips or uneven patches. If you make a mistake, you can always sand down the stain and start again. Once you are satisfied with the color, move on to the next step: letting the stain dry.
6. Let the Stain Dry
After applying the stain to the embroidery hoops, it is important to let them dry completely before moving on to the next step. This will ensure that the stain sets properly and gives a smooth finish to the hoops. Here are some tips to help you with the drying process:
- Find a well-ventilated area where you can place the stained hoops. This will help in speeding up the drying process.
- Avoid touching the stained surface of the hoops while they are drying. This can leave fingerprints or smudges on the stain.
- Depending on the type of stain used, the drying time may vary. It is recommended to refer to the instructions provided by the stain manufacturer for the specific drying time.
- Patience is key during this step. Rushing the drying process can result in an uneven finish or damage to the stain.
- It is advisable to leave the stained hoops undisturbed for at least 24 hours to ensure that they are completely dry.
Once the stain is dry, you can proceed to the next step of adding a second coat if desired.
Add a Second Coat (Optional)
Once the first coat of stain has dried completely, you have the option to add a second coat for a deeper and more vibrant color. This step is completely optional and depends on your personal preference. If you are satisfied with the color after the first coat, you can skip this step.
If you decide to add a second coat, make sure to lightly sand the surface of the hoop with fine-grit sandpaper before applying the stain. This will help the second coat adhere better and create a smoother finish. Use a clean cloth or brush to apply the second coat of stain, following the same technique as before.
Allow the second coat to dry completely before moving on to the next step. This may take a few hours or overnight, depending on the type of stain and the humidity in your area. Be patient and avoid touching the stained surface until it is fully dry.
Adding a second coat of stain can enhance the richness and depth of the color, giving your embroidery hoops a professional and polished look. However, if you prefer a more subtle and natural finish, one coat may be sufficient. The choice is yours!
Seal the Stained Hoops
Once the stain has dried completely, it is important to seal the stained embroidery hoops to protect the color and finish. Sealing the hoops will also give them a polished and professional look.
To seal the stained hoops, you will need a clear sealant or varnish. Make sure to choose a sealant that is compatible with the type of stain you used.
Start by applying a thin and even coat of sealant to the entire surface of the hoops. Use a brush or a sponge applicator to ensure smooth and even coverage.
Allow the first coat of sealant to dry completely before applying a second coat. This will help to enhance the durability and longevity of the seal.
Once the second coat is dry, inspect the hoops for any missed spots or uneven areas. If necessary, apply a third coat of sealant to achieve a flawless finish.
After the final coat of sealant has dried, your stained embroidery hoops are ready to be used for your projects. The sealant will protect the stain from fading or chipping, ensuring that your hoops look beautiful for years to come.
Clean Up and Final Touches
Once you have finished staining your embroidery hoops, it’s time to clean up and add some final touches to ensure they look their best. Start by cleaning any excess stain from your brushes or applicators. You can use warm soapy water to clean water-based stains or mineral spirits for oil-based stains. Make sure to follow the manufacturer’s instructions for proper disposal of any leftover stain or cleaning materials.
Next, inspect your stained hoops for any imperfections or areas that may need touch-ups. If you notice any uneven spots or missed areas, you can apply a small amount of stain to a clean cloth or brush and carefully touch up those areas. Allow the touch-up stain to dry completely before moving on.
Finally, consider adding some final touches to enhance the appearance of your stained hoops. You can use a fine-grit sandpaper to lightly sand the edges of the hoops for a smoother finish. Additionally, you can apply a coat of clear varnish or polyurethane to give the hoops a glossy or satin finish. This will not only protect the stain but also add a professional touch to your finished project.
By following these steps and taking the time to clean up and add final touches, you can ensure that your stained embroidery hoops look beautiful and professional. Now, you can proudly display your embroidery projects in these stunning hoops!
Wrapping it Up
After following these steps, you should now have beautifully stained embroidery hoops that are ready to be used for your next project. Remember, the key to achieving the perfect stain is in the preparation and application process. By gathering the necessary materials, preparing the hoops, choosing the right stain color, and applying it evenly, you can create a stunning finish that enhances the look of your embroidery.
Additionally, if you want to add more depth and richness to the color, you can apply a second coat of stain. This step is optional but can make a significant difference in the final result. Once the stain is dry, don’t forget to seal the hoops to protect the finish and ensure its longevity.
In conclusion, staining embroidery hoops is a simple yet effective way to elevate your embroidery projects. With a little time and effort, you can transform plain wooden hoops into beautiful pieces that complement your artwork. So go ahead, give it a try, and enjoy the satisfaction of creating something truly unique!
Learn how to stain embroidery hoops in this step-by-step guide. Create beautiful crafts with ease.
About The Author

Zeph Grant is a music fanatic. He loves all types of genres and can often be found discussing the latest album releases with friends. Zeph is also a hardcore content creator, always working on new projects in his spare time. He's an amateur food nerd, and loves knowing all sorts of random facts about food. When it comes to coffee, he's something of an expert - he knows all the best places to get a good cup of joe in town.