
Last Updated on July 27, 2023
Lavender wands have become quite popular in recent years, and it’s no wonder why. These beautiful creations not only add a touch of elegance to any space, but they also release a delightful fragrance that can instantly uplift your mood. If you’ve ever wondered how to make your own lavender wand, you’re in luck. In this article, we will guide you through the process step-by-step, from gathering the necessary supplies to adding the finishing touches. Whether you’re a seasoned crafter or a beginner, this article is designed to help you create a stunning lavender wand that you can proudly display in your home or give as a thoughtful gift.
Gathering Supplies
When it comes to making your own lavender wands, it’s important to have all the necessary supplies on hand. Here is a list of materials you will need:
- Lavender stems: Choose fresh, long stems with vibrant flowers.
- Scissors or pruning shears: These will be used to cut the lavender stems.
- Ribbon: Select a ribbon that complements the color of your lavender.
- Twine or rubber bands: These will be used to secure the lavender stems together.
- Optional embellishments: If you want to add extra flair to your lavender wand, consider using beads, feathers, or other decorative elements.
Having all these supplies ready will ensure a smooth and enjoyable lavender wand-making process.
Harvesting Lavender: Tips for selecting and cutting lavender stems.
When it comes to making lavender wands, the first step is to harvest the lavender stems. But how do you know which stems to choose? And how do you cut them properly? Here are some tips to help you with this crucial step.
Tip 1: Look for stems that are long and straight. These will be easier to work with when it comes time to weave the wand.
Tip 2: Choose stems that have not yet bloomed. The buds should be tightly closed and the stems should be firm and green.
Tip 3: Use sharp scissors or pruning shears to cut the stems. Make sure to cut them close to the base of the plant, leaving about 6-8 inches of stem.
Tip 4: Harvest the lavender in the morning when the oils are most concentrated. This will ensure that your lavender wand has a strong and fragrant scent.
By following these tips, you will be able to harvest the perfect lavender stems for your wands. So go out into the garden and start selecting and cutting your lavender today!
Preparing the Stems
Once you have gathered your lavender stems, it’s time to prepare them for weaving into a wand shape. This step is crucial to ensure that your lavender wand turns out beautifully and lasts for a long time.
Step 1: Removing Leaves
Start by carefully removing the leaves from each lavender stem. This can be done by gently sliding your fingers along the stem, pulling off the leaves as you go. Be careful not to break or damage the stem in the process.
Step 2: Straightening Stems
Next, you’ll want to straighten the lavender stems to make them easier to work with. To do this, gently hold the stem between your thumb and forefinger and run your fingers along the length of the stem, applying slight pressure to straighten any curves or bends.
It’s important to note that some stems may be more stubborn than others, so be patient and gentle as you straighten them. If a stem is particularly bent or twisted, you can also try lightly rolling it between your palms to help straighten it out.
By removing the leaves and straightening the stems, you are preparing the lavender for the weaving process, which will be covered in the next section. Taking the time to properly prepare the stems will ensure that your lavender wand looks neat and professional when it’s finished.
5. Creating the Weave
Once you have prepared your lavender stems, it’s time to start creating the weave for your lavender wand. Follow these detailed steps to achieve a beautiful wand shape:
- Take one lavender stem and hold it vertically in your hand, with the flower end facing down.
- Choose another lavender stem and hold it horizontally, with the flower end facing towards you.
- Place the horizontal stem over the vertical stem, about 1 inch from the top.
- Hold the horizontal stem in place with your thumb and index finger.
- Take the bottom end of the vertical stem and fold it over the horizontal stem, creating a loop.
- Hold the loop in place with your thumb and index finger.
- Take another lavender stem and place it horizontally over the loop, about 1 inch from the bottom.
- Hold the horizontal stem in place with your thumb and index finger.
- Take the top end of the vertical stem and fold it over the horizontal stem, creating another loop.
- Hold the loop in place with your thumb and index finger.
- Repeat steps 7-10 until you have used all your lavender stems.
- Once you have finished weaving, gently push the lavender flowers towards the top of the wand to create a tight and compact shape.
Remember to take your time and be patient while weaving the lavender stems. It may take a few tries to get the hang of it, but with practice, you will be able to create beautiful lavender wands.
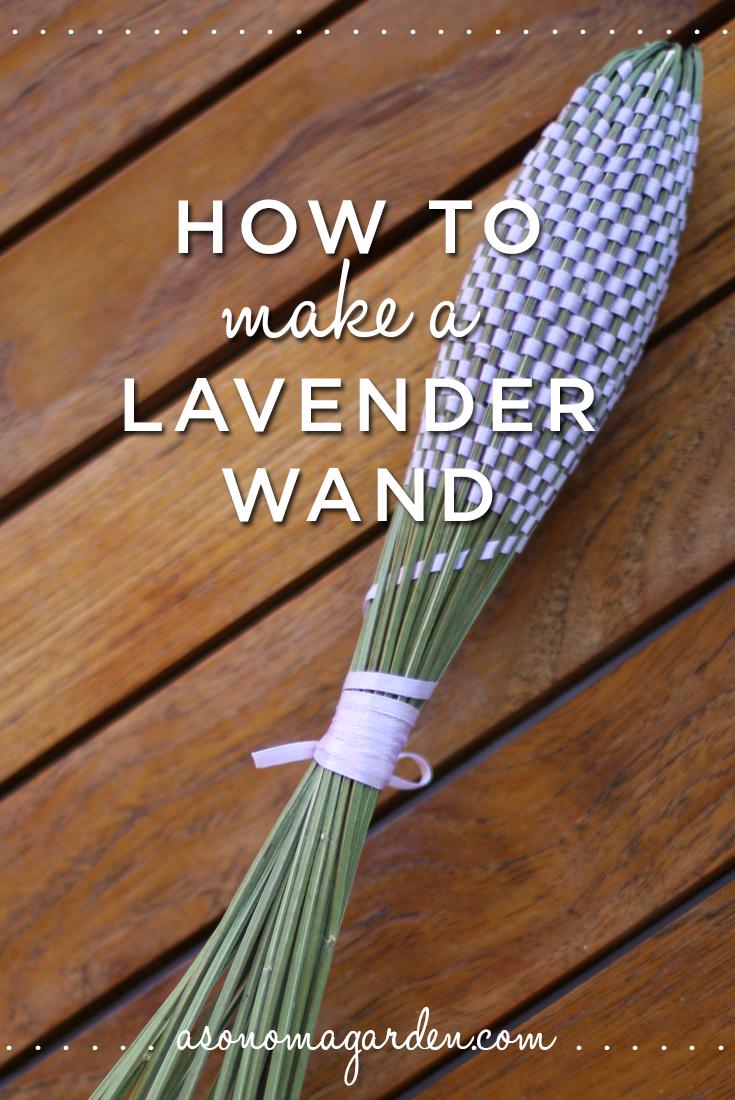
6. Adding Ribbon
Once you have woven the lavender stems into a wand shape, it’s time to add some ribbon to enhance its beauty. Here are some suggestions for choosing and attaching ribbon to your lavender wand:
- Choose the right ribbon: Select a ribbon that complements the color of your lavender. You can opt for a satin ribbon for a more elegant look or a rustic twine for a natural feel.
- Measure and cut: Cut a piece of ribbon that is long enough to wrap around the base of the lavender wand and tie a bow. Make sure to leave some extra length for the tails of the bow.
- Attach the ribbon: Place the ribbon around the base of the lavender wand, overlapping the ends slightly. Tie a tight knot to secure it in place. If desired, you can also use a small dab of glue to ensure the ribbon stays in place.
- Add embellishments: If you want to add some extra flair to your lavender wand, consider attaching small charms, beads, or dried flowers to the ribbon. This will give it a unique and personalized touch.
Remember, the ribbon is not only decorative but also helps to hold the lavender stems together. So, make sure it is securely attached. Experiment with different ribbon colors and textures to create a lavender wand that reflects your personal style.
Drying and Preserving: Tips for long-lasting lavender wands
After creating your beautiful lavender wand, it’s important to properly dry and preserve it to ensure its longevity. Here are some tips to help you with this process:
1. Hang it upside down
Find a cool, dry place to hang your lavender wand upside down. This will allow the stems to dry out completely and prevent any moisture from getting trapped inside.
2. Avoid direct sunlight
While drying, make sure to keep your lavender wand away from direct sunlight. Sunlight can cause the color of the lavender to fade and the stems to become brittle.
3. Use silica gel
If you want to speed up the drying process, you can use silica gel. Place your lavender wand in a container filled with silica gel and let it sit for a few days. The gel will absorb the moisture from the stems, leaving them dry and preserved.
4. Store it properly
Once your lavender wand is completely dry, store it in a cool, dry place. You can wrap it in tissue paper or store it in a breathable bag to protect it from dust and moisture.
By following these tips, you can enjoy the beauty and fragrance of your homemade lavender wand for years to come.
Decorating Options
Once you have created your lavender wand, you may want to add some extra flair and personalization to make it truly unique. Here are some creative ideas for decorating your lavender wand:
1. Beads and Charms
Add some sparkle to your wand by stringing beads or attaching small charms to the ribbon. Choose beads in colors that complement the lavender, such as shades of purple or silver.
2. Dried Flowers
Enhance the natural beauty of the lavender wand by adding dried flowers. You can use small dried flowers like baby’s breath or tiny rosebuds and attach them to the ribbon with a small piece of floral wire.
3. Ribbons and Bows
Experiment with different types and colors of ribbons to create a stunning visual effect. You can tie bows at the top of the wand or attach ribbons at various intervals along the stem.
4. Personalized Tags
Add a personal touch by attaching a small tag with a handwritten message or the recipient’s name. This is a great idea if you plan to give the lavender wand as a gift.
Remember, the possibilities for decorating your lavender wand are endless. Let your creativity flow and have fun adding your own personal touch to this beautiful and fragrant creation.
Care and Display
Once you have completed your beautiful lavender wand, it is important to know how to care for it and display it properly. By following these recommendations, you can ensure that your lavender wand remains in excellent condition for a long time.
Caring for your lavender wand: To keep your lavender wand looking fresh and fragrant, it is essential to handle it with care. Avoid touching the lavender stems too much, as this can cause them to break or become dislodged. Additionally, keep your lavender wand away from direct sunlight, as this can cause the color to fade.
Displaying your lavender wand: There are many creative ways to showcase your lavender wand. You can place it in a vase or jar filled with dried flowers or decorative stones. Alternatively, you can hang it on a wall or door using a decorative hook or ribbon. Whichever method you choose, make sure that your lavender wand is displayed in a location where it can be admired and enjoyed.
By following these care and display recommendations, you can ensure that your homemade lavender wand remains a beautiful and fragrant addition to your home decor for years to come.
Embrace the Beauty and Fragrance of Homemade Lavender Wands
After following the step-by-step instructions outlined in this article, you are now equipped with the knowledge to create your very own lavender wands. These delicate and aromatic creations have gained popularity for their unique charm and soothing fragrance. By gathering the necessary supplies and harvesting the finest lavender stems, you can embark on a creative journey.
Once you have prepared the stems and mastered the art of weaving, it’s time to add a touch of elegance with carefully chosen ribbons. As you dry and preserve your lavender wand, it will become a long-lasting reminder of your creativity and craftsmanship.
But why stop there? Let your imagination run wild with decorating options, adding your personal touch to the wand. Whether it’s dried flowers, beads, or feathers, the possibilities are endless.
Finally, as you care for and display your finished lavender wand, take a moment to appreciate the beauty and fragrance it brings to your surroundings. Let the calming scent of lavender fill your space, creating a serene and tranquil atmosphere.
So, go ahead and indulge in the art of making lavender wands. Enjoy the process, and revel in the beauty and fragrance that these homemade creations bring to your life.
Learn how to make beautiful and fragrant lavender wands with this step-by-step guide. Enjoy the art of crafting!
About The Author

Alison Sowle is the typical tv guru. With a social media evangelist background, she knows how to get her message out there. However, she's also an introvert at heart and loves nothing more than writing for hours on end. She's a passionate creator who takes great joy in learning about new cultures - especially when it comes to beer!