
Last Updated on July 27, 2023
A Lodar remote is a device used to control various functions of a machine or equipment remotely. It is essential to know how to program a Lodar remote to ensure its proper functioning and seamless operation. Programming a Lodar remote allows you to customize its settings and codes according to your specific needs. This article will guide you through the step-by-step process of programming a Lodar remote, starting from gathering the necessary materials and information to troubleshooting common issues. By the end of this article, you will have the knowledge and skills to program a Lodar remote efficiently and enhance its functionality.
Step 1: Gather the necessary materials and information
- Make sure you have the Lodar remote and the equipment it will be used with
- Check if any additional materials or tools are required for programming
- Collect any manuals or guides that came with the Lodar remote
- Obtain the necessary codes or settings for programming
Step 2: Understand the programming process
- Familiarize yourself with the functions and features of the Lodar remote
- Read the instructions carefully to understand the steps involved
- Take note of any specific requirements or limitations
- Ensure you have a clear understanding of the programming mode
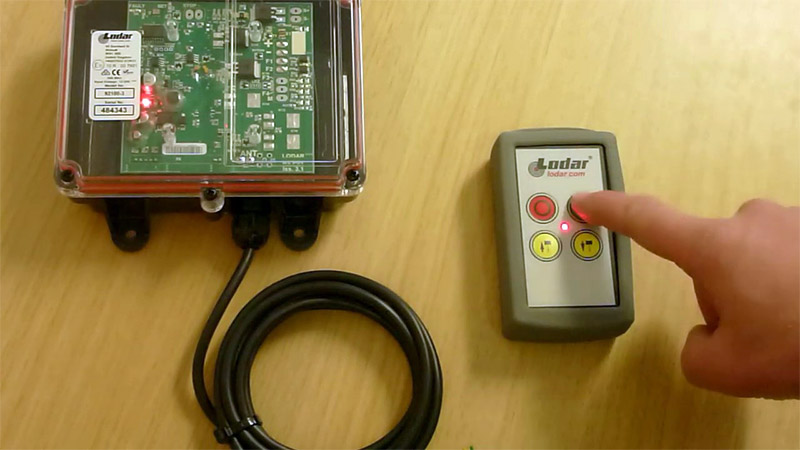
Step 3: Access the programming mode on the Lodar remote
- Follow the instructions provided to enter the programming mode
- Use the appropriate buttons or combination of buttons
- Pay attention to any indicators or prompts on the remote
- Make sure you are in a suitable environment for programming
Step 4: Enter the required codes or settings
- Refer to the manuals or guides for the specific codes or settings
- Enter the codes or settings using the buttons on the Lodar remote
- Double-check the accuracy of the entered codes or settings
- Follow any additional instructions for entering multiple codes or settings
Step 5: Test the programmed remote to ensure it is working correctly
- Try out the different functions and features of the Lodar remote
- Check if the programmed remote is responding as expected
- Make any necessary adjustments or reprogramming if needed
- Ensure the remote is functioning properly before using it
Step 2: Understand the programming process
Before you can begin programming your Lodar remote, it is important to have a clear understanding of the programming process. This step is crucial as it will ensure that you are able to follow the necessary instructions accurately and avoid any potential errors.
Firstly, familiarize yourself with the user manual or instructions provided by the manufacturer. These documents will outline the specific steps and procedures for programming your Lodar remote.
Next, take the time to read through the instructions carefully and make note of any important information or requirements. This may include specific codes or settings that need to be entered, as well as any additional steps or precautions.
It is also helpful to have a basic understanding of how the Lodar remote functions and communicates with the device it is being programmed for. This will give you a better understanding of the overall process and help you troubleshoot any issues that may arise.
By taking the time to understand the programming process, you will be better equipped to successfully program your Lodar remote and ensure its seamless operation.
Step 3: Access the programming mode on the Lodar remote
Once you have gathered all the necessary materials and information, it is time to access the programming mode on your Lodar remote. This step is crucial as it allows you to make changes and customize the remote according to your needs.
The process of accessing the programming mode may vary depending on the model of your Lodar remote. However, most remotes have a designated button or combination of buttons that need to be pressed to enter the programming mode.
Refer to the user manual or the manufacturer’s website for specific instructions on how to access the programming mode for your Lodar remote model. It is important to follow these instructions carefully to avoid any potential issues or errors.
Once you have successfully entered the programming mode, you will be ready to proceed to the next step of programming your Lodar remote.
Step 4: Enter the required codes or settings
Once you have accessed the programming mode on your Lodar remote, it is time to enter the required codes or settings. This step is crucial as it determines the functionality of your remote. Here are the steps to follow:
- Refer to the instruction manual or the manufacturer’s website to obtain the specific codes or settings for your device.
- Using the buttons on the remote, input the codes or settings in the correct order.
- Double-check the entered codes or settings to ensure accuracy.
- If there are multiple codes or settings, follow the instructions provided to cycle through them until you find the one that works for your device.
- Once you have entered all the required codes or settings, press the appropriate button to save the changes.
It is important to note that the process of entering codes or settings may vary depending on the model of your Lodar remote. Therefore, it is essential to carefully read the instructions provided by the manufacturer.
After completing this step, you are one step closer to successfully programming your Lodar remote.
Step 5: Test the programmed remote to ensure it is working correctly
Once you have entered the required codes or settings into your Lodar remote, it is important to test it to ensure that it is working correctly. This step is crucial to ensure that the remote will function as intended and provide seamless operation.
- Make sure that the remote is within range of the device or system you are trying to control.
- Press the appropriate buttons on the remote to test its functionality.
- Observe the device or system to see if it responds to the commands from the remote.
- If the device or system does not respond, double-check the codes or settings you entered to ensure they are correct.
- If the remote still does not work, try resetting it and repeating the programming process.
- If you are still experiencing issues, consult the user manual or contact Lodar customer support for further assistance.
Testing the programmed remote is an essential step to ensure that it is functioning properly. By following these steps and troubleshooting any issues that arise, you can ensure that your Lodar remote is programmed correctly and ready for use.
Additional resources and support for programming a Lodar remote
While this guide provides a comprehensive overview of programming a Lodar remote, there may be instances where you require additional resources or support. Fortunately, there are several avenues you can explore to enhance your understanding and troubleshoot any issues you may encounter.
1. Lodar Remote’s official website: The official website of Lodar Remote is a valuable resource for programming instructions, FAQs, and troubleshooting guides. It is recommended to visit their website and explore the support section for detailed information.
2. Online forums and communities: Engaging with online forums and communities dedicated to remote programming can provide you with insights from experienced users. You can ask questions, share your experiences, and learn from others who have faced similar challenges.
3. Customer support: If you are unable to find the answers you need through online resources, reaching out to Lodar Remote’s customer support team can be beneficial. They have knowledgeable representatives who can assist you with any programming-related queries or concerns.
By utilizing these additional resources and support options, you can ensure a smooth and successful programming experience with your Lodar remote.
Tips and tricks for programming a Lodar remote efficiently
Programming a Lodar remote can sometimes be a complex process, but with the right tips and tricks, you can make it more efficient and hassle-free. Here are some suggestions to help you program your Lodar remote with ease:
1. Read the instructions carefully
Before you begin programming, take the time to thoroughly read the instructions provided with your Lodar remote. This will give you a clear understanding of the steps involved and any specific requirements.
2. Gather all necessary information
Make sure you have all the necessary information and materials before you start programming. This may include the model number of your Lodar remote, the codes or settings required, and any additional tools or equipment.
3. Follow a systematic approach
It’s important to follow a systematic approach when programming your Lodar remote. Start by accessing the programming mode and then enter the required codes or settings in the correct sequence. This will help ensure a smooth and successful programming process.
4. Test and troubleshoot
After programming, it’s crucial to test your Lodar remote to ensure it is working correctly. If you encounter any issues, refer to the troubleshooting section in the instructions or seek additional support.
By following these tips and tricks, you can program your Lodar remote efficiently and enhance its functionality. Remember to refer to additional resources and support if needed, and enjoy the seamless operation of your programmed Lodar remote.
Additional resources and support for programming a Lodar remote
While this guide provides a comprehensive overview of programming a Lodar remote, there may be instances where you require additional resources or support. Fortunately, there are several avenues you can explore to enhance your understanding and troubleshoot any issues you may encounter.
1. Lodar Remote’s official website: The official website of Lodar Remote is a valuable resource for programming instructions, FAQs, and troubleshooting guides. It is recommended to visit their website and explore the support section for detailed information.
2. Online forums and communities: Engaging with online forums and communities dedicated to remote programming can provide you with insights from experienced users. You can ask questions, share your experiences, and learn from others who have faced similar challenges.
3. Customer support: If you are unable to find the answers you need through online resources, reaching out to Lodar Remote’s customer support team can be beneficial. They have knowledgeable representatives who can assist you with any programming-related queries or concerns.
By utilizing these additional resources and support options, you can ensure a smooth and successful programming experience with your Lodar remote.
Conclusion: Enhancing Functionality and Seamless Operation
Successfully programming a Lodar remote is a crucial step in maximizing its functionality and ensuring seamless operation. By following the steps outlined in this article, you can easily program your Lodar remote and enjoy the convenience it offers.
Programming a Lodar remote allows you to control various devices and systems with just one remote, eliminating the need for multiple remotes cluttering your space. Whether you are operating a garage door, a gate, or any other compatible device, programming the remote ensures that it functions smoothly and efficiently.
Additionally, programming a Lodar remote allows you to customize its settings according to your preferences. You can set up specific codes or settings that suit your needs, making it easier to operate your devices and systems.
By testing the programmed remote, you can ensure that it is working correctly and that all the programmed functions are functioning as intended. This step is crucial in identifying any issues or errors and resolving them promptly.
Overall, successfully programming a Lodar remote enhances its functionality and allows for seamless operation. Take advantage of the tips and tricks provided in this article, and refer to the additional resources and support available to make the programming process even more efficient. Enjoy the convenience and ease of use that a programmed Lodar remote brings to your daily life.
Learn how to program a Lodar remote efficiently and enhance its functionality for seamless operation.
About The Author

Alison Sowle is the typical tv guru. With a social media evangelist background, she knows how to get her message out there. However, she's also an introvert at heart and loves nothing more than writing for hours on end. She's a passionate creator who takes great joy in learning about new cultures - especially when it comes to beer!