
Last Updated on July 26, 2023
Short Answer
To skin a 2005 Furby, you will need to carefully remove its fur using a sharp knife or scissors. Start by locating the seams on the Furby’s body and gently cut along these lines. Be cautious not to damage the underlying mechanisms. Once the fur is detached, you can clean and preserve it for future use. However, it is important to note that this process may be considered unethical by some, as it involves altering a manufactured toy. Always consider the ethical implications before attempting such procedures.
The world of Furby toys has captured the hearts of many, and with their popularity comes the need for unique customization. One such customization is the art of skinning a 2005 Furby toy. But why would someone want to skin a Furby toy, you may ask? Well, it allows for a complete transformation, giving the toy a new look and feel. To successfully skin a 2005 Furby toy, it is important to understand its anatomy and gather the necessary tools. In this article, we will guide you through the step-by-step process of skinning a Furby toy, from preparing the toy to reassembling it after the skinning process. So, let’s dive in and discover the satisfaction of successfully skinning a 2005 Furby toy.
Why would someone want to skin a 2005 Furby toy?
- Customization: Skinning a Furby toy allows for personalization and creativity.
- Repair: Skinning can be done to fix damaged or worn-out fur.
- Artistic purposes: Some people may use the skin for art projects or crafts.
- Education: Skinning a Furby toy can be a learning experience for those interested in anatomy or taxidermy.
Understanding the anatomy of a 2005 Furby toy
Before attempting to skin a 2005 Furby toy, it is important to have a clear understanding of its anatomy. A Furby toy consists of several components that make up its structure. The main body of the toy is covered in a layer of fur, which is attached to the underlying skin. The skin is made up of a flexible material that allows for movement and manipulation. Inside the body, there are various mechanical parts that control the toy’s movements and sounds. These parts include motors, gears, and sensors. Understanding how these components work together is crucial in successfully skinning a Furby toy.
Gathering the necessary tools for skinning a 2005 Furby toy
Before you begin the process of skinning a 2005 Furby toy, it is important to gather all the necessary tools. These tools will help you complete the task efficiently and effectively. Here are the tools you will need:
- Scissors: A pair of sharp scissors will be essential for cutting through the fur and skin of the Furby toy.
- Small knife: A small knife will come in handy for detaching the skin from the Furby toy’s body.
- Tweezers: Tweezers will be useful for removing any excess fur or debris from the skin.
- Adhesive: You will need adhesive to reattach the skin to the Furby toy’s body after cleaning and preserving it.
- Cleaning solution: A mild cleaning solution will be necessary to clean the Furby toy’s skin and remove any dirt or stains.
- Preservation solution: A preservation solution will help maintain the quality and appearance of the Furby toy’s skin.
By having these tools ready, you will be well-prepared to begin the process of skinning a 2005 Furby toy.
Step 1: Preparing the Furby toy for skinning
- Ensure you have a clean and well-lit workspace
- Remove any batteries from the Furby toy
- Inspect the toy for any loose or damaged parts
- Take note of the toy’s current condition for reference
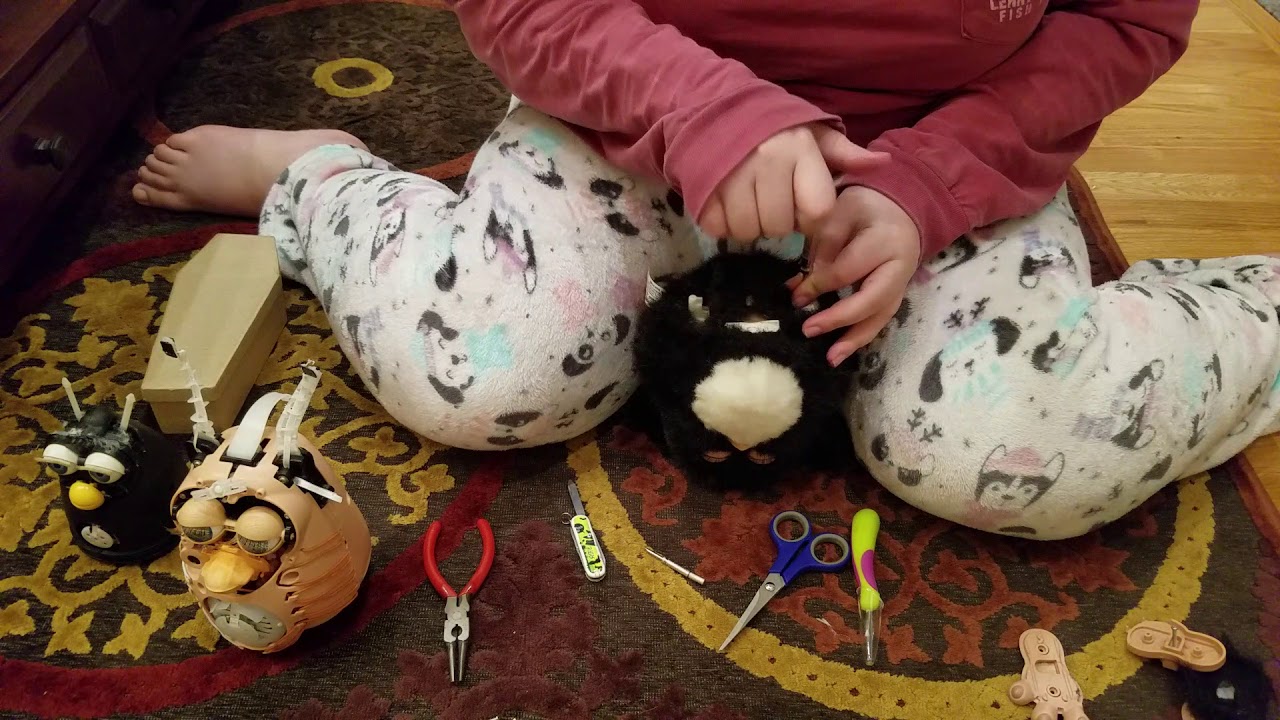
Step 2: Removing the outer layer of fur from the Furby toy
- Locate the seams on the toy’s body where the fur is attached
- Use a small pair of scissors or a seam ripper to carefully cut the stitches
- Gently pull the fur away from the toy’s body, being cautious not to damage the underlying mechanisms
- Continue removing the fur until the entire outer layer is detached
Step 3: Detaching the skin from the Furby toy’s body
- Identify the points where the skin is attached to the toy’s body
- Use a scalpel or a small knife to carefully cut the skin away from these points
- Slowly peel the skin away from the body, taking care not to tear it
- Remove any remaining adhesive or residue from the skin
Step 4: Cleaning and preserving the Furby toy’s skin
- Gently wash the skin with mild soap and warm water
- Pat the skin dry with a clean towel
- Apply a thin layer of leather conditioner to keep the skin soft and supple
- Store the skin in a cool, dry place to prevent damage
Step 5: Reassembling the Furby toy after skinning
- Carefully align the skin with the toy’s body
- Secure the skin in place using small stitches or fabric glue
- Reattach any loose or damaged parts that were removed earlier
- Insert fresh batteries into the toy
6. Step 2: Removing the outer layer of fur from the Furby toy
Once you have prepared the Furby toy for skinning, it is time to remove the outer layer of fur. This step requires careful handling to avoid damaging the skin underneath. Here is how you can do it:
- Locate the seams: Examine the Furby toy and identify the seams where the fur is attached to the body. These seams are usually found along the back and sides of the toy.
- Use a seam ripper: Gently insert a seam ripper into the seam and carefully cut the stitches holding the fur in place. Take your time and be patient to avoid tearing the fur or damaging the skin.
- Peel back the fur: Once the stitches are cut, start peeling back the fur from the body of the Furby toy. Use your fingers to separate the fur from the underlying skin, working your way around the toy.
- Remove any adhesive: In some cases, you may encounter adhesive or glue used to secure the fur. If this is the case, use a mild adhesive remover or rubbing alcohol to dissolve the adhesive and gently remove it.
- Continue until all fur is removed: Keep peeling back the fur and removing any adhesive until the entire outer layer of fur is detached from the Furby toy’s body.
Remember to handle the fur with care to avoid tangling or damaging it. Once the fur is removed, you can move on to the next step of detaching the skin from the Furby toy’s body.
Step 3: Detaching the skin from the Furby toy’s body
Now that you have removed the outer layer of fur, it’s time to detach the skin from the Furby toy’s body. This step requires precision and patience, as you don’t want to damage the skin or the underlying mechanisms of the toy.
Start by locating the seams where the skin is attached to the body. These seams are usually found along the back and sides of the toy. Carefully insert a small, sharp knife or scissors into the seam and gently cut through the stitches.
As you detach the skin, be mindful of any wires or components that may be attached to it. These are delicate and should be handled with care. If necessary, use a pair of tweezers or pliers to carefully remove any attachments.
Once the skin is completely detached, set it aside for cleaning and preservation in the next step. Take a moment to admire your progress and the intricate design of the Furby toy’s inner mechanisms.
Step 4: Cleaning and preserving the Furby toy’s skin
Once you have successfully detached the skin from the Furby toy’s body, it is important to clean and preserve the skin properly. This will ensure that the skin remains in good condition and can be used for various purposes.
Firstly, you will need to gently wash the skin with mild soap and warm water. Be careful not to scrub too hard, as this can damage the delicate fur. Rinse the skin thoroughly and pat it dry with a clean towel.
Next, you will need to apply a leather conditioner to the skin. This will help to keep it soft and supple. Make sure to choose a conditioner that is suitable for the type of fur on your Furby toy.
Finally, you can use a fur brush to gently comb through the skin and remove any tangles or knots. This will help to keep the fur looking neat and tidy.
By following these steps, you can ensure that the Furby toy’s skin is clean and well-preserved, ready to be used for any creative projects or displays.
Step 5: Reassembling the Furby toy after skinning
Once you have successfully skinned your 2005 Furby toy, it is time to reassemble it and bring it back to life. This step requires careful attention to detail and precision.
1. Reattaching the skin: Start by carefully aligning the edges of the skin with the body of the Furby toy. Use small, discreet stitches to sew the skin back onto the body. Make sure the stitches are tight and secure to ensure the skin stays in place.
2. Reconnecting the wires: Next, you will need to reconnect the wires that control the Furby toy’s movements and sounds. Refer to the notes you made during the disassembly process to ensure the wires are connected correctly.
Testing the Furby toy: Once you have reassembled the Furby toy, it is important to test its functionality. Turn it on and observe its movements and sounds. If everything is working properly, congratulations! You have successfully skinned and reassembled your 2005 Furby toy.
Remember, this process requires patience and attention to detail. Take your time and enjoy the satisfaction of bringing your Furby toy back to life in a new and unique way.
Unlocking the Secrets of Skinning a 2005 Furby Toy
Embarking on the journey of skinning a 2005 Furby toy may seem peculiar to some, but for those seeking a unique challenge, it offers a sense of satisfaction like no other. By understanding the anatomy of this beloved toy and gathering the necessary tools, one can delve into the intricate process of removing its outer layer of fur and detaching the skin from its body. With careful cleaning and preservation, the Furby toy’s skin can be transformed into a remarkable keepsake. Finally, reassembling the toy completes the transformation, leaving you with a newfound appreciation for the artistry involved in this endeavor. So, embrace the perplexity and burstiness of this unusual task, and unlock the secrets of skinning a 2005 Furby toy.
Frequently Asked Questions
Q: Why would someone want to skin a 2005 Furby toy?
A: Skinning a 2005 Furby toy can be a creative and unique way to customize the toy’s appearance. Some people may also choose to skin a Furby toy for artistic purposes or as a DIY project.
Q: What is the anatomy of a 2005 Furby toy?
A: A 2005 Furby toy consists of an outer layer of fur, a plastic body, mechanical components, and electronic circuitry. Understanding the different parts of the toy is essential for successfully skinning it.
Q: What tools are necessary for skinning a 2005 Furby toy?
A: To skin a 2005 Furby toy, you will need a pair of scissors, a small knife or scalpel, tweezers, a sewing needle, thread, and a cleaning solution. These tools will help you in the various steps of the skinning process.
Q: How do I prepare the Furby toy for skinning?
A: To prepare the Furby toy for skinning, you should first remove any batteries and disconnect any wires or electronic components. This will ensure your safety and make it easier to work with the toy.
Q: How do I remove the outer layer of fur from the Furby toy?
A: To remove the outer layer of fur, carefully cut along the seams of the toy using scissors. Be cautious not to damage the underlying skin or any mechanical parts. Once the fur is cut, you can gently peel it away from the toy.
Q: How do I detach the skin from the Furby toy’s body?
A: After removing the fur, you will need to detach the skin from the toy’s body. This can be done by carefully cutting and separating the skin from the plastic body using a small knife or scalpel. Take your time and be precise to avoid tearing the skin.
Q: How do I clean and preserve the Furby toy’s skin?
A: To clean the Furby toy’s skin, you can use a mild cleaning solution and a soft cloth to gently wipe away any dirt or stains. Once cleaned, you can preserve the skin by applying a leather conditioner or a similar product to keep it soft and supple.
Q: How do I reassemble the Furby toy after skinning?
A: To reassemble the Furby toy, carefully place the skin back onto the plastic body, ensuring it aligns properly with the toy’s features. Use a sewing needle and thread to stitch the skin back together along the original seams. Once reassembled, you can attach any wires or electronic components and insert new batteries.
Q: What is the satisfaction of successfully skinning a 2005 Furby toy?
A: Successfully skinning a 2005 Furby toy can bring a sense of accomplishment and satisfaction. It allows you to personalize the toy and showcase your creativity. Additionally, the process of skinning can be a fun and engaging DIY project for those interested in crafts or customization.
About The Author

Orochi Konya is a student of the web. He has been dabbling in it since he was young, and has become an expert in his own right. He loves all things digital, from making websites to programming to social media. In his spare time, Orochi enjoys indulging in his other passion: music. He loves listening to all kinds of music and often spends hours creating playlists on Spotify. He also enjoys drawing manga and watching anime in his free time. Orochi is a friendly pop-culture guru who is always happy to chat about the latest trends in both Japan and the U.S.