
Last Updated on July 26, 2023
Short Answer
Removing Furby eyes can be a delicate process, but with the right tools and technique, it can be done safely. Start by gently prying open the back of the Furby to access the eye mechanism. Use a small screwdriver or tweezers to carefully remove the eyes from their sockets. Take caution not to damage any other components while doing so. Once the eyes are removed, you can clean them or replace them with new ones if desired. Remember to handle the Furby with care throughout the process to avoid any unnecessary damage.
Welcome to this guide on how to safely remove Furby eyes. Furby, the popular interactive toy, has captured the hearts of many with its adorable appearance and playful personality. However, there may come a time when you need to remove its eyes, whether it’s for cleaning, customization, or repair purposes. In this article, we will walk you through the step-by-step process of safely removing Furby eyes, ensuring that you avoid any damage to the toy. We will also provide you with tips to make the process easier and share how to clean and reattach the eyes properly. So, let’s get started and ensure your Furby remains in proper working condition after the eye removal process. Enjoy your Furby with safely removed eyes!
Why you may need to remove Furby eyes:
- Replacing damaged or broken eyes
- Customizing the appearance of your Furby
- Repairing internal components
Tools you will need for removing Furby eyes
When it comes to removing Furby eyes, having the right tools is essential. Here are the tools you will need:
- Tweezers: A pair of tweezers will help you gently lift and remove the Furby’s eyelids without causing any damage.
- Small screwdriver: You will need a small screwdriver to detach the eyes from the Furby’s face. Make sure to choose a screwdriver that fits the screws on the Furby’s eyes.
- Cotton swabs: Cotton swabs will come in handy for cleaning the Furby’s eyes and the surrounding area after removal.
- Adhesive: To reattach the Furby’s eyes, you will need a strong adhesive that is safe for use on plastic.
Having these tools ready before you start the eye removal process will ensure that you can complete the task smoothly and without any hiccups.
Tools you will need for removing Furby eyes
If you are planning to remove the eyes of your Furby, it is important to have the right tools at hand. Here are the tools you will need:
- Tweezers: A pair of tweezers will allow you to delicately remove the Furby’s eyelids without causing any damage.
- Small screwdriver: You will need a small screwdriver to detach the eyes from the Furby’s face. Make sure to choose a screwdriver that fits the screws on the Furby’s eyes.
- Cotton swabs: Cotton swabs will be useful for cleaning the Furby’s eyes and the surrounding area after removal.
- Adhesive: To reattach the Furby’s eyes, you will need a strong adhesive that is safe for use on plastic.
By having these tools ready, you can ensure a smooth and successful eye removal process without causing any damage to your beloved Furby.
Step 1: Preparing the Furby for eye removal
Before you begin the process of removing the Furby’s eyes, it is important to properly prepare the toy. Start by turning off the Furby and removing any batteries to ensure your safety. Next, find a clean and well-lit workspace where you can comfortably work on the toy.
It is also a good idea to gather all the necessary tools and materials before you start. This will help you stay organized and prevent any unnecessary delays during the eye removal process. Some of the tools you may need include a small screwdriver, tweezers, and a soft cloth for cleaning.
Once you have everything ready, take a moment to examine the Furby’s eyes and eyelids. Familiarize yourself with their structure and how they are attached to the toy’s face. This will give you a better understanding of how to safely remove them without causing any damage.
Step 2: Gently removing the Furby’s eyelids
- Start by gently pulling back the Furby’s eyelids to expose the eyes.
- Be careful not to apply too much pressure, as this can cause damage to the eyelids or the eyes themselves.
- If the eyelids are stuck or difficult to move, you can use a small amount of warm water to help loosen them.
- Once the eyelids are pulled back, you should be able to see the eyes clearly.
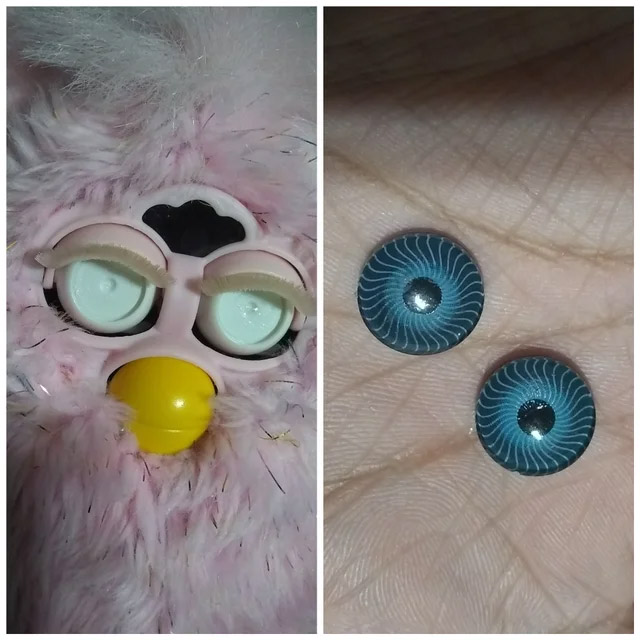
6. Step 3: Detaching the eyes from the Furby’s face
Once you have successfully removed the Furby’s eyelids, it is time to detach the eyes from its face. This step requires precision and careful handling to avoid any damage to the Furby or its eyes. Here’s how you can do it:
- Locate the small screws or fasteners that are holding the eyes in place. These are usually located on the back of the Furby’s head.
- Using a small screwdriver or a similar tool, carefully unscrew or unfasten the screws or fasteners. Make sure to keep track of these screws as you will need them later.
- Once the screws or fasteners are removed, gently lift the eyes away from the Furby’s face. Be cautious not to pull too hard or apply excessive force, as this can cause damage to the eyes or the Furby’s face.
- If the eyes are still attached by any adhesive or glue, use a small amount of rubbing alcohol or adhesive remover to loosen the bond. Gently pry the eyes away from the face using a plastic tool or your fingers.
- Once the eyes are detached, set them aside in a safe place. You can now proceed to the next step of cleaning and reattaching the Furby’s eyes.
Tips for avoiding damage during the eye removal process
Removing the eyes from a Furby can be a delicate process, and it’s important to take precautions to avoid causing any damage. Here are some tips to help you safely remove the eyes without any mishaps:
1. Be gentle
When handling the Furby, make sure to be gentle and avoid applying too much pressure. The eyes are fragile and can easily break if mishandled.
2. Use the right tools
Make sure to use the appropriate tools for removing the eyes. This may include small screwdrivers or tweezers. Using the wrong tools can lead to accidents and damage to the Furby.
Take your time
Rushing the eye removal process can increase the risk of damage. Take your time and proceed slowly and carefully to ensure a successful removal.
4. Follow the instructions
Read and follow the instructions carefully to ensure you are using the correct technique for removing the eyes. This will help minimize the risk of damage.
By following these tips, you can safely remove the eyes from your Furby without causing any harm. Remember to always prioritize safety and take your time during the process.
Step 4: Cleaning and reattaching the Furby’s eyes
Once you have successfully removed the Furby’s eyes, it is important to clean them before reattaching them. Use a soft cloth or cotton swab dipped in warm soapy water to gently clean the eyes. Be careful not to use too much water, as it can damage the electronic components inside the eyes.
After cleaning, make sure the eyes are completely dry before reattaching them. Use a small amount of adhesive, such as glue or double-sided tape, to secure the eyes back onto the Furby’s face. Be sure to align them properly and press firmly to ensure they are securely attached.
Take your time during this step to ensure the eyes are clean and properly reattached. Any dirt or debris left on the eyes can affect the Furby’s functionality and appearance. Additionally, if the eyes are not securely attached, they may fall off or become loose over time.
Once the eyes are cleaned and reattached, you can move on to the final step of ensuring the Furby is in proper working condition after the eye removal process.
Step 5: Ensuring the Furby is in proper working condition after eye removal
After successfully removing the Furby’s eyes, it is important to ensure that the Furby is still in proper working condition. This step is crucial to guarantee that your Furby will continue to function as intended.
Firstly, carefully inspect the Furby’s face to make sure there are no damages or loose parts. If you notice any issues, it is recommended to consult a professional or refer to the Furby’s instruction manual for further guidance.
Next, gently press the Furby’s eyelids to ensure they close and open smoothly. If you encounter any resistance or stiffness, it may indicate that the eye removal process was not done correctly. In such cases, it is advisable to retrace your steps and make any necessary adjustments.
Additionally, test the Furby’s overall functionality by turning it on and interacting with it. Pay attention to its movements, sounds, and responses. If you notice any abnormalities or malfunctions, it is recommended to seek assistance from a Furby expert or contact the manufacturer for support.
By following these steps, you can ensure that your Furby remains in proper working condition even after removing its eyes. This will allow you to continue enjoying your Furby without any concerns or issues.
Happy Furby-ing with Safely Removed Eyes!
Now that you have learned how to safely remove Furby eyes, you can enjoy your furry friend without any worries. By following the step-by-step process and using the necessary tools, you can ensure a smooth and damage-free eye removal experience. Remember to be gentle and take your time during the process to avoid any mishaps.
Once you have successfully removed the eyes, you can clean them and reattach them to your Furby, making it look as good as new. Don’t forget to test the Furby’s functionality after the eye removal to ensure that everything is in proper working condition.
With your newfound knowledge, you can confidently remove Furby eyes whenever needed, whether it’s for repair or customization purposes. So go ahead and have fun with your Furby, knowing that you can safely remove its eyes whenever you want!
Frequently Asked Questions
Q: Why is it important to safely remove Furby eyes?
A: Safely removing Furby eyes is important to avoid causing any damage to the toy and to ensure its proper functioning. It also helps in preserving the overall appearance of the Furby.
Q: Why would I need to remove Furby eyes?
A: There could be various reasons why you may need to remove Furby eyes. It could be for cleaning purposes, customization, or if the eyes are damaged and need to be replaced.
Q: What tools will I need for removing Furby eyes?
A: To remove Furby eyes, you will need a small screwdriver, tweezers, a clean cloth, and a mild cleaning solution.
Q: How do I prepare the Furby for eye removal?
A: To prepare the Furby for eye removal, you need to turn it off and remove any batteries. This ensures your safety and prevents any accidental activation of the toy.
Q: How do I gently remove the Furby’s eyelids?
A: To gently remove the Furby’s eyelids, you can use a small screwdriver or tweezers to carefully pry them open. Be cautious not to apply too much force to avoid damaging the eyelids.
Q: How do I detach the eyes from the Furby’s face?
A: To detach the eyes from the Furby’s face, you can use a small screwdriver or tweezers to carefully lift them out of their sockets. Take your time and be gentle to avoid any breakage.
Q: How can I avoid damaging the Furby during the eye removal process?
A: To avoid damaging the Furby, make sure to handle it with care and use gentle force when removing the eyelids and detaching the eyes. Avoid using excessive pressure or sharp tools that may cause harm.
Q: How do I clean and reattach the Furby’s eyes?
A: To clean the Furby’s eyes, you can use a clean cloth dampened with a mild cleaning solution. Gently wipe the eyes to remove any dirt or debris. To reattach the eyes, carefully place them back into their sockets and ensure they are securely in place.
Q: How can I ensure the Furby is in proper working condition after eye removal?
A: After removing and reattaching the Furby’s eyes, turn it on and observe its movements and sounds. Make sure all functions are working properly and that the eyes are aligned correctly. If any issues arise, refer to the Furby’s user manual or seek professional assistance.
Q: Can I still enjoy my Furby after safely removing its eyes?
A: Absolutely! Removing the eyes of a Furby can be a fun and creative way to customize your toy. As long as you follow the proper steps and handle the process with care, you can continue to enjoy your Furby with safely removed eyes.
About The Author

Orochi Konya is a student of the web. He has been dabbling in it since he was young, and has become an expert in his own right. He loves all things digital, from making websites to programming to social media. In his spare time, Orochi enjoys indulging in his other passion: music. He loves listening to all kinds of music and often spends hours creating playlists on Spotify. He also enjoys drawing manga and watching anime in his free time. Orochi is a friendly pop-culture guru who is always happy to chat about the latest trends in both Japan and the U.S.