
Last Updated on July 26, 2023
Short Answer
The Aerlit Tatting Shuttle is a tool used in the art of tatting, a form of lace-making. To use the shuttle, first thread it with the desired thread or yarn. Then, hold the shuttle in one hand and the working thread in the other. Begin by making a loop with the working thread and pass it through the shuttle’s central core. Next, create a series of knots and loops using the shuttle and working thread, following the desired pattern. The shuttle’s pointed tip can be used to pick up and manipulate the thread. Practice and patience are key to mastering the art of tatting with the Aerlit Tatting Shuttle.Tatting lace-making is a beautiful and intricate art form that requires skill and precision. One essential tool in this craft is the Aerlit Tatting Shuttle. In this article, we will explore the significance of the Aerlit Tatting Shuttle and its role in tatting lace-making techniques. We will delve into the different components of the shuttle and provide a step-by-step guide on how to load the thread onto it. Additionally, we will discuss various tatting techniques that can be achieved using the Aerlit Tatting Shuttle and offer tips and tricks for maintaining it for long-lasting use. Whether you are a beginner or an experienced tatter, this article will help enhance your skills and explore advanced techniques and designs achievable with the Aerlit Tatting Shuttle. Join us as we embrace the art of tatting lace-making with this remarkable tool.
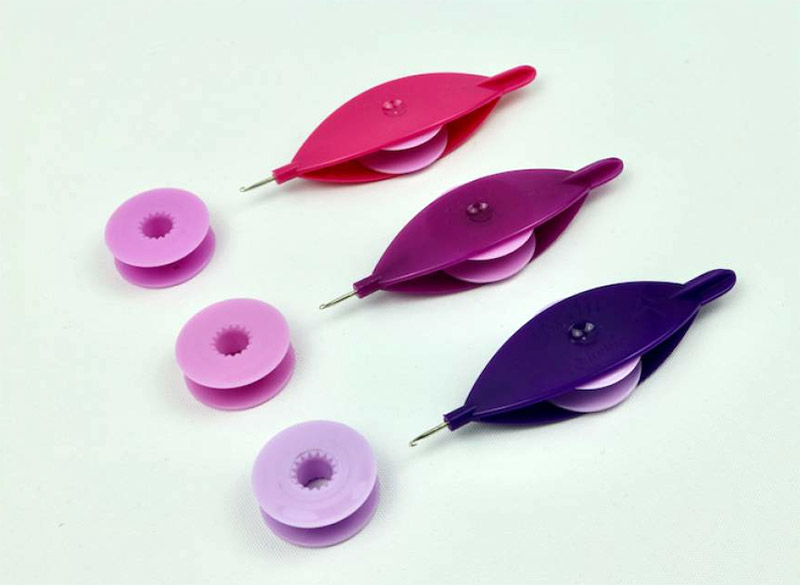
Understanding the different components of the Aerlit Tatting Shuttle:
- The Aerlit Tatting Shuttle is a tool used in tatting lace-making techniques.
- It consists of two main components: the shuttle body and the bobbin.
- The shuttle body is usually made of plastic or metal and has a pointed end for ease of use.
- The bobbin is where the thread is wound and is designed to fit securely inside the shuttle body.
- Some Aerlit Tatting Shuttles also have a removable cap to protect the thread.
Step-by-step guide on how to load the thread onto the Aerlit Tatting Shuttle
When it comes to using the Aerlit Tatting Shuttle, one of the first steps is to load the thread onto the shuttle. This process may seem daunting at first, but with a little practice, it can become second nature.
To begin, take the end of your thread and insert it through the hole at the top of the shuttle. Make sure to leave a small tail of thread hanging out.
Next, wrap the thread around the shuttle in a figure-eight pattern. This will help to secure the thread in place and prevent it from unraveling.
Once you have wrapped the thread around the shuttle a few times, use your thumb and index finger to hold the thread in place. This will ensure that it stays taut and doesn’t slip out of position.
Finally, gently pull on the tail of the thread to tighten the loop around the shuttle. Make sure that the thread is secure and doesn’t have any slack.
By following these simple steps, you will be able to load the thread onto the Aerlit Tatting Shuttle with ease. Remember to practice and be patient, as it may take some time to perfect this technique.
Step-by-step guide on how to load the thread onto the Aerlit Tatting Shuttle
When it comes to using the Aerlit Tatting Shuttle, one of the first steps is to load the thread onto the shuttle. This process may seem daunting at first, but with a little practice, it can become second nature.
To begin, take the end of your thread and insert it through the hole at the top of the shuttle. Make sure to leave a small tail of thread hanging out.
Next, wrap the thread around the shuttle in a figure-eight pattern. This will help to secure the thread in place and prevent it from unraveling.
Once you have wrapped the thread around the shuttle a few times, use your thumb and index finger to hold the thread in place. This will ensure that it stays taut and doesn’t slip out of position.
Finally, gently pull on the tail of the thread to tighten the loop around the shuttle. Make sure that the thread is secure and doesn’t have any slack.
Exploring various tatting techniques that can be achieved using the Aerlit Tatting Shuttle
The Aerlit Tatting Shuttle is a versatile tool that allows for the creation of various tatting techniques in lace-making. With its unique design and functionality, this shuttle opens up a world of possibilities for tatters of all skill levels.
One of the most popular techniques that can be achieved with the Aerlit Tatting Shuttle is the ring and chain technique. This involves creating rings and chains by manipulating the shuttle and thread in a specific manner. The shuttle’s smooth and lightweight construction makes it easy to maneuver, resulting in clean and precise stitches.
Another technique that can be explored with the Aerlit Tatting Shuttle is the split ring technique. This technique allows for the creation of intricate designs by splitting a ring into two separate sections and joining them back together. The shuttle’s fine point and smooth thread flow make it ideal for executing this technique with precision.
Additionally, the Aerlit Tatting Shuttle can be used to create picots, which are small loops that add decorative elements to lace patterns. By carefully manipulating the shuttle and thread, tatters can create picots of various sizes and shapes, adding depth and texture to their designs.
Overall, the Aerlit Tatting Shuttle offers endless possibilities for tatters to explore and experiment with different tatting techniques. Its ergonomic design and smooth functionality make it a valuable tool for anyone interested in the art of tatting lace-making.
Tips and tricks for maintaining the Aerlit Tatting Shuttle for long-lasting use
- Keep the shuttle clean and free from dust and debris by wiping it with a soft cloth after each use.
- Store the shuttle in a dry and cool place to prevent it from warping or becoming damaged.
- Avoid exposing the shuttle to direct sunlight or extreme temperatures, as this can cause the shuttle to fade or become brittle.
- Regularly oil the moving parts of the shuttle to ensure smooth and effortless tatting.
- If the shuttle becomes loose or the thread tension is not consistent, tighten the screws on the shuttle to fix the issue.
- Replace the bobbin when it becomes worn out or damaged to prevent any disruptions in your tatting work.
- Avoid dropping the shuttle or subjecting it to any impact, as this can cause it to break or become misaligned.
- If the shuttle becomes tangled or the thread gets stuck, gently untangle it using a needle or pin.
- Consider investing in a shuttle case or pouch to protect the shuttle when not in use or during travel.
- Regularly inspect the shuttle for any signs of wear and tear, and replace it if necessary to ensure optimal performance.
6. Enhancing your tatting skills with the help of the Aerlit Tatting Shuttle
The Aerlit Tatting Shuttle is a versatile tool that can greatly enhance your tatting skills. Here are some ways you can use it to improve your lace-making techniques:
- Experiment with different thread sizes and textures to create unique designs.
- Practice different stitch combinations to create intricate patterns.
- Use the Aerlit Tatting Shuttle to create picots, rings, and chains with precision.
- Try out advanced techniques such as split rings and mock picots to add complexity to your designs.
- Explore different color combinations to create visually stunning lacework.
- Use the Aerlit Tatting Shuttle to create lace edgings, motifs, and doilies.
- Join multiple motifs together to create larger projects like tablecloths or curtains.
- Experiment with different tension levels to achieve different effects in your lacework.
- Take inspiration from existing tatting patterns and adapt them using the Aerlit Tatting Shuttle.
- Practice regularly to improve your speed and accuracy with the Aerlit Tatting Shuttle.
By utilizing the Aerlit Tatting Shuttle and exploring its various possibilities, you can take your tatting skills to the next level and create beautiful and intricate lacework.
Common Mistakes to Avoid when Using the Aerlit Tatting Shuttle for Tatting Lace-Making
While the Aerlit Tatting Shuttle is a versatile tool that can greatly enhance your tatting skills, it is important to be aware of some common mistakes that beginners often make. By avoiding these mistakes, you can ensure that your lace-making projects turn out beautifully and that you get the most out of your shuttle.
1. Incorrect Loading of Thread
One of the most common mistakes is loading the thread onto the shuttle incorrectly. It is important to follow the step-by-step guide provided in section 3 to ensure that the thread is loaded properly. This will prevent tangles and knots during the tatting process.
2. Insufficient Tension
Another mistake is not maintaining the right tension while tatting. It is crucial to keep the thread taut but not too tight. Practice maintaining a consistent tension to achieve even and neat stitches.
Skipping Steps
Tatting requires precision and attention to detail. Skipping steps or rushing through the process can result in mistakes and uneven patterns. Take your time and follow each step carefully.
4. Not Practicing Enough
Tatting is a skill that requires practice. Many beginners give up too quickly because they become frustrated with their initial attempts. Keep practicing and you will gradually improve your skills.
By avoiding these common mistakes and dedicating time to practice, you can master the art of tatting lace-making with the Aerlit Tatting Shuttle and create stunning pieces of lacework.
Exploring advanced techniques and designs achievable with the Aerlit Tatting Shuttle
Once you have mastered the basic techniques of tatting lace-making with the Aerlit Tatting Shuttle, you can begin to explore more advanced techniques and designs. These advanced techniques will allow you to create intricate and beautiful lace patterns that will impress even the most experienced tatters.
One advanced technique that can be achieved with the Aerlit Tatting Shuttle is called the split ring technique. This technique involves creating a ring with two separate threads, allowing for more complex designs and patterns. By mastering this technique, you can create lace pieces with stunning detail and depth.
Another advanced technique is the use of picots. Picots are small loops that are created by leaving a space between stitches. These loops can be used to create decorative edges and motifs in your lacework. With the Aerlit Tatting Shuttle, you can easily create picots of varying sizes and shapes, adding a unique touch to your designs.
By experimenting with different combinations of stitches, rings, and picots, you can create endless possibilities with the Aerlit Tatting Shuttle. Let your creativity soar and explore the world of advanced tatting techniques and designs with this versatile tool.
The benefits of using the Aerlit Tatting Shuttle compared to other tatting tools
When it comes to tatting lace-making, the choice of tools can greatly impact the outcome of your work. The Aerlit Tatting Shuttle stands out among other tatting tools for several reasons.
Firstly, the Aerlit Tatting Shuttle is designed with precision and durability in mind. Made from high-quality materials, it ensures that your shuttle will last for a long time, even with frequent use. This means that you can rely on the Aerlit Tatting Shuttle to consistently deliver excellent results.
Secondly, the Aerlit Tatting Shuttle offers superior control and maneuverability. Its ergonomic design allows for a comfortable grip, making it easier to handle and manipulate the shuttle while creating intricate lace patterns. This level of control is essential for achieving precise and delicate tatting work.
Lastly, the Aerlit Tatting Shuttle is versatile and adaptable. It can accommodate various thread sizes, allowing you to experiment with different thicknesses and textures. This versatility opens up a world of possibilities for creating unique and personalized lace designs.
In conclusion, the Aerlit Tatting Shuttle offers numerous benefits that set it apart from other tatting tools. Its durability, control, and versatility make it an excellent choice for anyone looking to enhance their tatting lace-making skills.
Unlocking the Beauty of Tatting Lace-Making with the Aerlit Tatting Shuttle
With its unique design and versatile capabilities, the Aerlit Tatting Shuttle is a game-changer in the world of tatting lace-making. By understanding its components and following a step-by-step guide, you can easily load the thread onto the shuttle and explore a wide range of tatting techniques. Maintaining the shuttle is crucial for its long-lasting use, and with practice, you can enhance your tatting skills to create intricate designs.
However, it is important to be aware of common mistakes to avoid when using the Aerlit Tatting Shuttle. By learning from these mistakes, you can achieve flawless results and unlock the full potential of this tool. Additionally, advanced techniques and designs can be achieved with the shuttle, allowing you to push the boundaries of your creativity.
Compared to other tatting tools, the Aerlit Tatting Shuttle offers numerous benefits, making it a must-have for any lace-making enthusiast. Embrace the art of tatting lace-making with the Aerlit Tatting Shuttle and witness the beauty that unfolds with every stitch.
Frequently Asked Questions
What is the significance of the Aerlit Tatting Shuttle in tatting lace-making techniques?
The Aerlit Tatting Shuttle is a tool that is specifically designed for tatting lace-making. It allows for precise and intricate designs to be created with ease, making it an essential tool for any lace-maker.
What are the different components of the Aerlit Tatting Shuttle?
The Aerlit Tatting Shuttle consists of a central core, a bobbin, and a removable cap. The central core holds the bobbin in place, while the removable cap allows for easy loading and unloading of thread.
Can you provide a step-by-step guide on how to load the thread onto the Aerlit Tatting Shuttle?
Certainly! To load the thread onto the Aerlit Tatting Shuttle, first remove the cap and place the bobbin onto the central core. Then, thread the end of the thread through the hole in the bobbin and secure it with a knot. Finally, replace the cap and ensure that the thread is properly tensioned.
What are some tatting techniques that can be achieved using the Aerlit Tatting Shuttle?
The Aerlit Tatting Shuttle allows for a wide range of tatting techniques to be achieved, including rings, chains, picots, and joins. These techniques can be combined to create intricate lace patterns and designs.
Do you have any tips and tricks for maintaining the Aerlit Tatting Shuttle for long-lasting use?
To maintain the Aerlit Tatting Shuttle for long-lasting use, it is important to keep it clean and free from any debris. Regularly wipe it with a soft cloth and avoid exposing it to excessive heat or moisture. Additionally, storing it in a protective case when not in use can help prevent damage.
How can the Aerlit Tatting Shuttle enhance my tatting skills?
The Aerlit Tatting Shuttle’s ergonomic design and smooth operation make it easier to create precise and intricate lace designs. Its versatility allows for a wide range of techniques to be achieved, giving you more creative freedom and the ability to take your tatting skills to the next level.
What are some common mistakes to avoid when using the Aerlit Tatting Shuttle for tatting lace-making?
Some common mistakes to avoid when using the Aerlit Tatting Shuttle include pulling the thread too tightly, not properly tensioning the thread, and not properly securing the thread before starting a new section. It is also important to practice proper hand positioning and technique to ensure smooth and even stitches.
Are there any advanced techniques and designs achievable with the Aerlit Tatting Shuttle?
Yes, the Aerlit Tatting Shuttle allows for the creation of advanced techniques and intricate designs. Some examples include split rings, mock picots, and layered chains. These techniques can be combined to create stunning and complex lace patterns.
What are the benefits of using the Aerlit Tatting Shuttle compared to other tatting tools?
The Aerlit Tatting Shuttle offers several benefits compared to other tatting tools. It provides a smooth and comfortable grip, making it easier to handle and control. Its ergonomic design reduces hand fatigue, allowing for longer and more enjoyable tatting sessions. Additionally, its versatility and precision make it a preferred choice for lace-makers.
About The Author

Orochi Konya is a student of the web. He has been dabbling in it since he was young, and has become an expert in his own right. He loves all things digital, from making websites to programming to social media. In his spare time, Orochi enjoys indulging in his other passion: music. He loves listening to all kinds of music and often spends hours creating playlists on Spotify. He also enjoys drawing manga and watching anime in his free time. Orochi is a friendly pop-culture guru who is always happy to chat about the latest trends in both Japan and the U.S.