

Last Updated on July 5, 2023
When it comes to maintaining and repairing your ATV, knowing how to break a bead on an ATV tire is valuable. The bead is part of the tire that creates a seal with the rim, and breaking it allows you to remove the tire for repairs, replacements, or maintenance. This article will walk you through the step-by-step process of breaking the bead on an ATV tire while providing essential safety precautions.
Understanding the Basics
Before we dive into the process, let’s start by understanding what the tire bead is and why it needs to be broken. The bead is the tire’s inner edge that securely fits into the rim, creating an airtight seal. Breaking the bead is necessary when removing the tire from the perimeter, whether for patching a puncture, replacing a damaged tire, or simply performing maintenance.
To break the bead, you’ll need a few essential tools. These typically include a bead breaker tool, tire spoons, lubrication (such as soapy water), and an air compressor or tire gauge for deflating the tire. Ensuring you have the right tools readily available before beginning the process is crucial.
Preparing for the Process
Before you start breaking the bead, safety should be your top priority. Ensure you have a safe and well-ventilated workspace, away from open flames or potential hazards. Additionally, wear appropriate safety gear, such as gloves and safety glasses, to protect yourself from injuries.
Next, inspect the tire and rim to ensure no sharp objects or debris could cause harm during the process. It’s also a good idea to check the tire’s condition and tread depth to determine if it needs to be replaced or if it can be repaired.
Step-by-Step Guide to Breaking the Bead on an ATV Tire
Now, let’s dive into the step-by-step process of breaking the bead on an ATV tire.
Step 1: Deflating the Tire
Start by deflating the tire completely. This is crucial, as it reduces the pressure and makes it easier to break the bead. Using an air compressor or a tire gauge, deflate the tire by removing the valve core and allowing the air to escape. Monitor the tire pressure gauge closely to ensure it reaches zero.
Step 2: Positioning the Tire
Once the tire is deflated, it’s time to position it for the bead-breaking process. Lay the tire on a clean and flat surface with the side that needs the bead to be broken facing up. Ensure the tire is stable and won’t roll or move. Having someone assist you by holding the tire in place is also helpful.
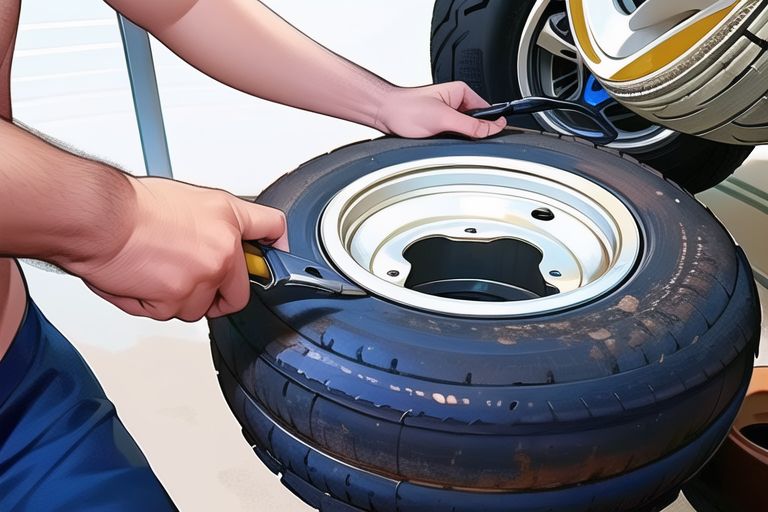
Step 3: Applying the Bead Breaker
Place your bead breaker tool on the tire’s sidewall, just next to the rim. The tool should be aligned with the edge of the rim where the bead sits. Apply firm pressure to the tool to break the bead. You may need to use your body weight or leverage from a tire spoon to create enough force.
Step 4: Applying Lubrication
To make the bead-breaking process smoother, apply lubrication to the bead and the rim. Soapy water or a specialized tire lubricant can help reduce friction and make it easier to break the bead. Apply the lubricant along the entire circumference of the tire where the bead meets the rim. This will allow the bead to slide more quickly as you apply pressure to break it.
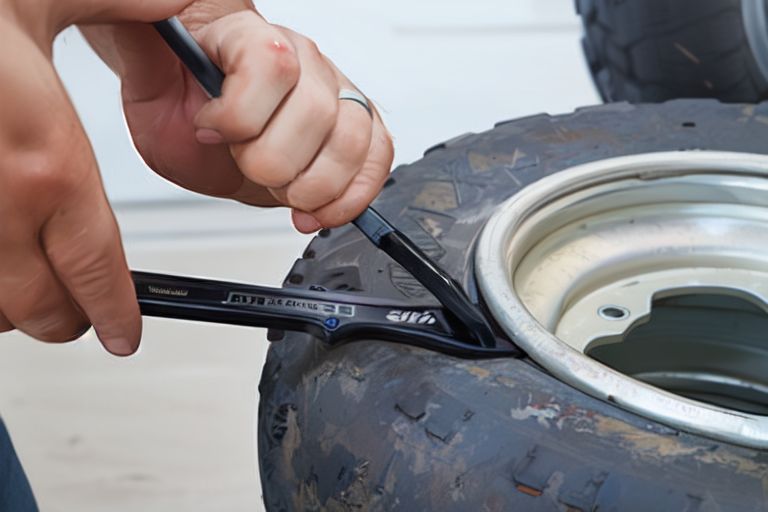
Step 5: Applying Pressure to Break the Bead
With the bead breaker tool in place and the lubrication applied, it’s time to apply pressure to break the bead. Push down on the handle of the bead breaker tool or use the tire spoon as a lever to exert force against the tire’s sidewall. Gradually increase the pressure until you hear or feel a popping sound, indicating the bead has been successfully broken.
During this step, it’s essential to be cautious and avoid applying excessive force that could damage the tire or rim. If you encounter significant resistance or difficulty breaking the bead, you may need to reposition the bead breaker tool or seek assistance from a professional.
Ensuring the Bead is Completely Broken
After breaking the bead, it’s essential to ensure that it is fully separated from the rim. Carefully inspect the entire circumference of the tire to ensure there are no areas where the bead is still connected to the rim. Use your hands or tire spoons to gently pry any remaining sections of the bead away from the rim. A completely broken bead will allow you to remove the tire easily for repairs or replacements.
Tips and Tricks for Breaking a Bead on an ATV Tire
Breaking the bead on an ATV tire can sometimes be challenging, especially with stubborn beads or tires that have been used for a long time. Here are a few tips and tricks to make the process easier:
Use heat: Applying heat to the tire bead, such as a heat gun, can help soften the rubber and make it more pliable, thus easing the bead-breaking process.
Use a rubber mallet: If you’re experiencing difficulty breaking the bead, gently tapping the tire’s sidewall with a rubber mallet can help loosen the bead and facilitate its separation from the rim.
Rotate the tire: If you’re facing resistance in breaking the bead in one specific area, try rotating the tire and applying pressure from a different angle. This can help distribute the force more evenly and aid in breaking the bead.
Remember to exercise caution and patience throughout the process, as forcefully breaking the bead can lead to tire or rim damage.
Maintenance of ATV Tires Post-Bead Breaking
Once you’ve successfully broken the bead and completed the necessary repairs or replacements, it’s crucial to properly store and care for your ATV tires. Please keep them in a cool, dry location, away from direct sunlight and chemicals. It’s also essential to periodically check the tire pressure and tread depth to ensure optimal performance and safety.
Sometimes, you may need to break the bead again for future tire maintenance or replacements. The process will familiarize you but always follow the same safety precautions and steps outlined in this guide.
Conclusion
Breaking a bead on an ATV tire is a valuable skill for any ATV owner or enthusiast. With the proper tools, precautions, and step-by-step process, you can safely remove and replace tires as needed, ensuring optimal performance and extending the lifespan of your ATV. Always prioritize safety, follow the recommended steps, and seek professional assistance. By mastering this skill, you’ll be well-equipped to handle various tire-related tasks and confidently maintain your ATV for years to come.
Mastering ATV Tire Maintenance: Performance, Repair, and Selection Guide
When it comes to off-road adventures, all-terrain vehicles (ATVs) are the perfect companions. These versatile machines are built to tackle rugged terrains, but their performance and safety heavily rely on the condition of their tires. In this comprehensive guide, we’ll delve into ATV tire maintenance. From proper inflation and patching techniques to tire replacement and selection, we’ll equip you with the knowledge you need to keep your ATV rolling smoothly and safely.
Proper Tire Inflation for ATV Performance and Safety
The Importance of Maintaining Optimal Tire Pressure
Picture this: you’re out on the trail, navigating through muddy tracks and rocky slopes, when suddenly, your ATV starts to feel sluggish and unresponsive. Chances are, improper tire pressure could be the culprit. Maintaining optimal tire pressure is vital for ATV performance, handling, and safety.
When your tires are under-inflated, they become prone to sidewall damage and may compromise the overall stability of your ATV. On the other hand, over-inflated tires reduce the contact patch with the ground, leading to a harsh ride and diminished traction. You’ll ensure optimal performance, handling, and stability by keeping your ATV’s tires properly inflated.
Checking and Adjusting Tire Pressure
Checking and adjusting the tire pressure on your ATV is a straightforward task that should be performed regularly. Start by referring to your ATV’s manual for the manufacturer’s recommended tire pressure. Next, you’ll need a reliable tire pressure gauge to measure the current pressure.
To check the tire pressure, remove the valve cap and firmly press the gauge onto the valve stem. The indicator will display the pressure reading. Compare it to the recommended pressure and make adjustments as necessary. Inflate or deflate the tires using an air compressor or a portable pump until the desired pressure is achieved.
The Impact of Under-inflated or Over-inflated Tires on ATV Performance
Now that you understand the importance of proper tire inflation let’s explore the effects of under-inflated or over-inflated tires on ATV performance. When your tires are under-inflated, they tend to flex excessively, generating heat and increasing rolling resistance. This reduces fuel efficiency, accelerates tire wear, and compromises ride quality. Furthermore, under-inflated tires are more susceptible to punctures and can cause rim damage.
On the contrary, over-inflated tires result in a harsh ride, decreased traction, and a higher risk of tire damage due to the reduced contact patch with the ground. Additionally, over-inflated tires can adversely affect your ATV’s suspension system, leading to an uncomfortable and unstable riding experience.
Tire Patching and Repair Techniques for ATV Tires
A Detailed Guide to Patching and Repairing Punctured or Damaged ATV Tires
Even with conservative riding, ATV tires will eventually encounter punctures or damage. Knowing how to patch and repair them effectively can save you from costly replacements. Let’s dive into the step-by-step process of fixing and repairing ATV tires.
Locate the puncture: Carefully inspect the tire to identify the hole or damage. Remove any debris lodged in the tire.
Prepare the tire: Before proceeding with the repair, it’s crucial to deflate the tire completely. Use a tire valve tool to remove the valve core and release all the air.
Clean and roughen the area: Use a wire brush or sandpaper to clean and roughen the damaged area. This ensures Clean and roughens the site: Use a wire brush or sandpaper to clean and roughen the damaged area. This provides better adhesion for the patching material.
Apply the patch: Depending on the type of puncture, you have several patching options. One popular method is using a tire plug. Insert the plug into the hole, ensuring it is fully embedded and tightly sealed. Another option is using a patch and adhesive. Apply the adhesive to the damaged area and place the patch over it, pressing firmly to ensure a secure bond.
Allow for proper curing: Follow the instructions provided with the patching material for adequate curing time. This ensures that the patch sets appropriately and creates a strong seal.
Reinflate and inspect: Once the patch has cured, reinflate the tire to the recommended pressure. Carefully inspect the repaired area to ensure no signs of leakage or damage. Monitoring the patched site periodically is also a good practice to ensure its integrity over time.
Tire Replacement Guide for ATV Owners
Determining When It’s Time to Replace ATV Tires
While proper maintenance and timely repairs can extend the lifespan of your ATV tires, there comes the point when replacement is necessary. Several factors indicate that it’s time to invest in a new set of tires:
- Treadwear: Inspect the tread depth regularly. Once the tread wears down to the point where it reaches the tread wear indicators or is significantly shallow, it’s time for a replacement. Worn-out treads result in reduced traction and compromised safety.
- Sidewall damage: Cracks, cuts, or bulges in the sidewall are signs of structural damage. Such damage weakens the tire’s integrity and increases the blowout risk. Replace tires with noticeable sidewall damage immediately.
- Age: Regardless of tread wear, tires deteriorate over time. If your tires are over six years old, it’s recommended to replace them, even if they appear in good condition. Aging tires become more susceptible to failure and lack the performance characteristics of newer ones.
Selecting the Right Tires for Different Terrains and Riding Conditions
Choosing the right tires for your ATV involves considering various factors. Let’s explore the key elements to keep in mind when selecting ATV tires:
- Terrain types: Determine the primary terrain you’ll be riding on. Different tire designs are optimized for specific terrains such as mud, sand, rocks, or trails. Identify the predominant landscape and select tires with tread patterns suitable for optimal traction in those conditions.
- Tread patterns vary in lug spacing, depth, and pattern design. Aggressive, deep lugs are ideal for mud and lose terrain, providing enhanced grip. Tires with shallower lugs and more closely spaced tread blocks perform better on hard-packed surfaces.
- Ply ratings and load capacities: Consider the tires’ ply rating and load capacity to ensure they can handle the weight and demands of your ATV. Higher ply ratings indicate increased strength and durability, while load capacities determine the maximum weight the tires can support.
- Front and rear tire matching: For optimal performance and handling, matching the tire types and sizes on the front and rear of your ATV is essential. Ensure that the tires have consistent characteristics to maintain balanced traction and control.
Tire Maintenance Tips to Extend the Life of ATV Tires
A Comprehensive Guide to Maintaining ATV Tires
Proper tire maintenance is critical to extending the lifespan of your ATV tires. Follow these tips to keep your tires in top shape:
- Regular cleaning: After each ride, clean your ATV tires thoroughly to remove mud, dirt, and debris. Use a hose or pressure washer to rinse off the tires and a soft brush or sponge to scrub away stubborn dirt. This prevents buildup and maintains traction.
- Inspection for wear and damage: Periodically inspect your ATV tires for signs of wear and damage. Look for uneven tread wear, cuts, bulges, or other abnormalities. Address any issues promptly to prevent further damage and ensure safe operation.
- Tire rotation: Rotating your ATV tires regularly promotes even wear and extends their lifespan. Refer to your ATV’s manual for recommended rotation patterns and frequencies. This helps distribute the workload across all tires and maximizes their longevity.
- Proper storage techniques: When storing your ATV, take precautions to protect the tires. Store the vehicle in a cool, dry location away from direct sunlight and extreme temperatures. Elevate the ATV to prevent tire deformation. Keep the tires inflated to the manufacturer’s recommended pressure during storage.
- Avoid overloading: Be mindful of the weight limits specified by the ATV manufacturer. Overloading your ATV can strain the tires excessively, leading to accelerated wear and potential failure. Ensure the total weight, including passengers and cargo, remains within the recommended limits.
Maintain proper tire pressure: As discussed earlier, maintaining optimal tire pressure is crucial for ATV performance and safety. Check the tire pressure regularly and adjust as needed to ensure they are inflated to the manufacturer’s recommended levels.
Factors to Consider When Selecting ATV Tires
- Several factors come into play when selecting the right tires for your ATV. Consider the following:
- Terrain types: Determine the primary terrains you’ll be riding on. Different tire designs are optimized for specific terrains such as mud, sand, rocks, or trails. Identify the predominant terrain and select tires with tread patterns suitable for optimal traction in those conditions.
- Tread patterns vary in lug spacing, depth, and pattern design. Aggressive, deep lugs are ideal for mud and lose terrain, providing enhanced grip. Tires with shallower lugs and more closely spaced tread blocks perform better on hard-packed surfaces.
- Ply ratings and load capacities: Consider the tires’ ply rating and load capacity to ensure they can handle the weight and demands of your ATV. Higher ply ratings indicate increased strength and durability, while load capacities determine the maximum weight the tires can support.
- Size and fitment: Refer to your ATV’s manual or consult a tire professional to determine the appropriate tire size and fitment for your specific model. Incorrect tire sizes can affect clearance, steering, and overall performance.
- Riding style and preferences: Consider your riding style and preferences. Do you prefer aggressive off-roading or more casual trail riding? Different tires offer varying levels of performance, durability, and ride comfort. Choose tires that align with your desired riding experience.
- Budget: Set a budget for your ATV tires. While investing in quality tires is essential, options are available at various price points. Research and compare prices, considering the overall value and performance of the tires.
- Considering these factors, you can make an informed decision and select ATV tires that match your specific needs and riding style.
Frequently Asked Questions
What does “break the bead” on an ATV tire mean?
Why would I need to break the bead on my ATV tire?
What tools do I need to break a bead on an ATV tire?
How do I prepare the ATV and workspace before breaking the bead?
How do I break the bead on an ATV tire?
What are some troubleshooting tips for breaking stubborn beads?
Are there any safety precautions I should follow when breaking a bead?
What should I do after breaking the bead on an ATV tire?
When should I replace an ATV tire for repairs instead of breaking the bead?
Can I break the bead on an ATV tire, or should I seek professional assistance?
About The Author

Wendy Lee is a pop culture ninja who knows all the latest trends and gossip. She's also an animal lover, and will be friends with any creature that crosses her path. Wendy is an expert writer and can tackle any subject with ease. But most of all, she loves to travel - and she's not afraid to evangelize about it to anyone who'll listen! Wendy enjoys all kinds of Asian food and cultures, and she considers herself a bit of a ninja when it comes to eating spicy foods.