
Last Updated on September 17, 2022
If you have ever wondered how to make an organza boa, you’re not alone. Many people are curious about this dazzling accessory. Its versatility makes it a great choice for special occasions, like weddings and ballroom dances. However, there are several factors you should consider before you get started. These include material, color, and size. Read on to discover the easiest way to make a gorgeous organza boa that will make everyone look their best.
Color
The most extravagant boa available is the Organza Boa. But you can customize its color to match your personality and style. It comes in several colors, and you can even dye it yourself at home. Learn how to do it and you’ll have an amazing boa in no time. It also comes in various sizes and lengths. You can order a custom size and color, or even have it custom-made.
First, thread a monofilament line onto a 2-inch length of organza ribbon. Repeat the process, poking the needle into the ribbon every 4 inches, for a fuller boa. For a tighter boa, you must place two inches apart between the needles. Once you have completed the process, trim the ribbon with scissors. The finished boa will look fluffy and full. You can also use a sewing machine if you want it to be more durable.
Size
If you have ever wanted to know how to make an organza boa, then you are definitely on the right track. These natural wonders are fun to wear and add to outfits. You can use them to complement your regular wardrobe or to embellish special costumes. You can easily create a boa for yourself from 25 yards of organza. You can also adjust its size as per your preference. Depending on your personal taste and style, you can make a longer or shorter boa.
You can use a 70/10 Microtex needle for sewing the organza. A smaller needle and smaller stitches are required for sewing the organza. Also, remember to use a pin to prevent puckering of the fabric while sewing. As the organza tends to pucker while sewing, you should hold the fabric either in front of the presser foot or behind it. However, this will slow you down.
Material
Learn how to make an organza boa by following this easy step-by-step tutorial. First, fold the wider piece in half. Fold the thinner half of the ribbon over the center. Now, thread the monofilament line through the gathered fabric. Repeat step 4 until you have the right length and puffiness. You can now adjust the length of the boa with the gathered ribbon. Once you’re satisfied with the length and puffiness, you can sew the ends together.
Next, cut a long piece of invisible thread. Thread this on a beading needle. Make 3 loops with seed beads. Make the loops of different lengths. Each strand should be an inch and a half long. Using a needle to make the loops will make the boa longer. Be sure that the thread doesn’t slip or break. Then, tie the ends of the strands together.
Pillow ruffles
Firstly, you need to measure the circumference of your pillow. To do this, you can use a tape measure. The ruler is not enough. Once you have the right measurement, you need to iron the fabric. This will make it easier to work with and the finished product will look nice. You should also avoid squeezing the pillow when measuring the circumference. The larger the circumference, the better.
Next, sew the ruffles on the pillowcase. Sew them with a 1/4 inch seam allowance. You can also use a zig-zag stitch around the seam allowance. When you are done, turn the pillowcase right side out and press it flat. You can then decorate the ruffles with lace or more organza. You can even sew some lace on the pillowcase to make it look more beautiful.
The width of the ruffle is a function of the width of the pillow. When measuring for a pillow ruffle, double the width of the pillow and add seam allowances. For instance, a 3″ wide ruffle requires 9″ of fabric. Cut the fabric along the crosswise grain, keeping in mind that it does not include the pillow body. Repeat until you have made all the ruffles in your desired width.
Decorative pillows are not a new concept. In fact, they were first invented in the 1700s. These decorative pillowcases were originally designed as removable covers for pillows. In today’s world, pillowcases are a must-have for any bedroom. And with their beautiful ruffles, pillowcases take a whole new level of beauty. If you aren’t comfortable sewing with the needle and thread, try using an invisible zipper.
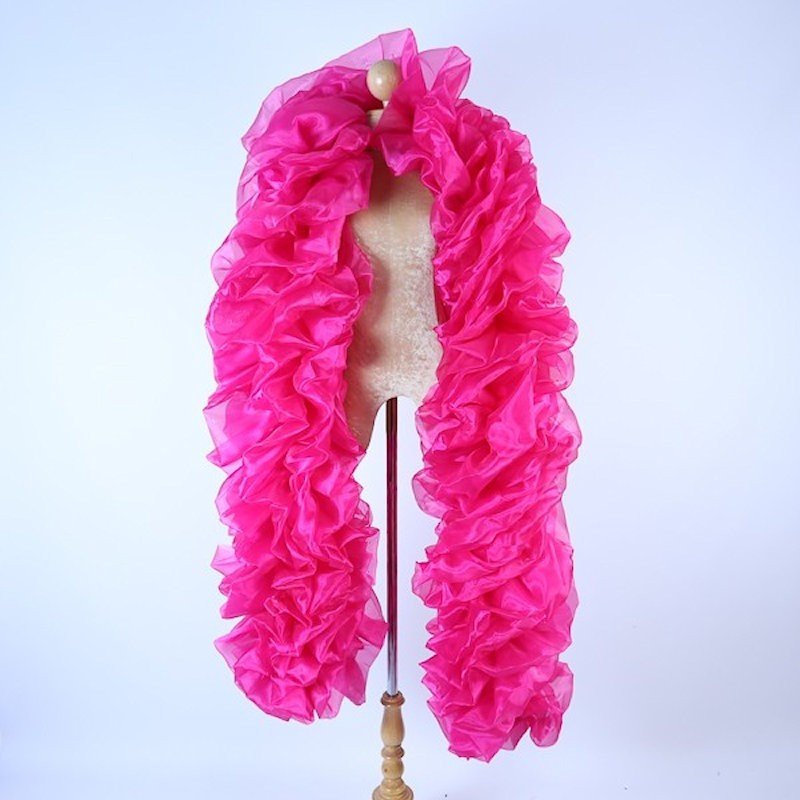
Fluffy
Organza boas are a modern take on the classic feather boa, and they’re perfect for cruelty-free fashion shows. Contestants at beauty pageants and models alike wear them for the sheer glamour they add to their outfits. But how do you make a fluffy organza boa? To make a fluffy boa, start by threading your monofilament line through the center of the organza ribbon, and poke the needle into it at least 4 inches from the first insertion. You’ll want to leave about 6 inches between each insertion if you want your boa to be fuller, and two inches between the first and second insertion. Then, trim the ribbon on the sewing needle with scissors.
Once you’ve folded your wider piece, pin the two pieces together, leaving the two thinner sections sticking out the middle. You’ll end up with a gathered fabric that looks like a boa with a bunch of folds and a few places where the organza will bunch up. That’s OK, though; the gathered fabric will hide any imperfections and make the boa look beautiful.
About The Author

Mindy Vu is a part time shoe model and professional mum. She loves to cook and has been proclaimed the best cook in the world by her friends and family. She adores her pet dog Twinkie, and is happily married to her books.