
Last Updated on September 17, 2022
To create a gif overlay, you need to place your image inside the sparks folder, which contains other layers containing text, textures, and other gifs. Unlike the normal folder, sparks is a small file size, so it can be used to create larger images. To create a gif overlay with text, you can click and drag a gif over the image.
EZGIF
Having trouble understanding how to overlay gifs in photoshop? Don’t worry, we’ll help you figure it out. Photoshop has a built-in feature that will allow you to easily insert an animated gif onto your image. All you have to do is select the gif you want to overlay, and press “Ctrl” or “Shift” to duplicate the selected layer.
Select the layer in which you want to overlay the gif. In the resulting window, click the “paste” icon, which is located on the left-hand side of the workbar. Now, select a gif and click “Paste Over Selection.” Once you paste the gif, it will be displayed over the selected image. But make sure the gif is on frame 1 and has an overlay value.
Now, you can use the resize tool to resize and move the GIF. Then, select the ’Save’ button and choose the GIF preset or “Save for Web (Legacy…” option. There are several settings to choose from, including looping and brightness. To preview the gif, click the ’preview’ button in the bottom-left corner.
Creating an animated GIF is easy to do with the help of Adobe Photoshop. Once you’ve created the GIF, you can add customized elements to it by adding them using a free online GIF maker. A classic online GIF maker is EZGIF. Its interface is minimal but it allows you to add an overlay file. You can even make an animated GIF from a video clip.
Another tool that lets you overlay GIFs with images is Imfilp. This application allows you to add an image over the top of a GIF. You can also merge two or more GIFs into one GIF. It doesn’t support picture-in-picture effects, but it allows you to add a watermark to a GIF and combine it with an image. Lastly, it’s free and has a simple interface.
When making a gif, you can export it to your computer using Photopea. The software is free and allows you to import photoshop psds and brushes. The tutorial is long, but it’s well worth the time. It’s easy to learn and applies to just about any photo. So, if you’re looking for an easy way to overlay gifs in photoshop, keep reading!
Photopea
To overlaid gifs in Photoshop, you must select two corresponding gifs with the same number of frames. Next, select the gif overlay layer and change its blending mode to overlay. Select the gif overlay layer and adjust its size and opacity accordingly. Click OK. After that, you can paste the gif over the selected image. You can repeat the same process with the second gif.
In Photoshop, you can also add text over GIFs. Just follow the same steps as with images. Once added, you can edit or change them if you want to. Remember that the text layer affects everything below it. Therefore, you must place the text layer above the last frame of the GIF and at the top of the layers list. You can then edit the text or change its color. If the gif is pixelated, you can use the free transform option in Windows.
The process to overlay gifs is relatively simple. Just make sure you have a copy of each image. Then, use the Layer panel on the bottom right of the screen to name the layers. Double-click on the layer name, type a new one and press enter. Once you have the gifs with the same number of frames, you can merge them into one. You can now add text and gifs over each other in Photoshop!
In addition to the layer method, you can create a customised GIF layer by using a free online editing tool called Photopea. This free program is similar to photoshop, and can import psds and brushes from photoshop. To learn more, check out the tutorial on Photopea. There are several options available in this program for creating an interesting GIF overlay. Once you have found the right one, you can make it a reality.
To create an gif overlay layer, you need to create a transparent background. To create this, separate the subject of the image from the background. This can be done with a PSD, JPG, or PNG. Once the background is transparent, the GIF should appear behind the image. If you want to create a larger image, you can also use a sparks folder containing more sparks and text.
Adobe Photoshop
The process of how to overlay a GIF is nearly identical. First, you must select two separate gifs with the same number of frames. Next, select the text layer and click the group icon. Position the text in the desired position, and then click OK. Repeat this step for the second gif. Once you have placed the text, you can change its color, position, or position. Finally, click OK again to close the group.
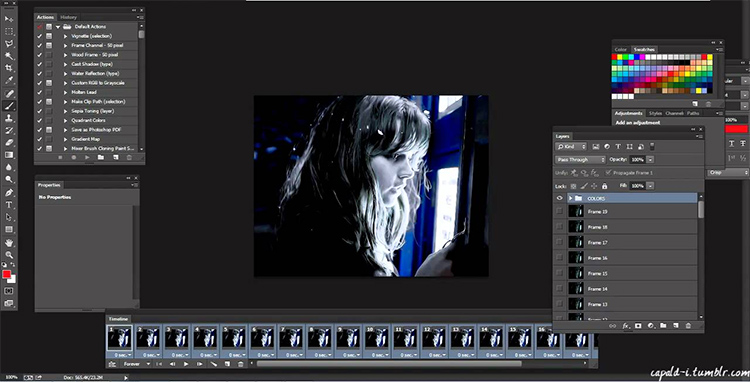
Once you have completed these steps, select both gifs and open them in your image editing software. Make sure they are of the same size. To do this, crop each gif to the same size. In the example above, the gif is 245px by 200px. Moreover, make sure they both contain the same number of frames. Click the “Flatten frames into layers” option on both.
Alternatively, you can create your own gif by downloading one from the internet. However, keep in mind that the larger the GIF file, the greater the file size. So, keep in mind the size of the GIF image when selecting it for overlaying. The key to a successful overlay is timing. Usually, the more frames you add, the bigger the file will become. The gif must be of an appropriate size to be incorporated into the image, as the larger the gif, the greater the file size.
To convert a video into a GIF, you must first import the video into Photoshop. After that, you must add a layer for each video frame and import it into Photoshop. Once you have all the necessary frames, you can then save the video as a GIF. You can also change the colours in the output image by selecting GIF 128 Dithered. You can save your video as GIF in a variety of formats.
The process of importing a GIF into Adobe Photoshop is similar to how you would import an image into Photoshop. First, import the GIF file into the photo you want to overlay on it. Then, choose the destination image and click OK. Next, you can scale the watermark by holding Shift while selecting it. Once you’re done, you can adjust the opacity and blending mode of the watermark.
Canva
If you want to overlay a GIF on your images, Canva is the way to go. It is a widely used graphic design platform, and it offers a wide range of options for adding images and other text, as well as customizing your designs. It doesn’t come with a watermark, but it does offer a lot of customizable options. One downside to Canva is that you can’t decide which GIF will appear first or last. However, you can choose to add a watermark for your images, which will save you a lot of time.
In Photoshop, you can choose to use any one of the programs, but Canva is more intuitive. It’s great for creating attention-grabbing advertisements and social media posts. You can add text and images to your canvas, select an animation, and adjust the length of the frames. You can then select which gifs to use as overlays. Once you’re done with the initial steps, you can start working with the rest of your design.
To begin making an animated GIF, you first need to add an image to your canvas. Click the layer button on the top right of your canvas to create a new layer. Once you’ve added the images, you can name each one separately. To do this, open the Layer panel in Photoshop and double-click on the layer name. Then, type the new name and press enter. You can now preview the GIF in Photoshop and export it for web use.
You can also use Canva to design a website. It offers a free trial for the Pro plan. You can use the tool for free to create graphics and share them with your social networks. There are paid and free plans, and you can also use the pro plan for larger businesses. The Enterprise plan offers advanced collaboration tools and support around the clock. Canva is a great option for your graphics design needs.
About The Author

Pat Rowse is a thinker. He loves delving into Twitter to find the latest scholarly debates and then analyzing them from every possible perspective. He's an introvert who really enjoys spending time alone reading about history and influential people. Pat also has a deep love of the internet and all things digital; she considers himself an amateur internet maven. When he's not buried in a book or online, he can be found hardcore analyzing anything and everything that comes his way.