
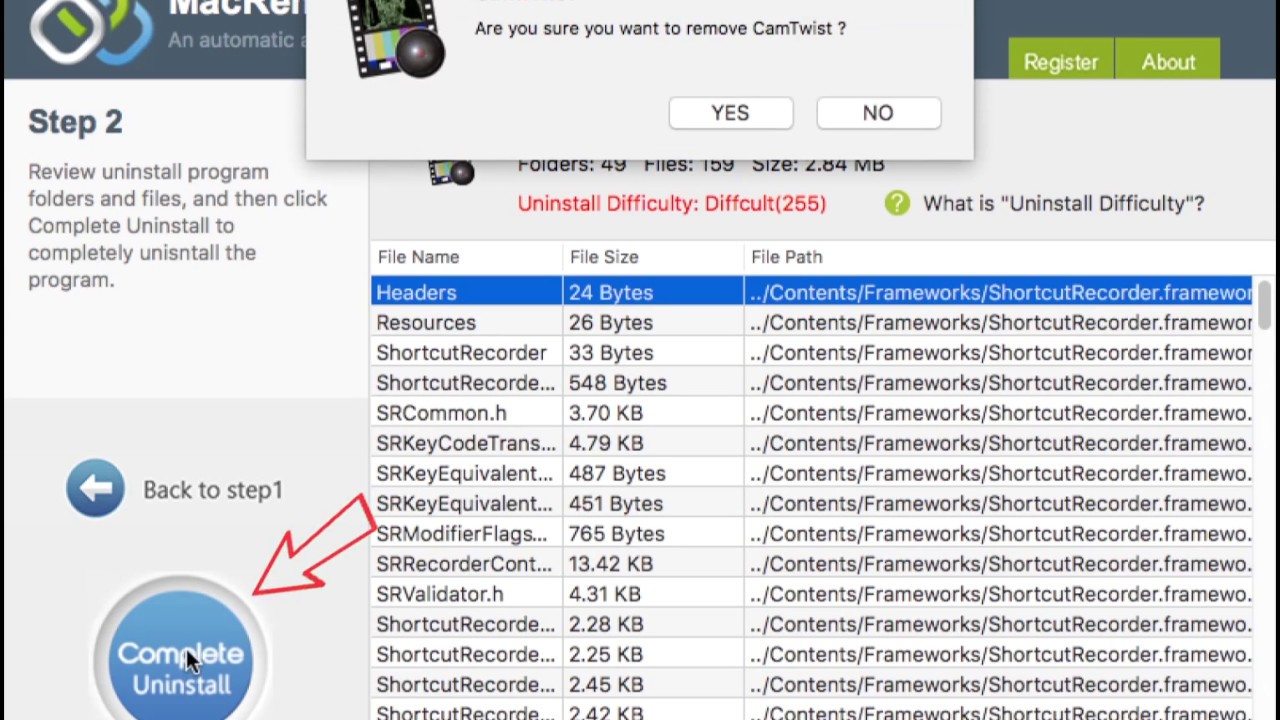
If you’re wondering how to remove CamTwist from Mac, you’ve come to the right place. MacRemover is a powerful yet simple-to-use app that can effortlessly uninstall any unwanted program from your Mac. Its Smart Analytic System is able to detect and remove the entire bundle of components installed by CamTwist on your Mac. With a single click, MacRemover can effectively and completely get rid of CamTwist from your computer. This uninstaller is also available for Windows and Linux users.
How do I get rid of virtual camera in OBS Mac?
To remove the virtual camera, open the Apple menu and choose “System Preferences.” In the Security & Privacy section, click the General tab. Find the OBS Studio icon and check the box to uninstall it. Then, use the Finder to move it to the Trash. Confirm your deletion by clicking the Delete button. You should now be able to see the virtual camera icon in the Applications folder.
Typically, you should see a blue bar at the edge of your screen, warning you that you are too close to the webcam field of view. This is to prevent the user from moving out of the camera’s field of view and losing tracking. This UI will still appear unless you set the camera’s transparency to off. In OBS, however, the option to hide it will make the blue bar disappear if you enable Allow transparency.
To remove the virtual camera in OBS Studio, make sure you have administrative privileges on your computer. This is a critical step as it could result in a conflicting background process or a minor bug. To ensure that the virtual camera doesn’t interfere with other apps, you can try to turn off the OBS Studio virtual camera. In the meantime, you can manually remove the virtual camera device by opening the Mac finder. If the virtual camera still persists, you can also use the keyboard shortcut “Command + Shift G” to bring up the goto dialog.
How do I uninstall Webcam on Mac?
If you’re wondering how to uninstall Webcam on Mac, you’re not alone. Many Mac users don’t even realize that they’ve installed this program! While this can be frustrating, removing Webcam Settings is actually pretty easy. All you have to do is follow the directions below. First, log into your Mac with an administrator account. You will be prompted to enter your password when you remove Webcam settings. Then, find the Webcam Settings application in the Finder and drag it to the Trash. Alternatively, you can move the folder and icon to your Trash.
Next, locate the QuickTime folder in the Library folder. The key file is the QuickTimeUSBVDCDigitizer.component. Copy this file with Command + C and paste it in a new folder titled “webcam backup”.
How do I change my default camera on Mac?
How do I change the default camera on my Mac? Most Macs come with a built-in camera, but if you want to use an external camera, you will need to connect it to your computer first. There is usually no on/off switch on these devices, but the camera will show a window preview if it’s connected. Open any video-related applications to enable it. If it doesn’t show a preview, click “Camera” again to turn it on.
On the top-left corner of your screen, click on the Apple icon. From there, select About This Mac or System Report. On the left sidebar, select Camera. Select the checkbox next to the app you’re using. If the camera is not listed, try reinstalling the software. Or, restart your Mac. In some cases, a simple reboot may be enough to fix the problem.
Uninstall OBS virtual camera from Chrome Mac
If you want to uninstall OBS virtual camera from Chrome Mac, you can find it by selecting its icon and going to Applications>Trash. Once there, select OBS Studio and drag it to the trash. To remove OBS virtual camera from Chrome Mac, you must have administrator privileges. Alternatively, you can open Finder>Empty Trash and delete it. If you’re using Windows, you can use a third-party screen-recording software.
Once the OBS virtual camera has been installed on your system, you can enable it by clicking its Action button and selecting the option Scan For Hardware Changes. You may need to restart your computer after you’ve selected the camera option. If you’d like to update the camera driver, right-click on the Integrated Camera option and choose Update Driver. The software will then look for available updates and download them to your computer.
To remove OBS virtual camera from Chrome Mac, you must be able to access the corresponding folders. The OBS plugin is located in the /Library/Application Support/obs-studio/plugins folder. The DAL plugin is located in /Library/CoreMediaIO/Plug-Ins/DAL. When you uninstall OBS virtual camera from Chrome Mac, you must remove both plugins.
How do I remove a virtual webcam?
If you’re wondering “How do I remove a virtual webcam from my Mac?” you’re not alone. Many people have gotten this annoying and unwanted application. Here are some of the steps you need to take to remove this application permanently from your computer. First, log into your Mac using an administrator account. In case of any error, you will be prompted for a password to delete files. Next, locate the Webcam Settings application in the Finder. Drag the application to the Trash. You can also drag the folder or icon to the Trash.
Next, you must identify and remove the software. Depending on the software, you can either remove the entire program or just its components. Alternatively, you can remove the drivers that are responsible for the webcam’s operation. For Windows 7, you can open Device Manager by pressing the Windows key (located between the Ctrl and Alt keys on most keyboards).
How do I remove OBS camera?
Uninstalling OBS Studio is easy. Open the Finder and locate the OBS Studio icon. Drag it to the Trash icon and click the Remove button. You will need to have administrator privileges to do this. This will remove all the applications associated with OBS Studio. Now, follow the next steps to remove OBS Studio from your Mac. If you are having trouble, try using these tips. They should work for you.
Uninstall OBS studio. The virtual camera is not always removed when you remove OBS studio. You can manually remove it if you encounter this problem. You can use the finder to find the folder where the virtual camera is installed. Alternatively, you can press the keyboard shortcut Command+Shift+G. This will open the goto window where you can remove the virtual camera. You can also remove the virtual camera from the Mac by uninstalling it from the Mac.
Make sure you have the permission to delete the OBS studio application. Moreover, you should make sure that your camera is connected directly to your Mac instead of using an adapter. Make sure that your camera is connected directly to your Mac. If you have installed an antivirus, then you need to uninstall it. Otherwise, you may accidentally delete other useful items. But this isn’t always easy. Therefore, make sure to backup all important data before deleting apps.
How to completely remove CamTwist from mac?
In order to delete CamTwist from your Mac, you must first empty its Trash. This can be done by right-clicking the trash icon in the dock or by selecting “Empty Trash” from the Finder menu. After emptying the Trash, restart your computer to complete the removal. However, you must be careful not to leave any files or folders related to CamTwist on your Mac.
To start the removal process, log in to your Mac using an administrator account and enter the password of your choice. Locate the CamTwist application in the Finder, and then drag it to the Trash. You can also drag the application icon to the Trash directly. After that, simply follow the directions in the uninstaller’s dialog box. If you run into any problems, follow the instructions again.
Unlike Windows, uninstalling applications on Mac is much easier than its Windows counterpart. However, if you’re not a Mac expert, you may find it difficult to remove the program completely. Thankfully, there are some solutions for that. Using a professional uninstaller like MacRemover can do the job for you in a matter of minutes. This software is capable of removing corrupted or incompatible applications.
Can teams use OBS virtual camera?
One of the most common questions regarding OBS is: Can teams use OBS to share a webcam with each other? There are several ways to do this, including using a keyboard shortcut, a remote device, or apps. Microsoft Teams and Panopto are both excellent options, but other applications can also use OBS to share video. Below, we’ll discuss some of the other ways teams can use OBS to share a webcam.
The OBS virtual camera is compatible with a wide variety of collaboration tools, including Microsoft Teams, Google Meet, and Facebook Messenger Rooms. It can also be used in other collaboration tools such as Zoom and Skype, and can even be shared in a video chat. In order to use OBS, you’ll need to download the latest version of OBS Studio, and then install it on the target device. If you’re using OBS with Skype, you’ll want to ensure you’re using the latest version of the app.
OBS is available for Windows, macOS, Linux, and Unix. The OBS virtual camera can also be used in Zoom, Skype, and Discord. Fortunately, it can also work with a wide range of other software, so you’ll have no trouble streaming a video. If you’d like to use the OBS virtual camera with your team’s video meetings, you can also download Movavi Screen Recorder. It’s free to download and install. Once you’ve installed OBS, you can upgrade it.
About The Author

Wendy Lee is a pop culture ninja who knows all the latest trends and gossip. She's also an animal lover, and will be friends with any creature that crosses her path. Wendy is an expert writer and can tackle any subject with ease. But most of all, she loves to travel - and she's not afraid to evangelize about it to anyone who'll listen! Wendy enjoys all kinds of Asian food and cultures, and she considers herself a bit of a ninja when it comes to eating spicy foods.