
Last Updated on July 26, 2023
Short Answer
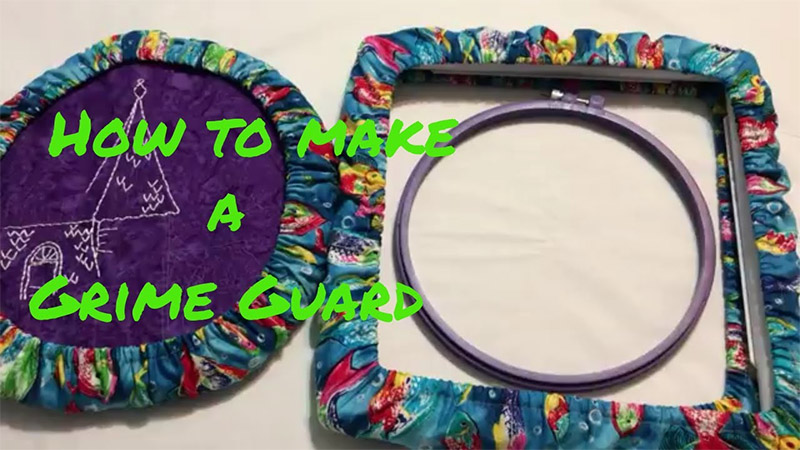
To make a grime guard, you will need a few simple materials and follow a step-by-step process. First, gather a piece of fabric, preferably waterproof or stain-resistant. Measure and cut the fabric to fit the desired area you want to protect. Next, sew the edges of the fabric to prevent fraying. Attach Velcro strips or elastic bands to the corners of the fabric for easy installation and removal. Finally, secure the grime guard in place by fastening the Velcro or stretching the elastic bands around the desired surface. With these steps, you can create a functional and effective grime guard to protect your belongings.Protecting your belongings from dirt and grime is essential, and a grime guard can help you achieve just that. In this article, we will explore the benefits of using a grime guard for your valuables and provide a step-by-step guide on how to make one yourself. We will start by gathering the necessary materials and then move on to measuring and cutting the fabric. Next, we will guide you through sewing the fabric pieces together and adding elastic or Velcro straps for easy attachment and removal. We will also discuss how to properly clean and maintain your grime guard, as well as provide additional tips and tricks for maximizing its effectiveness. By the end of this article, you will have the knowledge and skills to create your own DIY grime guard and enjoy peace of mind knowing your belongings are protected.
The Benefits of Using a Grime Guard for Your Valuables
- A grime guard is an essential accessory for protecting your belongings from dirt, dust, and other contaminants.
- Using a grime guard can help prolong the lifespan of your valuables and keep them looking clean and pristine.
- Here are some key benefits of using a grime guard:
1. Protection from dirt and dust
- A grime guard acts as a barrier, preventing dirt and dust from settling on your belongings.
- It is especially useful for items that are frequently exposed to outdoor elements or stored in dusty environments.
2. Prevention of scratches and damage
- The fabric used in a grime guard provides a protective layer that helps prevent scratches and damage to your valuables.
- It is particularly beneficial for delicate items such as electronics, jewelry, or glassware.
Easy to clean and maintain
- A grime guard is typically machine washable, making it easy to clean and maintain.
- You can simply remove the grime guard, toss it in the washing machine, and have it ready for use again.
4. Customizable and versatile
- Grime guards can be made in various sizes and shapes to fit different items.
- You can also choose from a wide range of fabrics and designs to match your personal style.
- They can be used for protecting anything from laptops and cameras to furniture and musical instruments.
By using a grime guard, you can ensure that your valuables stay clean, protected, and in excellent condition for years to come.
Step 1: Gathering the Necessary Materials for Making a Grime Guard
Before you can start making your own grime guard, it’s important to gather all the necessary materials. This will ensure that you have everything you need to complete the project without any interruptions. The materials you will need include fabric, scissors, thread, a sewing machine or needle and thread, elastic or Velcro straps, and a measuring tape. These items can be easily found at your local craft store or online. Make sure to choose a fabric that is durable and easy to clean, as it will be protecting your valuables from dirt and grime. Once you have all the materials ready, you can move on to the next step of the process.
Step 1: Gathering the Necessary Materials for Making a Grime Guard
When it comes to making a grime guard, the first step is to gather all the necessary materials. This includes fabric, scissors, thread, a sewing machine or needle and thread, elastic or Velcro straps, and a measuring tape. These materials are essential for creating a grime guard that will effectively protect your belongings. It’s important to choose a fabric that is both durable and easy to clean, as it will be exposed to dirt and grime. You can find these materials at your local craft store or order them online. Once you have everything you need, you can proceed to the next step of the process.
Step 2: Measuring and Cutting the Fabric for Your Grime Guard
Once you have gathered all the necessary materials for making a grime guard, the next step is to measure and cut the fabric. This is an important step as it determines the size and shape of your grime guard, ensuring a proper fit for your belongings.
Start by measuring the dimensions of the item you want to protect. Use a measuring tape to accurately measure the length, width, and height of the object. Add a few extra inches to each measurement to allow for seam allowances and ease of use.
Next, transfer these measurements onto your fabric using a fabric marker or chalk. Make sure to mark the measurements clearly and accurately to avoid any mistakes during the cutting process.
Using fabric scissors or a rotary cutter, carefully cut along the marked lines to create the fabric pieces for your grime guard. Take your time and make precise cuts to ensure clean edges and a professional finish.
Once you have cut all the necessary fabric pieces, you are ready to move on to the next step of sewing them together to create your grime guard.
Step 3: Sewing the Fabric Pieces Together to Create the Grime Guard
- Once you have cut out the fabric pieces according to your measurements, it’s time to start sewing them together.
- Place the two main fabric pieces together, with the right sides facing each other.
- Pin the edges together to keep them in place while sewing.
- Using a sewing machine or a needle and thread, sew along the edges of the fabric, leaving a small opening for turning the fabric right side out.
- Trim any excess fabric and clip the corners to reduce bulk.
- Turn the fabric right side out through the opening and use a pencil or a chopstick to push out the corners for a crisp finish.
- Press the fabric with an iron to remove any wrinkles.
- Topstitch around the edges of the fabric to give it a finished look and to close the opening.
Step 4: Adding Elastic or Velcro Straps for Easy Attachment and Removal
Once you have sewn the fabric pieces together to create your grime guard, the next step is to add elastic or Velcro straps for easy attachment and removal. This will ensure that your grime guard stays securely in place and can be easily adjusted as needed.
Here are the steps to add elastic or Velcro straps to your grime guard:
- Measure and cut the elastic or Velcro straps to the desired length. Make sure to leave some extra length for adjustments.
- Position the straps on the edges of the grime guard, ensuring that they are evenly spaced.
- Sew the straps onto the fabric, making sure to securely attach them.
- If using elastic straps, you may need to create a casing for the elastic to slide through. Fold over the edge of the fabric and sew a straight line, leaving a small opening to insert the elastic.
- Insert the elastic into the casing and sew the opening closed.
- If using Velcro straps, sew one side of the Velcro onto the fabric and the other side onto the strap. This will allow you to easily attach and detach the grime guard.
Once you have added the elastic or Velcro straps, your grime guard is now ready to be attached to your belongings. This will make it easy to protect your valuables from dirt, dust, and grime, while also allowing for easy removal and cleaning.
Step 5: Testing the Fit and Adjusting as Needed
Once you have completed sewing the fabric pieces together and adding the elastic or Velcro straps, it is important to test the fit of your grime guard. This step ensures that your belongings will be properly protected.
First, place the grime guard over the item you wish to protect. Make sure it covers the entire surface and fits snugly. If there are any gaps or loose areas, you may need to make adjustments.
Take note of any areas that need to be tightened or loosened. You can do this by either adding or removing fabric or adjusting the straps. It is important to ensure that the grime guard is secure and does not easily slip off.
Once you have made the necessary adjustments, test the fit again. Repeat this process until you are satisfied with the fit of your grime guard.
By taking the time to properly test and adjust the fit of your grime guard, you can have peace of mind knowing that your valuables are well-protected.
How to Properly Clean and Maintain Your Grime Guard
Once you have successfully created your DIY grime guard, it is important to know how to properly clean and maintain it to ensure its effectiveness in protecting your belongings. Here are some tips to help you keep your grime guard in top condition:
1. Regular Cleaning
It is recommended to clean your grime guard regularly to remove any dirt, dust, or stains that may have accumulated. You can simply hand wash it using mild detergent and warm water. Avoid using harsh chemicals or bleach as they may damage the fabric.
2. Air Drying
After washing, allow your grime guard to air dry completely before using it again. Avoid using a dryer as the heat may shrink or warp the fabric.
Storage
When not in use, store your grime guard in a clean and dry place to prevent it from getting dirty or damaged. You can fold it neatly or roll it up for easy storage.
By following these simple cleaning and maintenance tips, you can ensure that your grime guard remains in excellent condition and continues to provide the protection your valuables need.
Additional Tips and Tricks for Maximizing the Effectiveness of Your Grime Guard
Now that you have successfully created your DIY grime guard, there are a few additional tips and tricks that can help you maximize its effectiveness in protecting your belongings.
1. Choose the right fabric: When selecting the fabric for your grime guard, opt for materials that are durable, water-resistant, and easy to clean. This will ensure that your grime guard can withstand daily wear and tear.
2. Regularly clean your grime guard: To maintain its effectiveness, it is important to regularly clean your grime guard. Follow the manufacturer’s instructions for cleaning, or simply hand wash it with mild detergent and air dry.
Store your grime guard properly: When not in use, store your grime guard in a clean and dry place to prevent the accumulation of dirt and dust. This will help prolong its lifespan and keep it in good condition.
4. Inspect and repair: Periodically inspect your grime guard for any signs of wear and tear. If you notice any frayed edges or loose stitches, repair them promptly to ensure that your grime guard continues to provide optimal protection.
By following these additional tips and tricks, you can ensure that your DIY grime guard remains effective in safeguarding your valuables from dirt, dust, and other potential damages.
Protect Your Belongings and Enjoy Peace of Mind with Your DIY Grime Guard
By following the simple steps outlined in this article, you can create your own grime guard to protect your valuables. A grime guard is essential for keeping your belongings clean and free from dirt, dust, and other contaminants. By gathering the necessary materials and sewing them together, you can customize a grime guard that fits your specific needs.
Adding elastic or Velcro straps allows for easy attachment and removal, making it convenient to use your grime guard whenever necessary. It is important to test the fit and make any adjustments as needed to ensure maximum effectiveness.
Properly cleaning and maintaining your grime guard will prolong its lifespan and keep it in optimal condition. Additionally, implementing additional tips and tricks will further enhance the effectiveness of your grime guard.
With your DIY grime guard in place, you can enjoy peace of mind knowing that your valuables are protected and well-maintained.
Frequently Asked Questions
What is a grime guard and why is it essential for protecting your belongings?
What are the benefits of using a grime guard for your valuables?
What materials do I need to gather for making a grime guard?
How do I measure and cut the fabric for my grime guard?
How do I sew the fabric pieces together to create the grime guard?
How do I add elastic or Velcro straps for easy attachment and removal?
How do I properly clean and maintain my grime guard?
Do you have any additional tips and tricks for maximizing the effectiveness of a grime guard?
- Regularly inspect and clean your grime guard to ensure it is free from any dirt or debris.
- Store your valuables in a clean and dust-free environment when not in use.
- Avoid placing sharp or abrasive objects near your grime guard to prevent any damage.
- Consider using a waterproof or stain-resistant fabric for added protection.
How can I enjoy peace of mind with my DIY grime guard?
About The Author

Fernánda Esteban is a food fanatic. She can't go more than a few hours without eating, and she loves trying new foods from all over the world. Her friends know that they can always count on her for a good conversation, and she's an animal lover who will never turn down an opportunity to pet a dog or cat. Fernánda also enjoys learning about random facts, and she's a social media practitioner who loves to share what she knows with others.