
Last Updated on September 17, 2022
You can make 5 yards of continuous bias binding from a fat quarter. First, cut the fabric on a 45 degree angle. Then, place batting between the layers of fabric. After this, sew the strips right sides together. Repeat with the remaining fat quarters. Repeat until the binding is finished. Repeat for a second layer. You can now sew a quilt top together. Repeat as needed.
Double fold bias tape is a single folded tape
Double fold bias tape is used to line and provide decorative edges to sewing projects. It can be difficult to cut and can be very intimidating to work with. This tutorial will walk you through the process of making double fold bias tape. I hope you enjoy it as much as I do! You will soon find it to be a fun and rewarding sewing project that you’ll want to make time again! Just remember to measure the width of your bias tape before cutting it.
If you’re new to sewing, you may be wondering what the difference is between a single folded and a double folded bias strip. First, let’s look at the difference between single and double folded bias tape. Single folded bias tape is used as trim on one side of fabric, while double folded bias tape is used to encase an entire edge. Both types of bias tape can be used for various projects, such as casing elastic or a drawstring.
The difference between single and double folded bias strips is a matter of aesthetics. Single-fold bias strips are usually 1/4″ wide and finish at 1″’. Double-fold bias tape is wider on one side, so you’ll be less likely to accidentally sew your quilt top of the bias strip. However, it’s still important to understand that single-fold bias tape will work for the majority of your projects.
The double-fold version of bias tape is usually more versatile than the single-fold variety. The main difference between single and double-fold bias tape is that double-fold bias tape is more versatile and is used for many different crafts. Essentially, you can use either type of bias tape in the same way. And while making double-fold bias tape, remember to measure both strips carefully, and use a ruler to make sure you’re getting the right width.
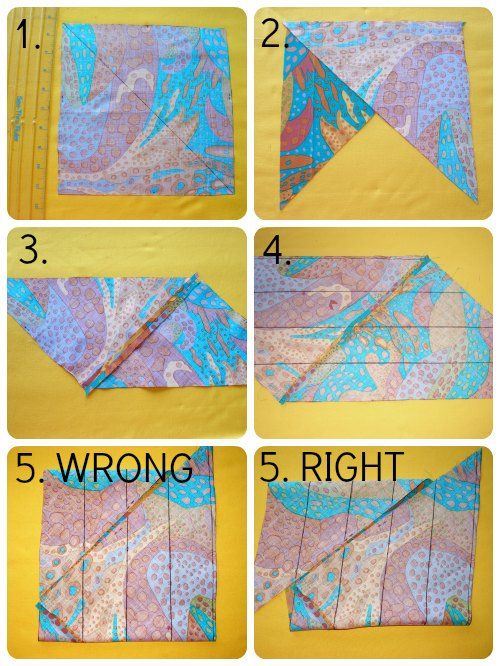
Fabric cutting on a 45-degree angle
When you cut fabric on the bias, you’ll get a smaller piece of fabric that is easier to cut. To cut fabric on the bias, start at the top left corner of the piece and bring the fabric diagonally down toward the bottom. Then line up the sides of the piece, bringing the bottom edge of the fabric up to a point. Repeat this process on all four sides, making two 45-degree angles.
Mark the fabric by eyeballing the 45-degree angle. You want the offset edges to be two inches wide. To cut a straight strip of bias binding, you can use a pattern that is printed with a 45-degree angle. If you can’t find a pattern square, cut the fabric with a ruler instead. Make sure to line up the selvedge of the fabric.
You can also make continuous bias by using straight stitches and decorative stitching. Another way to make continuous bias is to piece strips and sew them together. Scrappy continuous bias is a variation on this basic method. You can use a variety of fabrics for different effects. If you are using fat quarters, cut them in the same way and place the right side together. Sew the two sides together with a 1/4-inch seam allowance.
If you prefer not to use scissors, you can fold over the selvage to match the fabric’s edge. Then, place the triangle on the other edge. Align the two pieces with the right sides together and sew a 1/4-inch seam. Unlike traditional bias strips, the tip of the triangle will not line up with the top of the fabric, so make sure you use a straight-edged ruler to cut the fabric.
Sewing strips right sides together
To make bias binding from a fat quarter, you will need a length of about 5 yards, which will vary depending on the width of the strips you cut. To cut these strips, starch them and press them to remove wrinkles. Cut a strip that is approximately 18″x22″ and a 45 degree fold. Use a rotary cutter to cut along the pressed line. To sew the strips together, move the triangle right sides together and sew the overlapping edges with a shortened stitch.
Then, align the raw curved edge of the strip with the raw curved edge of the fabric. Align the strips and pin them together. You can also use a knee lifter on your sewing machine to make this process easier. When putting bias binding into a quilt, always remember to pin the raw edge of the strip to the back with pins on the right side. Before sewing the binding to the back, you should press it.
To make bias binding from a fat quarter, you can begin by cutting the fabric into diagonal strips. Cut each strip to a decent length to save time. Remember to cut a strip that is longer than your seam allowance to save on joins. You’ll need about two strips of fabric for one fat quarter. Afterwards, you’ll need to sew them together again. As you can see, the process of sewing strips right sides together to make bias binding from a fat quarter is easy and fast.
After you have cut the strips, you’ll need to fold them along the angled edge. You can also use a seam ripper or pin to guide the fabric through the bias tape maker. You can also use a hot iron to press the folds in place. Once the strips are folded, you can press them with a hot iron to secure the seam. Once the bias tape is complete, you’ll be ready to use it in your quilt.
Using batting between the layers of fabric
You can use batting in many sewing projects, including pillows and quilts. Its versatility makes it an excellent choice for binding projects. It can also be used to add bulk to other items, such as bags. After you have gathered enough fabric for your binding, you can begin sewing it. Here are a few tips for successful bias binding. First, make sure that your fabric is the correct width. Next, line up the seams of the two layers.
Pin the edges of your binding. Start sewing about 6 inches in from the edge. Then, fold the bias tape over the triangle, lining up the folded edge with the raw edge. You can continue sewing the binding down the shorter side of the quilt. If you are using batting, use it between the layers of fabric to make the binding even. It is also useful for mitered corners.
To make a bias binding, prepare the quilt backing. It is slightly larger than the top layer. Fold it forward and hand-stitch down the mitered corners. Be careful not to overstitch the binding, as this will cause the batting to shift. Check the instructions on the batting packaging to ensure it is the right thickness. You can stencil circles using thin embroidery floss. For perfect rings, use a fabric marker with disappearing ink.
If you’re sewing the batting part of your quilt, make sure that the batting and the fabric are the same weight and size. You should also be able to find batting in a range of colors, including black, red, or blue. Depending on the weight, you can dye the batting to match your quilt fabric. The batting should be at least 1.5 inches thick.
Using pre-made bias tape
Using pre-made bias tape is a fast and easy way to make bias binding for a variety of projects. You simply cut a length of bias tape to the width of your project and then overlap the ends by about 3 inches. Then pin the two ends together to form bias binding of the same width. Use a water-soluble marker to mark the joining points. You can use this template to cut bias tape to the correct length and width.
Before stitching, you’ll want to prepare the fabric. The bias tape is wider when folded, so you’ll want to sew along the crease on the right side of your fabric. Use a rotary cutter or clear ruler to make this task easier. Then, line up the strips so that the right sides are together. Sew across from corner to corner. Trim the triangle part of the fabric so that you have one long strip instead of two.
If you’re using pre-made bias tape, you’ll have the advantage of not having to worry about cutting the fabric yourself. It’s easy to cut it to the right width and then simply fold it into place. Then, you can stitch the bias tape onto the fabric using your sewing machine. Just remember to turn it over and stitch it again to hide the stitching. You can also machine stitch the bias tape on the right side of the fabric.
There are many ways to use bias tape, whether it’s as a decorative binding or as a way to add interest to a quilt. Using pre-made bias tape is an easy way to add beautiful bias binding to a wide variety of items. Whether you’re making a quilt or a baby blanket, you’ll find a use for it. If you’re working with a budget, use pre-made bias tape.
About The Author

Mindy Vu is a part time shoe model and professional mum. She loves to cook and has been proclaimed the best cook in the world by her friends and family. She adores her pet dog Twinkie, and is happily married to her books.