
Last Updated on July 27, 2023
Welcome to our guide on how to reupholster a dress form! In this article, we will walk you through the step-by-step process of transforming your old, worn-out dress form into a beautiful and functional piece for all your sewing and fashion projects.
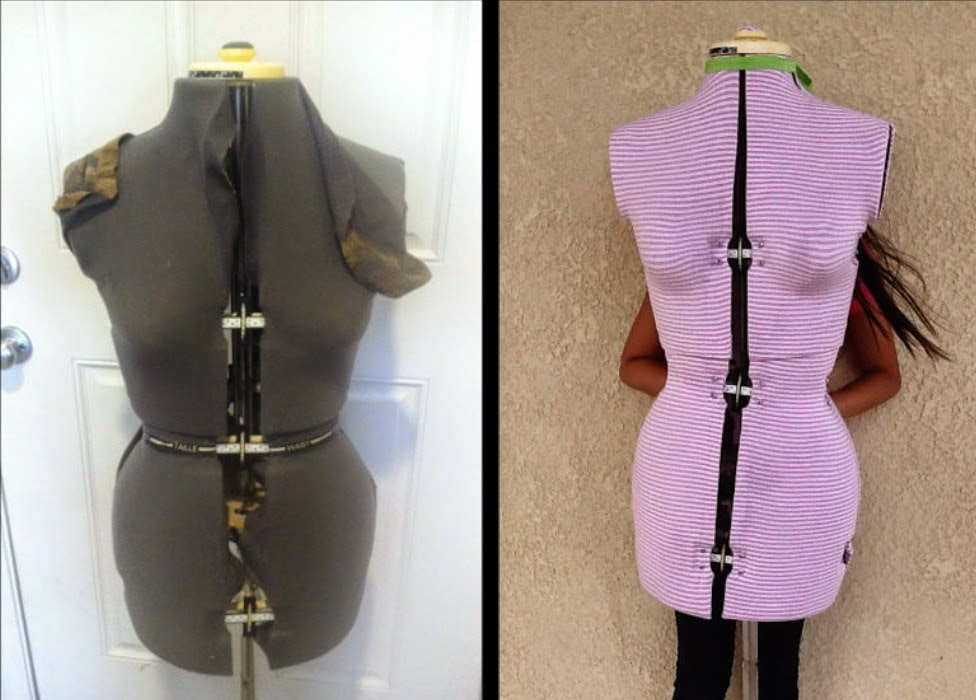
But first, let’s start with the basics. A dress form, also known as a mannequin, is a three-dimensional representation of the human body used in the fashion industry for fitting and draping garments. Over time, the upholstery on a dress form can become worn, torn, or outdated, making it necessary to reupholster it.
Reupholstering a dress form involves removing the old upholstery, preparing the new fabric, and applying it to the dress form. It also includes securing the fabric in place, adding any additional padding or adjustments, and adding finishing touches such as trimming excess fabric and decorative elements.
Throughout this article, we will provide you with detailed instructions, tips, and tricks to help you successfully reupholster your dress form. So gather your materials and tools, and let’s get started on this exciting DIY project!
Gathering the necessary materials and tools for the reupholstering process
Before you begin the reupholstering process, it’s important to gather all the necessary materials and tools. Here are the items you will need:
- Fabric: Choose a fabric that is durable and suitable for your dress form. Consider the color and pattern that will best match your sewing space.
- Scissors: You will need a pair of sharp scissors to cut the fabric.
- Measuring tape: Use a measuring tape to ensure you have the correct dimensions for cutting the fabric.
- Staple gun: A staple gun will be used to secure the fabric to the dress form.
- Staples: Make sure you have enough staples to complete the reupholstering process.
- Screwdriver: You may need a screwdriver to remove any screws or fasteners on the dress form.
- Padding: If your dress form requires additional padding, gather the necessary materials such as foam or batting.
- Decorative elements: If desired, gather any decorative elements such as trim or buttons to add a personal touch to your dress form.
By gathering all the necessary materials and tools beforehand, you can ensure a smooth and efficient reupholstering process.
Removing the old upholstery from the dress form.
When reupholstering a dress form, the first step is to remove the old upholstery. This can be a tedious process, but with the right tools and techniques, it can be done efficiently. Start by carefully inspecting the dress form and identifying any seams or fasteners that are holding the old fabric in place. Use a seam ripper or small scissors to carefully cut and remove any stitching or staples. Be sure to work slowly and methodically to avoid damaging the dress form or the new fabric. Once all the old upholstery is removed, take the time to clean and inspect the dress form for any damage or wear. This will ensure that the new fabric will adhere properly and provide a smooth finish.
Removing the old upholstery from a dress form may seem like a daunting task, but with patience and attention to detail, it can be accomplished successfully. By following these steps, you will be well on your way to reupholstering your dress form and giving it a fresh new look.
Preparing the new fabric for the reupholstering
Once you have successfully removed the old upholstery from your dress form, it is time to prepare the new fabric for the reupholstering process. This step is crucial in ensuring a smooth and professional-looking finish.
First, measure the dimensions of your dress form to determine the amount of fabric you will need. It is always better to have a little extra fabric than to run out in the middle of the project.
Next, choose a fabric that is suitable for upholstery. Consider factors such as durability, color, and texture. It is important to select a fabric that will not easily tear or show signs of wear and tear.
Before cutting the fabric, make sure to wash and iron it to remove any wrinkles or creases. This will ensure a clean and neat appearance once the fabric is applied to the dress form.
Finally, lay the fabric flat on a clean and smooth surface. Place the dress form on top of the fabric and carefully trace around it, leaving a few inches of excess fabric on all sides. This will allow for easy wrapping and securing of the fabric.
By following these steps, you will be well-prepared to move on to the next stage of the reupholstering process – applying the new fabric to the dress form.
5. Applying the new fabric to the dress form
Once you have removed the old upholstery and prepared the new fabric, it’s time to apply it to the dress form. Follow these steps to ensure a smooth and professional finish:
- Start by laying the dress form on a clean and flat surface.
- Place the new fabric over the dress form, making sure it is centered and aligned properly.
- Smooth out any wrinkles or creases in the fabric.
- Begin by securing the fabric at the top of the dress form, using pins or clips to hold it in place.
- Gradually work your way down, smoothing the fabric as you go and securing it with pins or clips.
- Make sure the fabric is taut and smooth, with no excess or sagging.
- Once the fabric is securely in place, use a staple gun to attach it to the dress form. Start at the top and work your way down, spacing the staples evenly.
- Trim any excess fabric, leaving a small margin for a clean finish.
By following these steps, you can achieve a professional and polished look for your reupholstered dress form.
6. Securing the fabric in place and ensuring a smooth finish
Once you have applied the new fabric to the dress form, it is important to secure it in place and ensure a smooth finish. Here are some steps to follow:
- Start by smoothing out any wrinkles or creases in the fabric. Use your hands or a fabric smoothing tool to gently stretch the fabric and remove any imperfections.
- Next, use a staple gun or upholstery tacks to secure the fabric to the dress form. Start at the top and work your way down, pulling the fabric taut as you go. Make sure to place the staples or tacks close together to ensure a secure hold.
- If there are any areas where the fabric is loose or sagging, use additional staples or tacks to tighten it up. You can also use a hot glue gun to secure any loose edges or corners.
- Once the fabric is securely in place, trim any excess fabric using fabric scissors. Be careful not to cut too close to the staples or tacks, as this could cause the fabric to come loose.
- Finally, step back and inspect the dress form for any remaining wrinkles or uneven areas. Use your hands to smooth out any imperfections and make any necessary adjustments.
By following these steps, you can ensure that your reupholstered dress form has a secure and smooth finish, ready for all your sewing and fashion projects.
7. Adding any additional padding or adjustments to the dress form
Once you have applied the new fabric to the dress form, you may find that it needs some additional padding or adjustments to achieve the desired shape and fit. This step is crucial in ensuring that the dress form accurately represents your body measurements and provides a reliable tool for your sewing and fashion projects.
Firstly, you can add padding to areas that require more volume or definition. This can be done by using foam or batting and strategically placing it under the fabric. For example, if you want to enhance the bust area, you can add some padding to create a fuller shape.
Additionally, you may need to make adjustments to the dress form’s measurements. This can be done by using adjustable dials or pins to modify the size of the dress form. By doing so, you can ensure that the dress form accurately reflects your body shape and measurements.
Remember to take your time during this step and make small adjustments gradually. It’s important to achieve a comfortable and accurate fit that will serve you well in your sewing and fashion endeavors.
Finishing touches: trimming excess fabric and adding decorative elements if desired
Once you have successfully applied the new fabric to your dress form and secured it in place, it’s time to add the finishing touches. One important step is to trim any excess fabric that may be hanging loose or creating a bulky appearance. Use sharp scissors to carefully trim away the excess, making sure to leave a clean and neat edge.
If you want to add a touch of personalization or enhance the aesthetic appeal of your dress form, you can consider adding decorative elements. This could include lace trim, ribbon, or even small embellishments like buttons or beads. Be creative and choose elements that reflect your personal style or the purpose of the dress form.
Remember to keep the decorative elements minimal and tasteful, as you don’t want them to overpower the functionality of the dress form. The goal is to create a visually appealing and functional piece that will serve you well in your sewing and fashion projects.
Tips and tricks for maintaining the reupholstered dress form
Once you have successfully reupholstered your dress form, it is important to take proper care of it to ensure its longevity and functionality. Here are some tips and tricks to help you maintain your newly reupholstered dress form:
1. Clean regularly:
Keep your dress form clean by dusting it regularly with a soft cloth or brush. Avoid using harsh chemicals or abrasive cleaners as they can damage the fabric.
2. Store properly:
When not in use, store your dress form in a cool and dry place to prevent any moisture or humidity from affecting the fabric. Cover it with a protective cloth or plastic cover to keep it dust-free.
3. Avoid excessive weight:
Avoid placing heavy objects on the dress form as it can strain the fabric and cause it to stretch or tear. Use it only for its intended purpose of displaying garments or for fitting purposes.
4. Handle with care:
When moving or adjusting the dress form, handle it with care to avoid any unnecessary stress on the fabric. Avoid pulling or tugging on the fabric too forcefully.
5. Repair any damages:
If you notice any tears, loose threads, or other damages to the fabric, repair them promptly to prevent further deterioration. Use a needle and thread or fabric glue to mend any small damages.
By following these tips and tricks, you can ensure that your reupholstered dress form remains in excellent condition for years to come. Enjoy using it for all your sewing and fashion projects!
Transform Your Dress Form with Reupholstering
After following the step-by-step guide on how to reupholster a dress form, you are now ready to enjoy the fruits of your labor. Your dress form has been given a new lease on life, ready to assist you in all your sewing and fashion projects.
With the old upholstery removed and the new fabric expertly applied, your dress form now boasts a fresh and stylish look. The smooth finish and secure fabric ensure that your dress form is not only aesthetically pleasing but also functional.
Remember to add any additional padding or adjustments to ensure the dress form perfectly matches your body measurements. This will allow you to create garments that fit like a dream.
As you admire your newly reupholstered dress form, take a moment to trim any excess fabric and add decorative elements if desired. These finishing touches will add a personal touch and make your dress form truly unique.
Now that you have completed the reupholstering process, your dress form is ready to be put to use. Whether you are a professional seamstress or a fashion enthusiast, your newly transformed dress form will be an invaluable tool in your creative endeavors. Enjoy the journey of sewing and fashion with your revamped dress form by your side!
Learn how to reupholster a dress form with this step-by-step guide. Transform your sewing companion and unleash your creativity!
About The Author

Alison Sowle is the typical tv guru. With a social media evangelist background, she knows how to get her message out there. However, she's also an introvert at heart and loves nothing more than writing for hours on end. She's a passionate creator who takes great joy in learning about new cultures - especially when it comes to beer!