
Last Updated on July 26, 2023
Short Answer
To make a stretch ladder, you will need a few materials and follow a step-by-step process. First, gather two sturdy wooden planks and measure the desired height and width of the ladder. Cut the planks accordingly and sand them to ensure smooth edges. Next, attach rungs at equal intervals using screws or nails. Make sure the rungs are securely fastened. Finally, apply a coat of paint or varnish to protect the ladder and enhance its appearance. Remember to always prioritize safety when using the ladder and follow proper usage guidelines.Incorporating a stretch ladder into your home exercise routine can provide numerous benefits for your overall fitness and flexibility. Whether you are a beginner or an experienced fitness enthusiast, a stretch ladder can help you improve your range of motion, increase muscle flexibility, and enhance your overall workout experience. But how do you go about making a stretch ladder? This article will guide you through the process, from choosing the right materials to building the frame and adding rungs for optimal flexibility. We will also discuss safety measures, customization options, and how to incorporate the stretch ladder into your daily exercise routine. So let’s get started and enjoy the convenience and benefits of a DIY stretch ladder at home.
Choosing the right materials for your DIY stretch ladder
- Consider the weight capacity of the ladder and choose materials accordingly
- Opt for sturdy and durable materials such as hardwood or metal
- Ensure the materials are resistant to moisture and can withstand regular use
- Take into account the size and dimensions of the ladder to fit your space
Step-by-step guide: Building the frame of your stretch ladder
Building the frame of your stretch ladder is the first and most important step in creating your own DIY exercise equipment. To ensure stability and durability, it is crucial to choose the right materials. Start by selecting strong and sturdy wood, such as oak or maple, for the ladder’s frame. Measure and cut the wood according to your desired ladder height and width.
Next, assemble the frame by attaching the vertical and horizontal pieces together using screws or nails. Make sure to reinforce the joints with additional support brackets for added stability. It is important to follow the measurements and instructions carefully to ensure a secure and safe ladder.
Once the frame is complete, sand down any rough edges and apply a coat of paint or varnish to protect the wood from moisture and wear. Allow the ladder to dry completely before moving on to the next step of adding rungs for optimal flexibility.
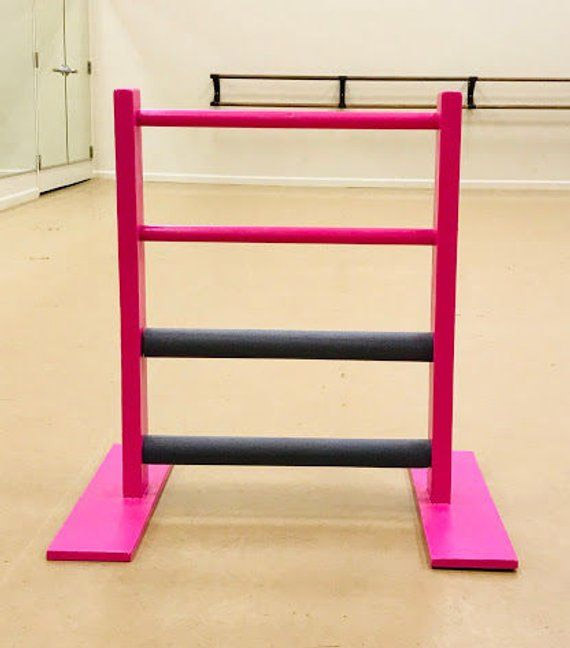
Adding rungs to your stretch ladder for optimal flexibility
Now that you have built the frame of your stretch ladder, it’s time to add the rungs. The rungs are the horizontal bars that you will use to support your body during various stretching exercises. These rungs are essential for providing stability and allowing you to achieve optimal flexibility.
When adding the rungs, it is important to consider their placement. The spacing between the rungs should be wide enough to accommodate your body comfortably, but not too wide that it compromises your balance. A good rule of thumb is to space the rungs about shoulder-width apart.
Additionally, you can choose to add more rungs to your ladder for increased versatility. By having multiple rungs at different heights, you can target different muscle groups and vary the intensity of your stretches.
When attaching the rungs to the frame, make sure to use strong and durable materials such as metal or hardwood. This will ensure that the rungs can support your weight and withstand regular use.
Once the rungs are securely attached, your stretch ladder is ready for use. In the next section, we will discuss how to enhance safety measures to prevent accidents while using the ladder.
Enhancing safety measures: Securing the ladder and preventing accidents
- Securing the ladder is crucial to prevent accidents and injuries. Here are some safety measures to consider:
- Ensure that the ladder is placed on a stable and level surface to prevent it from tipping over.
- Use non-slip rubber feet or grip pads on the bottom of the ladder to provide stability and prevent it from sliding.
- Consider attaching the ladder to a wall or sturdy structure for added stability.
- Inspect the ladder regularly for any signs of damage or wear and tear. Replace any worn-out parts immediately.
- Always use the ladder according to its intended purpose and weight capacity. Overloading the ladder can lead to accidents.
- When using the ladder, maintain three points of contact at all times – two hands and one foot or two feet and one hand.
- Avoid leaning or reaching too far while on the ladder. Instead, reposition the ladder to ensure you can safely reach your desired area.
- Never leave the ladder unattended, especially if there are children or pets around.
- Follow proper ladder safety guidelines and techniques to minimize the risk of accidents.
6. Customizing your stretch ladder: Adding adjustable features for different exercises
One of the great advantages of building your own stretch ladder is the ability to customize it to suit your specific exercise needs. By adding adjustable features, you can easily adapt the ladder for different stretches and exercises. Here are some ideas to consider:
- Adjustable rungs: Instead of fixed rungs, you can install adjustable rungs that can be moved up or down to accommodate different heights and flexibility levels.
- Removable rungs: If you want the option to remove certain rungs for specific exercises, you can design your ladder with removable rungs. This allows for greater versatility in your workout routine.
- Attachment points: Consider adding attachment points to your ladder where you can attach resistance bands or other exercise equipment. This allows you to incorporate resistance training into your stretching routine.
- Additional bars: If you want to add more variety to your exercises, you can install additional bars or handles at different heights on the ladder. This provides more options for grip positions and exercise variations.
Remember to plan and measure carefully before making any modifications to your ladder. It’s important to ensure that any adjustable features are secure and stable to prevent accidents during your workouts.
Incorporating the stretch ladder into your daily exercise routine
Now that you have successfully built your DIY stretch ladder, it’s time to incorporate it into your daily exercise routine. The stretch ladder offers a wide range of exercises and stretches that can help improve flexibility, strength, and overall fitness.
Start by setting aside a specific time each day to dedicate to your stretch ladder exercises. This will help you establish a routine and make it easier to stick to your fitness goals. Begin with a warm-up to prepare your muscles for the exercises ahead.
Next, choose a variety of stretches and exercises that target different muscle groups. This will ensure a well-rounded workout and prevent muscle imbalances. You can find numerous resources online or consult with a fitness professional for guidance on specific exercises.
Remember to listen to your body and start with exercises that are suitable for your current fitness level. As you become more comfortable and confident, you can gradually increase the intensity and duration of your workouts.
By incorporating the stretch ladder into your daily exercise routine, you can reap the benefits of improved flexibility, increased strength, and enhanced overall fitness.
Exploring different stretches and exercises using your DIY stretch ladder
Now that you have successfully built your DIY stretch ladder, it’s time to explore the various stretches and exercises you can do with it. The stretch ladder offers a wide range of possibilities for improving flexibility, strength, and overall fitness.
One popular exercise you can do with the stretch ladder is the hamstring stretch. Simply place one foot on a rung and lean forward, keeping your back straight. This stretch helps to improve flexibility in the hamstrings and lower back.
Another great stretch is the shoulder stretch. Stand facing the ladder and place your hands on the rungs, slightly wider than shoulder-width apart. Slowly lower your chest towards the ladder, feeling a stretch in your shoulders and upper back.
In addition to stretches, you can also use the stretch ladder for various strength exercises. For example, you can perform pull-ups by gripping the rungs and pulling your body up towards the ladder. This exercise targets the muscles in your back, arms, and shoulders.
Remember to start with gentle stretches and exercises and gradually increase the intensity as your flexibility and strength improve. Always listen to your body and stop if you feel any pain or discomfort. With regular use, your DIY stretch ladder will become an essential tool in your home exercise routine.
Maintaining and Caring for Your Stretch Ladder to Ensure Longevity
Once you have built your DIY stretch ladder, it is important to properly maintain and care for it to ensure its longevity. By following a few simple steps, you can keep your ladder in excellent condition for years to come.
Regular Cleaning: Dust and dirt can accumulate on the ladder over time, so it is important to regularly clean it. Use a soft cloth or sponge and mild soap to gently wipe down the ladder, paying special attention to the rungs and frame.
Inspect for Damage: Regularly inspect your ladder for any signs of damage, such as loose rungs or cracks in the frame. If you notice any issues, repair them immediately to prevent further damage and ensure your safety during use.
Store Properly: When not in use, store your stretch ladder in a dry and secure location. Avoid exposing it to extreme temperatures or moisture, as this can cause damage to the materials.
Follow Weight Limitations: Be mindful of the weight limitations of your ladder and avoid exceeding them. Overloading the ladder can lead to structural damage and increase the risk of accidents.
By taking these simple steps, you can ensure that your DIY stretch ladder remains in excellent condition, allowing you to continue enjoying the convenience and benefits of exercising at home.
Experience the Benefits of a DIY Stretch Ladder at Home
By incorporating a stretch ladder into your home exercise routine, you can enjoy a wide range of benefits. From increased flexibility to improved muscle strength, this DIY project offers a convenient and effective way to enhance your fitness journey. By carefully choosing the right materials and following a step-by-step guide, you can easily build the frame of your stretch ladder. Adding rungs and implementing safety measures ensures optimal flexibility and prevents accidents. Customizing your ladder with adjustable features allows for a variety of exercises and stretches. By incorporating the stretch ladder into your daily routine, you can explore different exercises and stretches to target specific muscle groups. With proper maintenance and care, your stretch ladder will provide longevity and continued benefits. Experience the convenience and advantages of a DIY stretch ladder in the comfort of your own home.
Frequently Asked Questions
Q: What are the benefits of incorporating a stretch ladder into my home exercise routine?
A: A stretch ladder can help improve flexibility, increase range of motion, and enhance overall fitness levels. It allows for targeted stretching and can be used for various exercises to strengthen different muscle groups.
Q: How do I choose the right materials for my DIY stretch ladder?
A: When choosing materials for your stretch ladder, it is important to consider durability and safety. Opt for sturdy wood or metal for the frame and rungs, and ensure that all components can support your weight and withstand regular use.
Q: Can you provide a step-by-step guide for building the frame of a stretch ladder?
A: Certainly! Building the frame of a stretch ladder involves measuring and cutting the wood or metal pieces, assembling them using screws or bolts, and reinforcing the structure with braces or brackets. Detailed instructions can be found in our article.
Q: How can I add rungs to my stretch ladder for optimal flexibility?
A: To add rungs to your stretch ladder, measure the desired spacing between each rung and mark the positions on the ladder frame. Then, attach the rungs securely using screws or bolts. It is important to ensure that the rungs are evenly spaced and at a comfortable height for your exercises.
Q: What safety measures should I take to secure the ladder and prevent accidents?
A: To enhance safety, make sure the ladder is securely anchored to the wall or floor. Use brackets or straps to secure it in place and prevent it from tipping over. Additionally, always use the ladder on a stable surface and avoid overexertion or performing exercises beyond your capabilities.
Q: Can I customize my stretch ladder to add adjustable features for different exercises?
A: Yes, you can customize your stretch ladder by incorporating adjustable features such as removable rungs or adjustable angles. This allows you to adapt the ladder to different exercises and accommodate varying levels of flexibility.
Q: How can I incorporate the stretch ladder into my daily exercise routine?
A: You can incorporate the stretch ladder into your routine by setting aside dedicated time for stretching and exercising on the ladder. Start with simple stretches and gradually increase the intensity and duration of your workouts as you become more comfortable and flexible.
Q: What are some different stretches and exercises I can do using my DIY stretch ladder?
A: The possibilities are endless! You can perform various stretches for different muscle groups, such as hamstring stretches, calf stretches, and shoulder stretches. Additionally, you can use the ladder for exercises like leg raises, planks, and modified push-ups.
Q: How do I maintain and care for my stretch ladder to ensure its longevity?
A: To maintain your stretch ladder, regularly inspect it for any signs of wear or damage. Clean it with a mild detergent and water, and avoid using harsh chemicals that may damage the materials. Store it in a dry and safe place when not in use to prevent any potential damage.
Q: What are the benefits of having a DIY stretch ladder at home?
A: Having a DIY stretch ladder at home offers convenience and flexibility in your exercise routine. It allows you to perform targeted stretches and exercises at your own pace and in the comfort of your own space.
About The Author

Zeph Grant is a music fanatic. He loves all types of genres and can often be found discussing the latest album releases with friends. Zeph is also a hardcore content creator, always working on new projects in his spare time. He's an amateur food nerd, and loves knowing all sorts of random facts about food. When it comes to coffee, he's something of an expert - he knows all the best places to get a good cup of joe in town.